Wednesday, 19 September 2018

Oakberry Cottage

Hello Everyone!!

A very heartfelt good morning to all of you:)
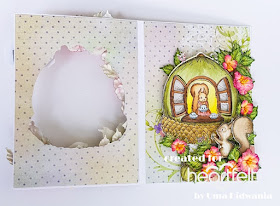
Today I'm here with another card with the amazing "Oakberry lane Collection". It's really fun to work with this collection.  Oakberry blooms are so gorgeous.  Here is my card.....


HC PRODUCTS USED :-
HCDP1-294 Oakberry Lane Paper Collection
HCPC-3840 Oakberry Cottage & Sentiments Stamp
HCPC-3839 Furry-Tailed Frolic Stamp
HCPC-3842 Oakberry lane Blossoms Stamp
HCD1-7200 Oakberry Lane Blossoms Die
HCD1-7198 Oakberry Cottage Die
HCD1-7197 Furry-Tailed Frolic Die
HCFB1-469 3D Blossoms Shaping Mold
Rose Madder Archival 
Sunflower Yellow Archival 
Olive Green Archival 
Leaf Green Archival 
Black Archival 

OTHER PRODUCTS USED :-
Smooth white cardstock, The Secret Garden flower making paper, Water color Paper , zig markers,  Glue dots, Sparkling dust 
VIDEO LINK:-


INSTRUCTIONS:-
Ready sidefold card measures 5.25"×7.25"

Take a smooth white cardstock measures 10.5"×7.25". Score on 5.25" and create a side fold card. To prepare the card mats first choose pattern paper from the designer paper collection and cut 3 pieces measures 5"×7". Mat 1 piece of the designer paper on the front side of the card base and 2 pieces in the inside of card as shown in the picture. Cut a cottage from the front side of the card using Oakberry Cottage die.
Stamp the Oakberry Cottage on the water color paper and color it with zig markers.  Cut it with coordinating die and arrange the cottage inside of the card using glue dots. Also stamp 2 more squirrel images from the Furry-Tailed Frolic stamp on the water color paper and color it with zig markers.  Cut the images using coordinating die and arrange the images using dimensional tape as shown in the picture.
 Stamp the Oakberry Lane Blossoms on the flower making paper using rose madder archival.  Color the flowers using rose madder archival and sunflower yellow.  Stamp the leaves using olive green archival and color them with leaf green and olive green ink. Cut the flowers and leaves using coordinating dies and shape them in shaping mold. Arrange the flowers and leaves as shown in the picture.  Stamp some nuts from the Oakberry Cottage & Sentiments stamp on the water color paper and color it with zig markers.  Cut with coordinating die and arrange them with flowers.
Cut a sentiment ticket from the same collection and arrange it using dimensional tape as shown in the picture.  For the finished look apply sparkling dust on the flowers and leaves using adhesive that dries clear.


HOPE YOU LIKE IT....
THANKS FOR STOPPING BY !!!
HUGS....
UMA
Wednesday, 12 September 2018

My wish for you

Hello Creative Folks!!!!!

Heartfelt Morning............ :)

Come along as we head deep into the woodlands to explore the world of Oakberry Lane…the 
newest collection from Heartfelt Creations! Filled with delightful illustrations of lively, high 
spirited and lovable squirrels, this collection is one to capture your heart and creative 
imagination, and will appeal to both the young and the young at heart! Create irresistible 
outdoor themed scrapbook layouts preserving those precious moments experienced in the 
great outdoors, as well as charming handmade greeting cards ready to deliver well wishes and 
sentimental thoughts to friends and loved ones! Darling illustrations of squirrels at play on
teeter totters and tire swings, gathering nuts, and bounding about in beautiful floral gardens
with their tails held high, remind us that taking time to play, enjoying the company of others 
and banding together to make light work of the tasks at hand are important to a well balanced
life! A stunning autumn themed color palette of acorn browns, woodland greens, sunset 
oranges, autumn leaf reds, along with deep plums and dark pinks, lay the foundation for 
decorative papers displaying delicate lace like patterns, vintage style barn wood patchwork 
backgrounds, as well as fascinating outdoor garden settings! Create your very own Oakberry 
Lane scenes with three cute and entertaining cling stamp sets and coordinating dies featuring a 
substantially sized acorn homestead, an assembling of lovable squirrels at play, and of course 
Oakberry Lane’s own signature wildflower blossom ready to be stamped, colored and 
assembled into a realistic 3D floral embellishment to accent all of your Oakberry Lane 
creations! So take a cue from our furry friends and make time to join in on the merriment! A 
creative adventure awaits you…we promise!
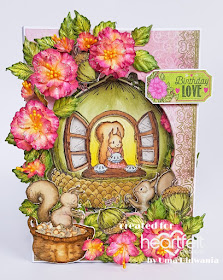
Here is my inspirational post for this amazing collection....


 HC PRODUCTS USED
ITEM NUMBER NAME
HCD1-7197 Furry-tailed Frolic Die
HCD1-7198 Oakberry Cottage Die
HCD1-7200 Oakberry Lane Blossoms Die
HCPC-3839 Furry-tailed Frolic Cling Stamp Set
HCPC-3840 Oakberry Cottage & Sentiments Cling Stamp Set
HCPC-3842 Oakberry Lane Blossoms Cling Stamp Set
HCFB1-469 3D Blossoms Shaping Mold
HCDP1-294 Oakberry Lane Paper Collection
HCD1-7179 Butterfly Kisses Decorative Die
HCD1-7157 Eyelet Oval &Basics Large Die
HCD1-7144 Decorative Medallion die
Cactus Flower Archival
Olive Green Archival
Leaf Green Archival
Thistle Archival
Tea rose Archival
Sepia Archival

Other Products:
Smooth white cardstock,  Gold Shimmer cardstock , zig markers, Rainbow glitter
VIDEO LINKS
For more tips on creating with the Oakberry Lane collection, watch the tutorial at https://youtu.be/HirfUN8NEYY.
For more tips on creating with the flower shaping molds, watch the tutorial at https://youtu.be/FSdPL7nXvQE
Instructions:
Ready top side fold card measures 7.5"×5.5"
To prepare the card mats first take a gold shimmer card measures 6.75"×5.25" and layer it on the ready card base. Choose a pattern paper from the designer paper collection and cut a piece measures 6.5"× 5". Distress the edges of the pattern paper using the same colour ink. Layer it on the card base using dimensional tape.

Prepare a shadow box measures 4"× 5" using eyelet oval & Basics large die. Cut two small card panel from the Same collection. Layer one card panel inside the box to create a window scene. Layer mother card panel on the outside of the box. Cut a oval frame form the white cardstock using Eyelet Oval &Basics Large Die. Glue the frame on the box. Stamp nuts and squirrel images using sepia ink on the water color paper. Color the images with zig markers and cut with  coordinating die. Arrange the images inside the box

Stamp nuts and squirrel images using sepia ink on the water color paper. Color the images with zig markers and cut with  coordinating die. Arrange the images inside the box using dimensional tape. Stamp the flowers using cactus flower ink and cut with coordinating dies. Color the flowers with tea rose and thistle color. Stamp the leaves using olive green color and cut with coordinating die. Color the leaves using leaf green and olive green ink. Shape the flowers and leaves using flower shaping molds.

Glue the shadow box on the middle of the card. Cut two border using decorative medallion die from the gold shimmer card stock. Glue the borders both side of the shadow box. Cut a frame using butterfly  kisses decorative die. Glue the frame on the shadow box as shown in the picture. Arrange the flowers and the leaves as shown. Cut a  tag and a sentiment strip from the same collection. Glue the tag on the left side of the card using dimensional tape for added dimensions. Glue the sentiment strip as shown in the picture. For the finished looked apply rainbow glitter on the flowers using the glue that dries clear.


Thanks for stopping by
Hugs
Uma

Saturday, 8 September 2018

Mix Media Card Tutorial With Handmade Flowers

Hello friends!!!!

How is your weekend??? Hope you all are enjoying. Do you like to work on your weekend or want to chill?? I like to finish my work for upcoming week. Today I have a card to share with you. I create this card using Get Inspired products .  This is an Indian brand who launch premium quality products.  You can checķ their entire range of products here.  I also created a video tutorial of this card.


Check the tutorial here:-


Thanks for stopping by 
Regards 
Uma


Wednesday, 5 September 2018

FLORAL FAN

Hello Everyone!!!!
A very good morning to all of u......  It's again inspirational wednesday and I am back with my new project to inspire you.  This time I tried something new,  a floral fan or a wedding fan. I got this idea from pintrest when I was searching about wedding dress. I saw a bride pic with a fresh flower fan. At that moment I decided to create similar to that one and here it is.... This is not the same one. I hope you like this........


HC PRODUCTS USED :
HCDP1-267 Lush Lilac Paper Collection
HCD1-7179 Butterfly Kisses Decorative Die
HCD1- 7161 Sweetheart Borders Die
HCD1- 7169 Rainboots and Blossoms Die
HCD1- 7110 Classic Rose Die
HCPC-3811 Rainboots and Blosooms Stamp
HCPC-3752 Classic Rose Stamp
HCST1-401 Deluxe Flower Shaping Kit
Deep Purple Archival
Thistle Archival
Leaf Green
Olive Green
Sunflower

OTHER PRODUCTS USED:-
White satin ribbon , decorative lace , half cut pearl , wooden stick , green moss , foam , sparkling dust

VIDEO LINKS:-

INSTRUCTIONS -
Ready project measures 12”×12”
First choose two pattern paper from the  designer paper collection. Score on every half inch and fold all the score lines in zig zag manner. Then fold it into half and create a fan. Do same with the another pattern paper. Take a foam pad and cut into a half circle. Glue both the paper fans with the foam pad.

Now cover the wooden stick with the satin ribbon and arrange it in the middle of the fan as shown in the picture. Cut a white cardstock using Sweetheart border die. Glue the borders on the edges of the fan. Cut two round dolly fron the white cardstock using butterfly Kisses decorative die. Glue the dolly as shown in the picture

Stamp the classic rose flowers on the flower making paper using thistle ink. Cut the flowers with the coordinating die and color the flowers using deep purple ink and thistle ink. Also stamp small fowers using sunflower yellow ink.  Shape the flowers using Deluxe Flower Shaping kit. Also stamp the leaves using Olive Green color and cut with coordinting die. Color the leaves with leaf green and olive green color. Slightly shape the leaves with using ball tool.

Arrange the flowers , leaves and green moss on the top of the fan using hot melted glue. Glue the decorative lace in the middle of the fan. For the finished look glue some half cut pearl as shown and apply glitter on thr flowers using the glue that dries clear.


Thanks for stopping by
Would love to hear from you
Hugs
Uma

Monday, 3 September 2018

Best wishes Card

Hello Everyone!!!
Today I have gorgeous card to share with you using Dadarkar Arts vellum paper. Get Inspired vellum paper of 180 gsm is perfect for flower making. You can check the dame one here. Check the entire range of Get Inspired products here.
I use Heartfelt's Creations sweet Peony stamp and die to make these flowers.


Thanks for stopping by
Hugs
Uma

Sunday, 2 September 2018

GIVEAWAY ALERT

A happy and cheerful hello to all my crafty friends,
It’s a day to be celebrated thanking each one of you for your love and support.


Yaaayyyyy…..Its “Little Rosebud Crafts” very first blog anniversary and so to make it  little more special. I have come ahead with a small giveaway to all my crafty friends around the world without whom nothing would have been possible.

I would like to thank #Dadarkararts #Mudracraftstamp and #prikaallaboutcrafts for being the part of our little celebration.

I still can’t believe I officially completed a year for my blog, trying and testing myself everyday…..it has been a roller coaster ride…for me…but I think I enjoyed riding it along with my inspiring and motivating friends!!

Let’s begin the fun part of the Giveaway…

Just follow these steps to complete your enrolment for the giveaway:

 Like and Share this post to your timeline and groups setting as public using #littlegiveawaybyuma . So i can easily track the post.

# Follow me on my social media handles:

Like and review my Facebook page:

https://www.facebook.com/byumadidwania/

Follow my Blog:

http://craftinlife.blogspot.com/?m=1

Follow me on Instagram:

http://Instagram.com/uma_didwania

Follow me on Twitter:

http://Twitter.com/didwania_uma

Follow me on Pinterest:

https://www.pinterest.com/didwaniauma/

Subscribe my YouTube channel:

https://www.youtube.com/channel/UCP4K2ya_OLxn7wBhHxeONMg

# And last but not the least tag as many of your crafty friends to grab to chance to enroll for the giveaway…


NOTE: ALL STEPS MANDATORY


Winners Get:

Gift voucher worth $25 of Lindy's Store

Gift voucher worth $15 by Mudra Craft Stamps

Gift voucher by Prika All About Crafts

"Love in Paris" paper pack by Dadarkar Arts

 Heartfelt Creations's paper pack with some amazing craft goodies

One more  Heartfelt Creations's Paper Pack


Wish you all the best ….and quickly enroll yourself before 31st august ….Winner’s to be announced on 1st Sept 2018.