Wednesday, 31 October 2018

CAGED

Hello Crafty Peeps!!
Good Evening  ........

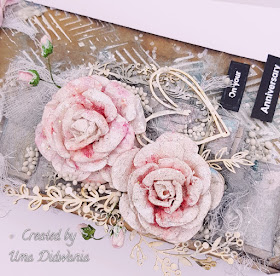
Today is inspirational wednesday. This time I altered a cage frame using mixedmedia techniques and Oakberry blossoms.


HC PRODUCTS USED:
HCPC-3842 Oakberry Lane Blossoms Stamp
HCD1-7200 Oakberry lane Blossoms die
HCPC-3839 Furry-Tailed Frolic stamp
HCD1-7197 Furry-Tailed Frolic Die
HCFB1-3D Blossoms Shaping mold
HCD1-7193 Leafy Accents Die
HCPC-3835 Leafy Accents Stamp
HCFB1- 467 3DLeafy Accents Shaping mold
HCDP1-288 Sweet Peony Paper Collection
RACP-482 Olive Green Archival
RACP-436 Leaf Green Archival
Sepia Archival
478455 Zig markers
HCS1-459-3 Assorted Bead Stamens Medium

OTHER PRODUCTS :
Cage Frame, White Gesso, Art stones , Acrylic paint, Opaque texture paste,  Dried moss ,Soft matt gel

INSTRUCTIONS :
Open the cage frame and apply thick layer of white gesso over it. Dry it and apply opaque texture paste.  Once it completely dry paint it using acrylic paints. Stamp the Oakberry Lane Blossoms flowers on the flower making paper using sepia ink and cut with coordinating die. Shape the flowers using flower shaping molds.  Stamp some leaves using olive green ink and cut with coordinating die. Paint the leaves using sap green archival and olive green archival.  Shape the leaves using shaping mold.

Stamp squirrels using black archival on water color paper.  Paint the squirrel images using zig markers and cut with coordinating die. Arrange the flowers, leaves and squirrels as shown in the picture. Glue dry moss inside the frame using hot melted glue.  Choose a pattern paper from the designer paper collection and cut a piece according to the frame. Glue it on the back cover of the frame. Glue some art stones using soft matt gel.  For the finished look apply sparkling dust on the flowers.


Hope you like it
Hugs
Uma

Participating in:-

Altered Eclectics

Monday, 29 October 2018

Altered Gift bag 3

Hello friends!
Good morning...
Today I have a altered gift bag to share with you. This is perfect for gifting bottles. 
First I applied clear gesso on the bag and apply texture paste using Mudra's stencil. After drying mist it with color bloom spray. Glue some piece of pattern paper from my stash. Again mist with color.  Glue cheese cloth and arrange handmade flowers and chipzeb.  Stamp the sentiment on the black chipboard using versamark and heat embossed it with white embossing powder.  Glue the sentiment using dimensional tape as shown in the picture.  For the finished look apply art stones using soft matt gel. 


Hope you like it....
Hugs
Uma

Sunday, 28 October 2018

BIRTHDAY EXPLOSION BOX

Hello Friends!!
Good morning....:)

Today I have a beautiful explosion box to share with you. I use Dress my craft's Floral Symphonypaper pack and handmade flowers.  Flowers created with gold shimmer cardstock. 


Thanks for stopping by
Regards
Uma

Wednesday, 24 October 2018

Pocket box

Hello Friends!!
Good morning. ...

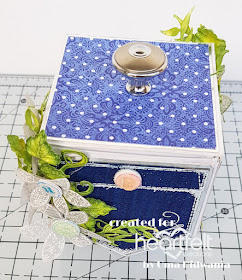
It's Heartfelt Wednesday and we have another inspirational project using Buttons and Blooms collection.  Today I have created a box using pocket die. This box is very versatile, you can use this for storing thread spools,  for gifting choclate and many more. Here is my box...


Products used :
HCDP1-295 Buttons and Blooms paper collection
HCPC-3849 Buttons and Blooms Stamp
HCD1-7205 Buttons and Blooms Die
HCD1-7206 Patchwork Pockets & Patterns Die
HCPC-3850 Patchwork Pockets & Patterns Stamp
HCPC-3811 Rain Boots and Blossom Stamp
HCD1-7169 Rain Boots and Blossom Die
HCPC-3835 Leafy Accents Stamp
HCD1-7193 Leafy Accents Die
HCFB1-467 Leafy Accents Shaping Mold
Olive Green Archival
Leaf Green Archival

OTHER PRODUCTS:
White cardstock, silver mirror cardstock, versamark, white embossing powder, Blue velvet cardstock, vellum paper,  Silver metal knob

VIDEO LINKS

INSTRUCTIONS:
Ready box measures 3.25”×3.25”× 4.5”
To prepare a box first take a piece of white cardstock measures 13.5”× 5.5”. Score and create a box according to the template.

Stamp 4 pockets on the blue velvet cardstock using versamark and heat embossed it with white embossing powder. Cut with coordinating die. Mat the pockets on silver mirror cardstock, 1/16” of an inch bigger on all sides. Glue it on the all 4 sides of the box. Cut a piece of white cardstock measures 3.25”×3.25”. Mat it inside of the box to create a flat surface.  Choose a pattern paper from the designer paper collection and cut 4 pieces measures 3”× 2.5”. Mat them on the silver mirror cardstock, 1/16” of an inch bigger on all 4 sides. Glue them on inside walls of the box. Cut a piece measures 3”×3” from the pattern paper and mat it on the silver mirror cardstock, 1/16” of an inch bigger on all sides. Glue it inside of box surface.
To prepare a lid take a piece of white cardstock measures 4.25”×4.25”. Score on ½” and 1” on all 4 sides and fold to prepare a small box. Take a piece of white cardstock measures 3.5”×3.5”. Glue the lid on it. Cut a pattern paper measures 3.25”×3.25” and mat it on the silver mirror cardstock,  glue it on the top of the lid. Arrange a knob in the middle of the lid.
Stamp flowers from  the Buttons and Blooms stamp on the vellum paper using versamark and heat embossed it with white embossing powder. Cut the flowers with coordinating die.  Stamp leaves from rain boots and blossoms stamp on the white cardstock using olive green ink.  Color with leaf green and olive green archival and cut with coordinating die. Also stamp some leaves from leafy accents stamp on the white cardstock using olive green ink and color them with leaf green and olive green archival and olive green archival.  Cut with coordinating die and shape them in shaping mold. Stamp some buttons on the white cardstock using different color archival and cut with coordinating die . Layer 5 buttons together of same size. Apply glossy accents on the buttons and let them to dry for sometime. Glue all the elements on the box as shown in the picture.


Hope u all like it
Thanks for stopping by
Hugs
Uma

Tuesday, 23 October 2018

BIRTHDAY CARD

Hello Friends!!

Good morning......

It's Tuesday and it's time for another GDT post for ICRAFT. Today I create a card using super gorgeous products by Icraft.


Icraft Products used:
Majestic Blooms paper pack
Majestic Blooms Element sheet
Deckled Edge Paper
Stamens
Icraft flower die SKU 95020

Take a white raw cardbase and mat light purple cardstock on it. Choose pattern paper from the designer paper collection and cut a piece.  Mat it also on the cardbase.  Cut 2 arrow, 1 from purple cardstock and another from pattern paper and glue them using dimensional tape as shown in the picture.  Take a paper dolly and glue it. Create some flower using Icraft die and deckled edge paper. Glue the cheese cloth and arrange the flowers and chipboard cutouts.  Stamp a sentiment on the white cardstock using versafine ink and layer it on the purple card stock.  Glue the sentiment using dimensional tape as shown in the pic.  For the finished look apply white gesso using dry brush techniques and add arr stones using soft matt gel .


Thanks for stopping by
Hugs
Uma

Wednesday, 17 October 2018

A Gift Of Beautiful Memories

Hello Everyone!!!!

Happy Durga Puja to all of you...

Today I have a beautiful album to share with you which I create using Buttons and Blooms collection.  


Products Used

Other Products: 
White cardstock, acetate sheet, vellum paper, versamark, white embossing powder, Old jeans distress oxide, Fossilized amber distress oxide, Aquarium Archival ink.
For more tips on creating with the Buttons and Blooms collection, watch the tutorial at https://youtu.be/WpR2XrSH0U0.
For more tips on creating with the tags & sentiments, watch the tutorial at https://youtu.be/eAfLuNkRda4.
Instructions: 
 Ready album measures 8" x 5 3/4" x 3". To prepare the cover, first take 2 pieces of chipboard measuring 8" x 5 3/4" each and 1 piece measuring 8" x 2 3/4". Glue the chipboard on the thick white cardstock, creating a book shape and bind it, making sure all of your chipboard is covered with thick white cardstock. Take a piece of white cardstock measuring 7 1/2" x 6 1/2". On the 6 1/2" side, score every 1/2", making a total of 12 score lines. Fold these accordion style, so that you have a 1/2" valley between your hills (apply glue to the inside of your hills, to keep them together). Glue these hinges inside the spine of the album (your pages will be adhered onto these hinges). Distress the edges of the album using Distress Oxide ink.
Cut 2 pieces of white cardstock measuring 7 13/16" x5 3/8" and 1 piece measuring 7 13/16" x 2 9/16" and adhere onto the front cover, back cover and spine using foam dots. Choose a pattern paper from the designer paper collection and cut 2 pieces measuring 7 5/8" x 5 1/8" and 1 piece measuring 7 5/8' x x 2 1/2". Round the corners and layer it on the white cardstock. Add metal chain for closing if desired.
To create pocket pages, take a piece of white cardstock measuring 5 1/4" x 15 1/4", score on 7 1/2" and 15" and crease well using bone folder. Place the Eyelet Oval die at the center of the page and die cut. Glue acetate sheet on the inside of both the front and back view of the page. Glue the 1/4" tab, at the bottom, this creates a page that you'll slide over the hinges already prepared. Choose patterned paper from the designer paper collection and cut a piece measuring 5 1/8" x 6 3/8". Diecut it also using eyelet oval die. Distress the edges of the pattern paper using same color ink and layer it on the page and round the corners. Die cut an oval frame from the white cardstock using eyelet oval die and glue it on the page as shown in the picture. Create 4 pages in the same process. Apply glue on the hinge and slide prepared page over it, adhering it securely.
To prepare photo mats, that slide inside the pocket pages, take a piece of white cardstock measuring 9 3/4" x 7 1/4", score on 4 7/8"and create a side fold card. Choose pattern paper from the designer paper collection and cut 2 pieces measuring 4 3/4" x 7 1/8". Stamp numerous hexagon shapes, color and diecut. Glue two together, back to back, to create a durable pull tab. Adhere onto the fold side of card. Distress the edges of the pattern paper and layer it on the front and back of the card. Cut the picture using eyelet oval die and glue it on the ready card base. Also cut an Oval frame from the white cardstock using eyelet oval die and glue it as shown in the picture. Create 4 cards in same process and put them inside the page pocket.
Create a pocket using Fleur Border Basics Die and add it on the first page of album. To create a waterfall card to add in the pocket, inside front cover, cut white cardstock 4" x 11". Score and fold at 5 1/2", choose designer paper to cover the front and inside of folded card. Cut 5 waterfall panels at 3 1/4 x 4", score and fold at 1/4". Adhere folded tab onto toward the bottom. Adhere another one above bottom waterfall, continuing until all 5 panels are adhered. Add photos as desired.
Using white cardstock diecut the following for use through out album. decorative medallion and outline, sentiment die and outline, eyelet accent tag. Stamp the rick rack on white cardstock, color, diecut and adhere onto cover of album.
Stamp flowers on the white cardstock using Buttons and Blooms stamp and cut with coordinating die. Slightly shape using deluxe flower shaping kit. Stamp button on the white cardstock using archival ink pad and cut with coordinating die. Glue 4 pieces of the buttons together and apply glossy accents on it. Glue the buttons on the flowers. Stamp leaves using rain boots and Blossoms stamp and leafy accents stamp on flower making paper and cut with coordinating die. Paint the leaves using leaf green archival and olive green archival. Shape the leaves using shaping mold. For more tips on creating with the flower shaping molds, watch the tutorial at https://youtu.be/FSdPL7nXvQE.
Stamp a pocket and pattern using Patchwork Pocket and Patterns stamp on vellum paper using VersaMark and heat emboss with white embossing powder. Cut with coordinating die and color with distress oxide. Glue flowers and leaves and embellishments on the pages as shown in the picture.


Thanks for stopping by
Regards
Uma