Hi All !!!
Happy Wednesday....
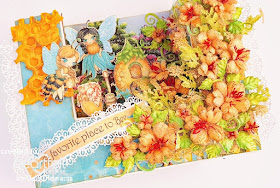
Today i am back with a new card featuring Heartfelt Creations 'leafy Accent Stamp and Die. I create a U- fold card using Sweet As Honey Collection and leafy accent collection.
Here is my card...
HC PRODUCTS USED:
HCDP1-291 Sweet As Honey Paper Collection
HCD1-7183 Honey Bee Maidens Die
HCD1-7184 Honey Bee Bungalows Die
HCD1-7185 Sweet As Honey Die
HCPC-3819 Small Sweet Peony Stamp
HCD1-7174 Small Sweet Peony Die
HCPC-3835 Leafy Accents Cling Stamp
HCD1-7193 Leafy Accents Die
HCFB1-3819 3D Leafy Accents Shaping Mold
HCD1-7161 Sweetheart Borders Die
HCPC-3828 Garden's Edge Coneflower Stamp
HCD1-7128 Garden's Edge Coneflower Die
HCPC-3827 Backyard Blossoms Stamp
HCD1-7181 Backyard Blossoms Die
HCST1-401 Deluxe Flower Shaping Kit
OTHER PRODUCTS USED:
Smooth white cardstock, Archival Ink Pad ( Venetian Orange, Red Geranium , Leaf Green) , Distress Oxide ( Vintage Photo , Spiced Marmalade ) Glossy Accent , Glitter , , , Cheese cloth.
VIDEO LINK:
For more tips on creating with the flower shaping molds, watch the tutorial
https://youtu.be/KDbdzC0MnAI
For more tips on creating with the Sweet as Honey collection, watch the tutorial at https://youtu.be/89nlTDw3kOE
INSTRUCTIONS:
Ready open card measures 10"×7"
To create a U-fold card follow the amazing instructions by "Maymay made it" .
Create a U-fold card with the white cardstock. For mating choose a pattern paper from the sweet as honey paper collection. Distress the edges of the pattern paper using venetian orange ink. Stamp the sweet peony flowers using red geranium color on white cardstock and cut with the coordinating die.
Color the flowers with venetian orange and shape them using deluxe flower shaping kit. Stamp the leafy accents leaves using leaf green color, cut with co-ordinating dies and paint with the same color. Shape the leaves using leafy accent shaping mold. Also stamp some leaves from the garden's edge coneflower stamp. Cut a yellow cardstock using honey comb die and slightly color it with distress oxide vintage photo and spiced marmalade. Apply glossy accent on the honey comb die as shown in the picture. Cut some preprinted images from the pattern paper using their coordinating die.
Glue a cheese cloth on the left side of the card and start arranging flowers and leaves. Glue them with hot melted glue. Glue the honey comb die on the right side of the card. Glue the preprinted images using acetate sheet for added dimensions. Cut the borders from the white card stock using sweetheart border die and glue them on the both edges of the card. Cut a sentiment strip from the same paper collection. Glue the borders on both side of the strip and arrange it as shown in the picture. For finished looked apply glitter that dries clear.
Thanks for stopping by !!!!
Would love to hear from you....
Hugs
Uma
Happy Wednesday....
Today i am back with a new card featuring Heartfelt Creations 'leafy Accent Stamp and Die. I create a U- fold card using Sweet As Honey Collection and leafy accent collection.
Here is my card...
HC PRODUCTS USED:
HCDP1-291 Sweet As Honey Paper Collection
HCD1-7183 Honey Bee Maidens Die
HCD1-7184 Honey Bee Bungalows Die
HCD1-7185 Sweet As Honey Die
HCPC-3819 Small Sweet Peony Stamp
HCD1-7174 Small Sweet Peony Die
HCPC-3835 Leafy Accents Cling Stamp
HCD1-7193 Leafy Accents Die
HCFB1-3819 3D Leafy Accents Shaping Mold
HCD1-7161 Sweetheart Borders Die
HCPC-3828 Garden's Edge Coneflower Stamp
HCD1-7128 Garden's Edge Coneflower Die
HCPC-3827 Backyard Blossoms Stamp
HCD1-7181 Backyard Blossoms Die
HCST1-401 Deluxe Flower Shaping Kit
OTHER PRODUCTS USED:
Smooth white cardstock, Archival Ink Pad ( Venetian Orange, Red Geranium , Leaf Green) , Distress Oxide ( Vintage Photo , Spiced Marmalade ) Glossy Accent , Glitter , , , Cheese cloth.
VIDEO LINK:
For more tips on creating with the flower shaping molds, watch the tutorial
https://youtu.be/KDbdzC0MnAI
For more tips on creating with the Sweet as Honey collection, watch the tutorial at https://youtu.be/89nlTDw3kOE
INSTRUCTIONS:
Ready open card measures 10"×7"
To create a U-fold card follow the amazing instructions by "Maymay made it" .
Create a U-fold card with the white cardstock. For mating choose a pattern paper from the sweet as honey paper collection. Distress the edges of the pattern paper using venetian orange ink. Stamp the sweet peony flowers using red geranium color on white cardstock and cut with the coordinating die.
Color the flowers with venetian orange and shape them using deluxe flower shaping kit. Stamp the leafy accents leaves using leaf green color, cut with co-ordinating dies and paint with the same color. Shape the leaves using leafy accent shaping mold. Also stamp some leaves from the garden's edge coneflower stamp. Cut a yellow cardstock using honey comb die and slightly color it with distress oxide vintage photo and spiced marmalade. Apply glossy accent on the honey comb die as shown in the picture. Cut some preprinted images from the pattern paper using their coordinating die.
Glue a cheese cloth on the left side of the card and start arranging flowers and leaves. Glue them with hot melted glue. Glue the honey comb die on the right side of the card. Glue the preprinted images using acetate sheet for added dimensions. Cut the borders from the white card stock using sweetheart border die and glue them on the both edges of the card. Cut a sentiment strip from the same paper collection. Glue the borders on both side of the strip and arrange it as shown in the picture. For finished looked apply glitter that dries clear.
Would love to hear from you....
Hugs
Uma


Gorgeous! I'm becoming a huge fan!
ReplyDeleteLove this gorgeous creation Uma! Wow!
ReplyDeleteSo beautiful! I love all of your gorgeous flowers!
ReplyDelete