Hey Crafty Folks!
Happy Wednesday..........
It’s time to shake off the wintertime blues and greet the spring season with the breathtaking Tulip Time Collection from Heartfelt Creations! Energize yourself with a beautifully hued paper collection filled with pastel pinks, pretty purples, sunny yellows and grassy greens…the ideal springtime colors for all of your spring themed paper craft creations! Graceful illustrations of delicate tulip bouquets, elegant flower pot arrangements, and colorful meadow like scenes garnish delicate backgrounds adorned in beautiful brocades, dainty lace like patterns and soft floral images, certain to put a spring in your step and a song in your heart! Rounding out this spring-inspired collection are three blossoming cling stamps sets displaying tender images of budding tulips, an assortment of flower pots ready to hold the first cuttings of the season, as well as a pretty picket fence ideal for building a cheerful garden scene! When paired with the coordinating dies, creating fresh and invigorating springtide embellishments for handmade greeting cards, scrapbook layouts and altered art pieces are accomplished quickly and with ease! A fourth beautifully illustrated cling stamp set featuring breezy tulip petals in varying diameters, along with the coordinating dies and a customized Tulip Shaping Mold, will allow you to surround yourself with realistic replicas of the first flowers of spring! So, join us as we welcome the season of new beginnings with the Tulip Time Collection!
Here is my first take with this beautiful collection
HEARFELT CREATIONS PRODUCTS:
HCD1-7218 Tulip Time Die
HCD1-7219 Tulip Bouquet Die
HCD1-7220 Tulip Vase & Fillers Die
HCD1-7221 Tulip Cart & Fence Die
HCPC-3858 Tulip Time Cling Stamp Set
HCPC-3859 Tulip Bouquet Cling Stamp Set
HCPC-3860 Tulip Vase & Fillers Cling Stamp Set
HCPC-3861 Tulip Cart & Fence Cling Stamp Set
HCDP1-298 Tulip Time Paper Collection
HCFB1-472 3D Tulip Shaping Mold
Zig Markers
Black Archival
Leaf Green
Olive Green
Sunflower Yellow Archival
Vibrant Fuchsia
HCD1-7213 Elegant Pocket Accents Die
HCD1-7212 Petite Pocket Accents Die
OTHER PRODUCTS:
Flower making paper , water color paper, smooth white cardstock , glitter
VIDEO LINKS:
INSTRUCTIONS:
Ready side fold card measures 8.25”×7”
To create card base choose a pattern paper from the designer paper collection and cut a piece measures 8.25”×7”. Matt it on a white cardstock to create bendy frame , take a piece of smooth white cardstock measures 10.25”×7”. Score ½” on both side and cut a window using eyelet rectangle & basics die. Choose a pattern paper from the same collection and cut a piece measures 9.25”×7”. Cut a window from the pattern paper using same die. Matt it on the base frame.
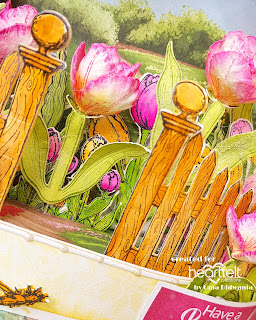
To create window scene stamp some tulip flowers using vibrant fuchsia ink on flower making paper and cut with coordinating die. Color the flowers center using sunflower yellow ink. Color the edges of the flowers using vibrant fuchsia ink . Shape the flowers using 3d flower shaping mold. Stamp some tulip leaves using olive green ink. Paint the leaves with the leaf green ink and cut with coordinating dies. Shape the leaves using deluxe flower shaping kit. Arrange the flowers and leaves and keep it aside. Stamp some fillers , cart , fence & tulip bouquet using black archival on water color paper. Paint the images using zig markers and cut with coordinating die.
Glue the fence inside the bendy frame as shown in the picture. Glue flowers , tulip fillers and bouquets on the base card to create a window scene. Glue the frame on the base card as shown in the picture. Cut two decorative borders from the white cardstock using Elegant Pocket Accents Die and glue it on the both side of the card. Cut two borders from the white cardstock using petite pocket accents die and glue it on the top of the frame.
Glue the cart on the lower side of the frame and fill it with fillers and small tulip flowers. Cut a sentiment ticket from the same collection and matt it on the white cardstock. Glue a tulip bouquet and tulip flowers on the other side of the frame. Glue the sentiment ticket on the flowers using dimensional tape. Cut two tags from the same collection and tie it with satin cord. Matt the bendy frame on the side folded card base. For the finished look apply glitter on the flowers using glue that dries clear.
Love


Beautiful card Uma! Love your tulips!
ReplyDeletewell, I just want to walk right through that gate. X
ReplyDeleteOh I just love your tulips! Beautiful!
ReplyDelete