Hello Friends!!
Here is my fourth and card for this day.


HC PRODUCTS USED:
Deluxe Flower Shaping Paper Pack 50
3D Pansy Shaping Mold
Cheery Pansy Die
Cheery Pansy Cling Stamp Set
Tulip Time Die
Tulip Time Cling Stamp Set
DMCT4185 Groove Golf Tool Set
HCST1-401 Deluxe Flower Shaping Kit
HCDA2-450 Stack and Store Daubers-Pack of 30
HCS1 459 4 Rock Candy Stamens Small
DDC08 Designer Dries Clear Adhesive Refill
RACP985 Ranger Archival Ink Cactus Flower
RACP436 Ranger Archival Ink Leaf Green
RACP614 Ranger Archival Ink Pad Magenta Hue
RACP475 Ranger Archival Ink Pad Library Green
PGM15015 Rajni Chawlas's Crystal Clear
Wild Aster Paper Collection
HCD1-7285 Window Hinges Die
HCDP1-2109 Window Scenes Paper Collection
HCD1-7271 Rounded Window Frame Die
HCD1-7272 Rounded Sunlight Window Die
HCD1-7273 Rounded Eyelet Window Die
HCCB1-480 6" x 6" Shutter Fold Card - White
HCD1- 7203 Ornamental Tags Die
OTHER PRODUCTS:
Smooth white cardstock, Satin cord, hot melted glue,
VIDEO LINKS:
Ready card measures 6” × 6”
First, cut a card mat from designer paper collection measures 5 7/8”×5 7/8”. Adhere it on card base. Cut another piece of designer paper of same size , cut one edge using Swirly Accents Spray die. Mat it on card base to create a pocket. Cut a border from white cardstock using Swirly Accents Spray die. Glue it on pocket as shown in the picture. Cut 2 circle using die from designer paper collection and cut them into half to create shutter mats and glue them. Cut 4 piece from white cardstock using Rounded Eyelet window die. Distress those with cactus flower ink and glue them.
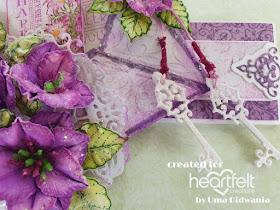
To create a belly band, take a strip of white cardstock measures 13”×2”. Score on 3.5" and 9 7/8” from longer side. Fold score lines and glue both ends to create a band. Cut 2 strips from designer paper measures 1 6/8” × 6”. Mat these on both side of belly band. Cut 2 strips of white cardstock measures 1”×6” and 2 of designer paper measures 7/8”×6”, Adler them on belly band as shown. Take a piece of designer paper measures 5”×5” and create a envelope. Glue this envelope on belly band using dimensional tape. Cut 2 small card mats and 2 tags from designer paper collection and glue them in envelope . Stamp a sentiment on tag using cactus flower ink. Take a dark purple copic marker and highlight the edges of envelope. Cut a small dolly from white cardstock and glue it on envelope Cut keys from white cardstock using hinges die , Tie them with satin cord . Glue cord in envelope as shown.
For Flowers, stamp tulip flowers using cactus flower ink on deluxe flower shaping paper and cut with coordinating die. Sponge flowers using majestic Violet ink and cactus flower ink. Shape flowers using groove tool and layer it. I use 3 layers for one flower .Add Rock Candy stamens small to the center of flowers. Stamp Cheery Pansy leaves using library green ink on deluxe flowers shaping paper. Cut with coordinating die and paint with leaf green archival. Shape leaves using shaping mold. Glue flowers and leaves on card using hot melted glue. For finished look apply crystal clear on flowers using glue that dries clear.


That's all for today
Thanks for stopping by
Hugs
Uma
Here is my fourth and card for this day.


HC PRODUCTS USED:
Deluxe Flower Shaping Paper Pack 50
3D Pansy Shaping Mold
Cheery Pansy Die
Cheery Pansy Cling Stamp Set
Tulip Time Die
Tulip Time Cling Stamp Set
DMCT4185 Groove Golf Tool Set
HCST1-401 Deluxe Flower Shaping Kit
HCDA2-450 Stack and Store Daubers-Pack of 30
HCS1 459 4 Rock Candy Stamens Small
DDC08 Designer Dries Clear Adhesive Refill
RACP985 Ranger Archival Ink Cactus Flower
RACP436 Ranger Archival Ink Leaf Green
RACP614 Ranger Archival Ink Pad Magenta Hue
RACP475 Ranger Archival Ink Pad Library Green
PGM15015 Rajni Chawlas's Crystal Clear
Wild Aster Paper Collection
HCD1-7285 Window Hinges Die
HCDP1-2109 Window Scenes Paper Collection
HCD1-7271 Rounded Window Frame Die
HCD1-7272 Rounded Sunlight Window Die
HCD1-7273 Rounded Eyelet Window Die
HCCB1-480 6" x 6" Shutter Fold Card - White
HCD1- 7203 Ornamental Tags Die
OTHER PRODUCTS:
Smooth white cardstock, Satin cord, hot melted glue,
VIDEO LINKS:
For more tips on creating with the Window Scene cards & dies, watch the tutorial at https://youtu.be/LnM95GR92ao.
For more tips on creating with the Tulip Time collection, watch the tutorial at https://youtu.be/rfYMxeNBmJk.
Instructions:Ready card measures 6” × 6”
First, cut a card mat from designer paper collection measures 5 7/8”×5 7/8”. Adhere it on card base. Cut another piece of designer paper of same size , cut one edge using Swirly Accents Spray die. Mat it on card base to create a pocket. Cut a border from white cardstock using Swirly Accents Spray die. Glue it on pocket as shown in the picture. Cut 2 circle using die from designer paper collection and cut them into half to create shutter mats and glue them. Cut 4 piece from white cardstock using Rounded Eyelet window die. Distress those with cactus flower ink and glue them.
To create a belly band, take a strip of white cardstock measures 13”×2”. Score on 3.5" and 9 7/8” from longer side. Fold score lines and glue both ends to create a band. Cut 2 strips from designer paper measures 1 6/8” × 6”. Mat these on both side of belly band. Cut 2 strips of white cardstock measures 1”×6” and 2 of designer paper measures 7/8”×6”, Adler them on belly band as shown. Take a piece of designer paper measures 5”×5” and create a envelope. Glue this envelope on belly band using dimensional tape. Cut 2 small card mats and 2 tags from designer paper collection and glue them in envelope . Stamp a sentiment on tag using cactus flower ink. Take a dark purple copic marker and highlight the edges of envelope. Cut a small dolly from white cardstock and glue it on envelope Cut keys from white cardstock using hinges die , Tie them with satin cord . Glue cord in envelope as shown.
For Flowers, stamp tulip flowers using cactus flower ink on deluxe flower shaping paper and cut with coordinating die. Sponge flowers using majestic Violet ink and cactus flower ink. Shape flowers using groove tool and layer it. I use 3 layers for one flower .Add Rock Candy stamens small to the center of flowers. Stamp Cheery Pansy leaves using library green ink on deluxe flowers shaping paper. Cut with coordinating die and paint with leaf green archival. Shape leaves using shaping mold. Glue flowers and leaves on card using hot melted glue. For finished look apply crystal clear on flowers using glue that dries clear.


That's all for today
Thanks for stopping by
Hugs
Uma
Absolutely beautiful card Uma! Love these tulips.
ReplyDelete