Wednesday 27 June 2018

Sweet Honey Bees

Hi All !!!

Happy Wednesday....

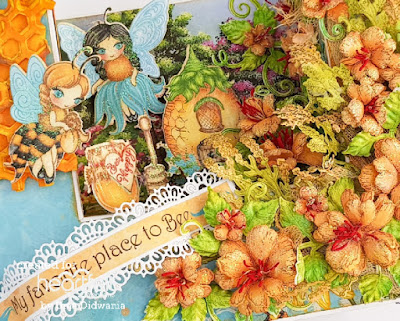
Today i am back with a new card featuring Heartfelt Creations 'leafy Accent Stamp and Die. I create a U- fold card using Sweet As Honey  Collection and leafy accent collection. 

Here is my card...


HC PRODUCTS USED:


HCDP1-291 Sweet As Honey Paper Collection

HCD1-7183 Honey Bee Maidens Die
HCD1-7184 Honey Bee Bungalows Die
HCD1-7185 Sweet As Honey Die
HCPC-3819 Small Sweet Peony Stamp
HCD1-7174 Small Sweet Peony Die
HCPC-3835 Leafy Accents Cling Stamp
HCD1-7193 Leafy Accents Die
HCFB1-3819 3D Leafy Accents Shaping Mold
HCD1-7161 Sweetheart Borders Die
HCPC-3828 Garden's Edge Coneflower Stamp
HCD1-7128 Garden's Edge Coneflower Die
HCPC-3827 Backyard Blossoms Stamp
HCD1-7181 Backyard Blossoms Die
HCST1-401 Deluxe Flower Shaping Kit


OTHER PRODUCTS USED:

Smooth white cardstock,  Archival Ink Pad ( Venetian Orange,  Red Geranium , Leaf Green) , Distress Oxide ( Vintage Photo , Spiced Marmalade ) Glossy Accent , Glitter , , , Cheese cloth.

VIDEO LINK:

For more tips on creating with the flower shaping molds, watch the tutorial
https://youtu.be/KDbdzC0MnAI

For more tips on creating with the Sweet as Honey collection, watch the tutorial at https://youtu.be/89nlTDw3kOE

INSTRUCTIONS:
Ready open card measures 10"×7"

To create a U-fold card follow the amazing instructions by "Maymay made it" .

Create a U-fold card with the white cardstock. For mating choose a pattern paper from the sweet as honey paper collection. Distress the edges of the pattern paper using venetian orange ink. Stamp the sweet peony flowers using red geranium color on white cardstock and cut with the coordinating die.
Color the flowers with venetian orange and shape them using deluxe flower shaping kit. Stamp the leafy accents leaves using leaf green color,  cut with co-ordinating dies and paint with the same color. Shape the leaves using leafy accent shaping mold. Also stamp some leaves from the garden's edge coneflower stamp. Cut a yellow cardstock using honey comb die and slightly color it with distress oxide vintage photo and spiced marmalade. Apply glossy accent on the honey comb die  as shown in the picture. Cut some preprinted images from the pattern paper using their coordinating die.
Glue a cheese cloth on the left side of the card and start arranging flowers and leaves. Glue them with hot melted glue. Glue the honey comb die on the right side of the card. Glue the preprinted images using acetate sheet for added dimensions. Cut the borders from the white card stock using sweetheart border die and glue them on the both edges of the card. Cut a sentiment strip from the same paper collection. Glue the borders on  both side of the strip and arrange it as shown in the picture. For finished looked apply glitter that dries clear.


Thanks for stopping by !!!!
Would love to hear from you....
Hugs
Uma

Timeless Beauty

Hello friends!!!

Happy Release Day ......

Yes, you are right !! It's not only inspirational wednesday, it's also a release day of leafy Accents stamp, die and mold. Must be in your crafty stash, If you are in flower making and loves to make floral projects. I have created a box . Have a look...


HC PRODUCTS USED:

HCPC-3835 Leafy Accents Cling Stamp 
HCD1-7193  Leafy Accents Die
HCFB1- 3819  3D Leafy Accents Shaping Mold
HCPC-3820  Large Sweet Peony Stamp
HCPC-3819  Small Sweet Peony Stamp
HCD1- 7174  Large Sweet Peony Die
HCD1- 7174  Small Sweet Peony die
HCDP1-283  Young at Heart paper collection
HCPC-3769  Wildwood Florals Stamp
HCD1-7125  Wildwood Florals Die
HCST1-401  Deluxe Flower Shaping Kit


OTHER PRODUCTS:

Mdf box, Secret garden flower making paper, Archival Ink Pad (cactus flower, Venetian Orange , leaf Green, Olive green, library green), White Acrylic paint, Gesso, Texture Paste, Stencil, lindys Stamp Gang(A bit o'bubbly, Juzzy navel peach), Mdf Dial frame, Half cut pearls, Sisal, cheese cloth, Glitter, Acetate sheet

For more tips on creating with the Sweet Peony collection, watch the tutorial athttps://youtu.be/L9_MLkvpGPQ.
For more tips on creating with the flower shaping molds, watch the tutorial at https://youtu.be/FSdPL7nXvQE

INSTRUCTIONS:

Ready project measures 8"×8"

PC: Google 

Take a mdf box and apply gesso evenly.  After drying apply texture paste using stencil.  Color the box with Lindy’s starburst sprays. Stamp Sweet Peony flowers on the flower making paper using cactus flower ink,  also stamp some Wildwood Florals flower using sap green color and cut with coordinating die.  Paint the peony flowers with cactus flower and venetian orange color. Shape the flowers using Deluxe Flower Shaping Kit.  Stamp the leaves using olive green ink and cut with coordinating dies. Color the leaves using leaf green , library green and olive green color.  Shape the leaves using leafy accents mold.

Take a mdf clock frame and a sentiment, color them with white acrylic color.  Also spray with pink color. Apply glitter on both using adhesive that dries clear. Take a pattern paper from Young at Heart collection and cut it according to size of frame. Also cut a acetate sheet of the same size. Glue a pic and acetate sheet on the pattern paper. Glue the frame over the pattern paper as shown. Adhere the frame on the centre of the box. 

Glue the cheese cloth and sisal near the frame. Arrange the flowers and leaves around the frame and glue them using hot melted glue. Apply the glitter over the flowers. Futher apply  the gesso on the flowers and leaves using dry brush technique.  For the finished look glue half cut pearl on the edges of the box.

More close pics......


Hope u all like it ....
Visit Heartfelt Creations blog for more amazing projects by DT member .

Hugs 
Uma

Wednesday 20 June 2018

Honey Home Card

Hello Crafty Peeps!!!

Good morning. ........
It's time for Wednesday inspirational post for Heartfelt Creations. So, here I am with a new project with Sweet As Honey Collection. These bees are so cute, isn't it???

Here is my card....


HC PRODUCTS USED:

ITEM NUMBER:        PRODUCT NAME:

HCDP1-291 Sweet As Honey Paper Collection 
HCD1-7183 Honey Bee Maidens Die 
HCD1-7184 Honey Bee Bungalows Die
HCD1-7185 Sweet As Honey Die 
HCD1-7144 Decorative Medallion Die 
HCD1-7179 Butterfly Kisses Decorative Die 
HCPC-3826 Blossoming Coneflower Stamp Set
HCP1-7180 Blossoming Coneflower Die 
HCPC-3828 Garden'sEdge Coneflower Stamp Set 
HCD1-7128 Garden'sEdge Coneflower Die 
HCST1-401 Deluxe Flower Shaping Kit 

OTHER PRODUCTS:

Smooth white cardstock,  Archival Ink Pad (Chrome yellow, Red Geranium, leaf green, Iridescent Wow glitter, Distress Oxide (Vintage Photo), Satin ribbon 

VIDEO LINKS:

For more tips on creating with the Sweet as Honey collection, watch the tutorial at https://youtu.be/89nlTDw3kOE

INSTRUCTIONS:

Ready upside fold card measures 6.5"×6.5".

Choose a 6' by 6' card panel from the Sweet As Honey  Paper Collection and cut the center square window. Also, distress the edges using a distress oxide vintage photo. Choose another pattern paper and create a window scene by layering the same with the help of glue dots. Cut white cardstock using Honeycomb die and color it using distress oxide vintage photo. Glue the die cut on the left corner of frame card as shown. Cut two tags from the same collection. Also cut white cardstock using Decorative Medallion Die. Glue the tags and border on the left side of frame card. Cut a dolly from the white card stock using Butterfly Kisses Decorative Die and glue it on the right side of the frame card. Further, create a yellow color mat and distress the edges and layer it using glue dots. Once happy with all layering, glue the card front to the ready card base.
Stamp some cone flowers on white cardstock using black archival. Color the flowers using chrome yellow and red geranium archival.  Slightly shape the flowers using Deluxe Flower Shaping Kit. Cut some preprinted images from the same collection. Arrange flowers and images as shown in the picture using glue dots for dimensions. Tie a bow with the satin ribbon and glue it on the right corner of the card. Cut a sentiment strip from the designer paper pack and glue it as shown. For the finished look apply glitter on the flowers center.

More close up pics......


Hope u all like it .....
Thanks for your precious time ....
Hugs...
Uma

Monday 18 June 2018

Heart Shaped Anniversary Card

Hello friends!!!!!
Good morning.....

I create a heart shaped anniversary card for Mudra's blog. You can check here step by step instructions and list of supplies i used.

Here are pics of my card......


Hope you like it....
Would love to hear from you
Hugs
Uma

Friday 15 June 2018

Special Hug Layout

Hello Crafty folks!!!

A very good morning to all of u.....

I want to let you all know that our 5th challenge is starting today at.....
         
              "THE CREATIVE CRAFTERS "

Our theme is always "Anything Goes ".

As a inspiration I create a layout using heartfelt creations products.


Product used:
HCDP1-290 Backyard Blossoms Paper Collection
HCDP1-287 Lush Lilac Paper Collection
HCPC-3826 Blossoming Coneflower Stamp Set
HCPC-3828 Garden’s Edge Coneflower Stamp Set
HCPC-3827 Backyard Blossoms Stamp Set
HCPC-3494 Delicate Asters Stamp Set
HCD1-7180 Blossoming Coneflower Die
HCD1-7181 Backyard Blossoms Die
HCD1-7182  Garden’s Edge Coneflower Die
HCD1-726  Delicate Asters Die
HCD1-7161 Sweetheart Borders Die
HCD1-7179 Butterfly Kisses Decorative Die
HCS1-459-4 Rock Candy-Small Stamens
HCST1-401 Deluxe Flower Shaping Kit

Other Products:

Archival Ink (Sunflower  Yellow and Leaf Green),ZIG Markers (202,041,047,050 and 070),Art Stones, Styro foam Buds , Green Moss, Water Droplets, Versamark , White Heat Embossing Powder, Fence chipboard 

Instructions:
Project Size: 12"×12"
PC: Google 
Choose a pattern paper from the Backyard paper collection. Adhere it on the thick chipboard. Choose 2  another pattern paper from Lush lilac paper collection and create a curtain. Glue sweetheart border die cut on the edge of the curtain. Apply modelling paste on the base paper using stencil.  Take a photo of 3.75"×3.25". Cut two photo matt (4"×3.5" and 4.25"×3.75") from the same paper collection. Distress the edges of the photo matt using scissors. Glue the photo matt on the base using dimensional tape as shown in the pic.  Glue the photo over the photo matt. Cut a dolly die cut using Butterfly Kisses Decorative Die. Also cut a tag from the same paper collection and add a cord. Arrange the dolly and tag around the photo matt as shown in the pic. Arrange the curtain using dimensional tape for added dimensions. Glue the green moss at the bottom of the layout using glue that dries clear. Stamp flowers and fillers from Backyard Collection using black archival and color using zig markers. Cut them with coordinating die. Shape slightly using deluxe flower shaping kit. Also make some aster flowers and leaves using Delicate Aster stamp and die.. Glue them as shown in the pic. Color some styro foam buds using archival ink. Take a fence chipboard and heat emboss it with white embossing powder.  Glue the chipboard at the bottom of the layout as shown. Cut two sentiment tickets from the Lush lilac paper collection and adhere on the layout as shown. For the finished look apply sparkling dust on the flowers and some art stones using adhesive that dries clear.

More close up pics:


Thanks for stopping by......... 
Would love to hear from you ...........
Hugs .......
Uma

Wednesday 13 June 2018

Sweet Bee Bendi Card/ Heartfelt Creations

Hello friends!!!

A very good morning to all of u.....


Today is second  Wednesday of the month  and Heartfelt Creations launch an amazing collection "Sweet As Honey". 


Life is busy and can “bee” overwhelming at times…and it’s in the middle of that chaos that you need to get “busy as a bee” with your creative side and refresh your soul with some fun and lighthearted art from the heart! The “bee-autiful” thing about creating art from the heart is that

whether you’re needing to send “bee-lated” birthday greetings, remind someone to “bee-lieve” in themselves, or simply let someone know you’ll “bee” thinking about them, you’ve not only accomplished your act of kindness through remembering and touching the hearts of friends and loved ones with your creative projects, but you’ve refreshed your soul and refocused your heart as well! Join us in spreading joy and “bee-autiful” creations with the new Sweet as Honey Collection by Heartfelt Creations! “Swarming” with stunning illustrations of whimsical honey bees, charming hives and “bee-autious” garden scenes, this fun and lighthearted collection is ideal for creating projects for a multitude of occasions and is sure to capture the hearts of the young and the young at heart! A bright and happy hued paper collection will fill your soul with rays of warm sunshine yellows, bright sky blues and rich golden honey colors, while boasting captivating honeycomb patterns, happy hexagons, delightful polka dots, perfect plaids and dreamy florals! An assembling of three “bee-coming” cling stamp sets, along with coordinating dies provide endless inspirations with a “bee-autiful” colony of honey bee maidens, whimsical hives and sweet sentiments ideal for pairing with honeycomb die cuts! So, now that you know what all the “buzz” is about, join us in “bee-ing” Sweet as Honey and sharing “bee-autiful” art from the heart wherever you go!


Here is my card with this bee-autiful collection.  I create a Bendi fold card. 


HC Products:


HCDP1-291 Sweet as Honey Paper Collection

HCD1-7183  Honey Bee Maidens Die
HCD1-7184  Honey Bee Bungalows Die
HCD1-7185  Sweet as Honey Die
HCPC-3674  Blazing Poppy Petals Cling Stamp
HCD1-3769  Blazzing Poppy Die
HCPC-3769  Wildwood Florals Cling Stamp 
HCD1-7125  Wildwood Florals Die
HCD1-7161  Sweetheart Border Die
HCST1-401  Deluxe Flower Shaping Kit 
HCS1-459-4 Rock Candy Small Stamen 

Other products:

White Card Stock, Archival Ink (Venetian Orange, Tiger lily, Red Geranium, Chrome Yellow, library Green, leaf Green), Distress Oxide ( Vintage Photo), Clear Sheet, Glitter, Glossy Accents 

Video links:

For more tips on creating with the Sweet as Honey collection, watch the tutorial at https://youtu.be/89nlTDw3kOE

To see how to shape the poppy, watch the video at https://youtu.be/83jv-zjmdag.

Instructions: 
Ready card measures 6.5"×6"
Create a Bendi-Card by following these easy and wonderful instructions by Susan Campfield, check tutorial here . Choose a designer paper from Sweet As Honey Paper Collection for mat. Distress the pattern paper using distress oxide vintage photo. Cut the borders from white cardstock using Sweetheart border die and glue them on the edge of the card as shown in the picture. Cut some preprinted images from the designer paper using coordinating dies. Apply a thick layer of glossy accents on the images and leave them to dry. Stamp some poppy flower on the white cardstock using Red Geranium  and cut them with coordinating die.  Color the flowers using Tiger lily and Venetian Orange. Shape the flowers using groove tool and create flowers. Stamp some leaves using library green ink on the white cardstock and color them with leaf green and chrome yellow. Cut with coordinating die and shape them using deluxe flower shaping kit. Glue flowers and leaves on the card using hot melted glue. Arrange the all images on the card using clear sheet for added dimensions. Cut a sentiment tricket from the same collection using tag and luggage die and adhere on the top right side of card using dimensional tape as shown in the picture. For the finished look apply glue on the flowers and sprinkle some glitter on it. 


Hope you all like it....

Thanks for stopping by...... 

Would love to hear from you........

Uma

Heart Shaped Cards

Hello friends!!!!

Good morning.......

 Today I'd like to share sneak peak of my project which I created for Mudra's Craft Stamp Blog. I altered mdf boxes in mixed media form. Hop on the blog for for pics and step by step instructions.
Here is the link of my post...


Hope u all like it. .
Thanks for stopping by 
Hugs 
Uma 

Wednesday 6 June 2018

Blooming friendship Card

Hello Crafty Folks!!!

Good morning......   

Today, I am here with another card with Butterfly Dreams and Sweet Peony collection from Heartfelt.  I totally inspired by "Rajni Chawla" maam for this card.


HC PRODUCTS USED:

HCDP1- 289  Butterfly Dreams Paper Collection
HCPC- 3824  Fluttering Butterfly Stamp
HCD1- 7178  Fluttering Butterfly Die
HCPC- 3820  Large Sweet Peony Stamp
HCD1- 7174  Large Sweet Peony Die
HCD1- 7157  Eyelet Oval And Basics Large Die
HCD1- 7120  Fleur Border Basics Die
HCS1- 459-4  Rock Candy Small Stamen
HCPC-3811   Rain Boots and Blossom stamp
HCD1-7169   Rain Boots and Blossom Die

Other Products:

Vellum paper ,Versamark ,White heat embossing powder,Glitter , Archival (library green, leaf green, vibrant fuchsia), Distress oxide( spiced marmalade, broken china)


For more tips on creating with the Butterfly Dreams collection, watch the tutorial at https://youtu.be/uCKKJfAQFHA

Instructions: 

Ready upside fold card measures  6.5"×6.5"

Choose  a designer paper from Butterfly Dreams Paper collection and cut into 6.25"×6.25". Adhere it on the card base using tacky tape. Also choose another paper from the same collection and cut into 6"×6". Adhere that on the card using dimensional tape for added dimensions. Cut a 2"wide border using Felur border basic die and adhere that using dimensional tape as shown in the picture. Create a frame using Eyelet oval and basics large die. Also cut a paper from the same collection to create a window scene. Stamp large Sweet Peony flower using versamark on vellum paper and heat embossed it with white embossing powder. Also stamp a butterfly on vellum paper using versamark and heat embossed with white embossing powder and cut with coordinating die. Color the flowers with vibrant fuchsia ink and spiced marmalade distress oxide  and shape them. Color the butterfly using vibrant fuchsia ink, broken china, spiced marmalade. Stamp some leaves using library green ink on white cardstock and color then with leaf green ink. Cut them with coordinating die. Arrange all as shown in the picture and glue them using hot glue. Cut a sentiment ticket from the same collection and glue it using dimensional tape. For the finished look apply rainbow glitter using adhesive that dries clear.


Thanks for visiting

Hugssss....

Uma


Best Guy Ever

Hello Everyone! Good morning.... Today is Heartfelt Wednesday and I am back with another card using "Majestic Frames" die....