Showing posts with label stamping. Show all posts

Wednesday, 11 December 2019

A Gift From The Heart

Hello Everyone!!

Happy Wednesday....

Today is the debuting day of Calla lily collection by Heartfelt Creations. Here is my inspiration of this week.


HC PRODUCTS USED:
HCD1-7275 Calla Lily Die
HCD1-7276 Feathery Swan Die
HCPC-3897 Calla Lily Cling Stamp Set
HCPC-3898 Feathery Swan Cling Stamp Set
HCDP1-2110 Calla Lily Paper Collection
HCFB1-484 3D Calla Lily Shaping Mold
HCS1-485 Pastel Pollen Stamens – Medium
RACP614 Ranger Archival Ink Pad Magenta Hue
RACP482 Ranger Archival Ink Pad Olive
TSMP704 Memento Dye Ink Pad New Sprout
Swirly Accents Spray Die
HCD1-7162 Eyelet Hearts Die
Zig markers
Black Archival

OTHER PRODUCTS:
Smooth white cardstock, water color paper, hot melted glue, dimensional tape

VIDEO LINKS:
For more tips on creating with Calla lily Collection watch the tutorial at https://youtu.be/VWKPoXjpiug

INSTRUCTIONS:
Ready side fold card measures 6.5"×7.5"
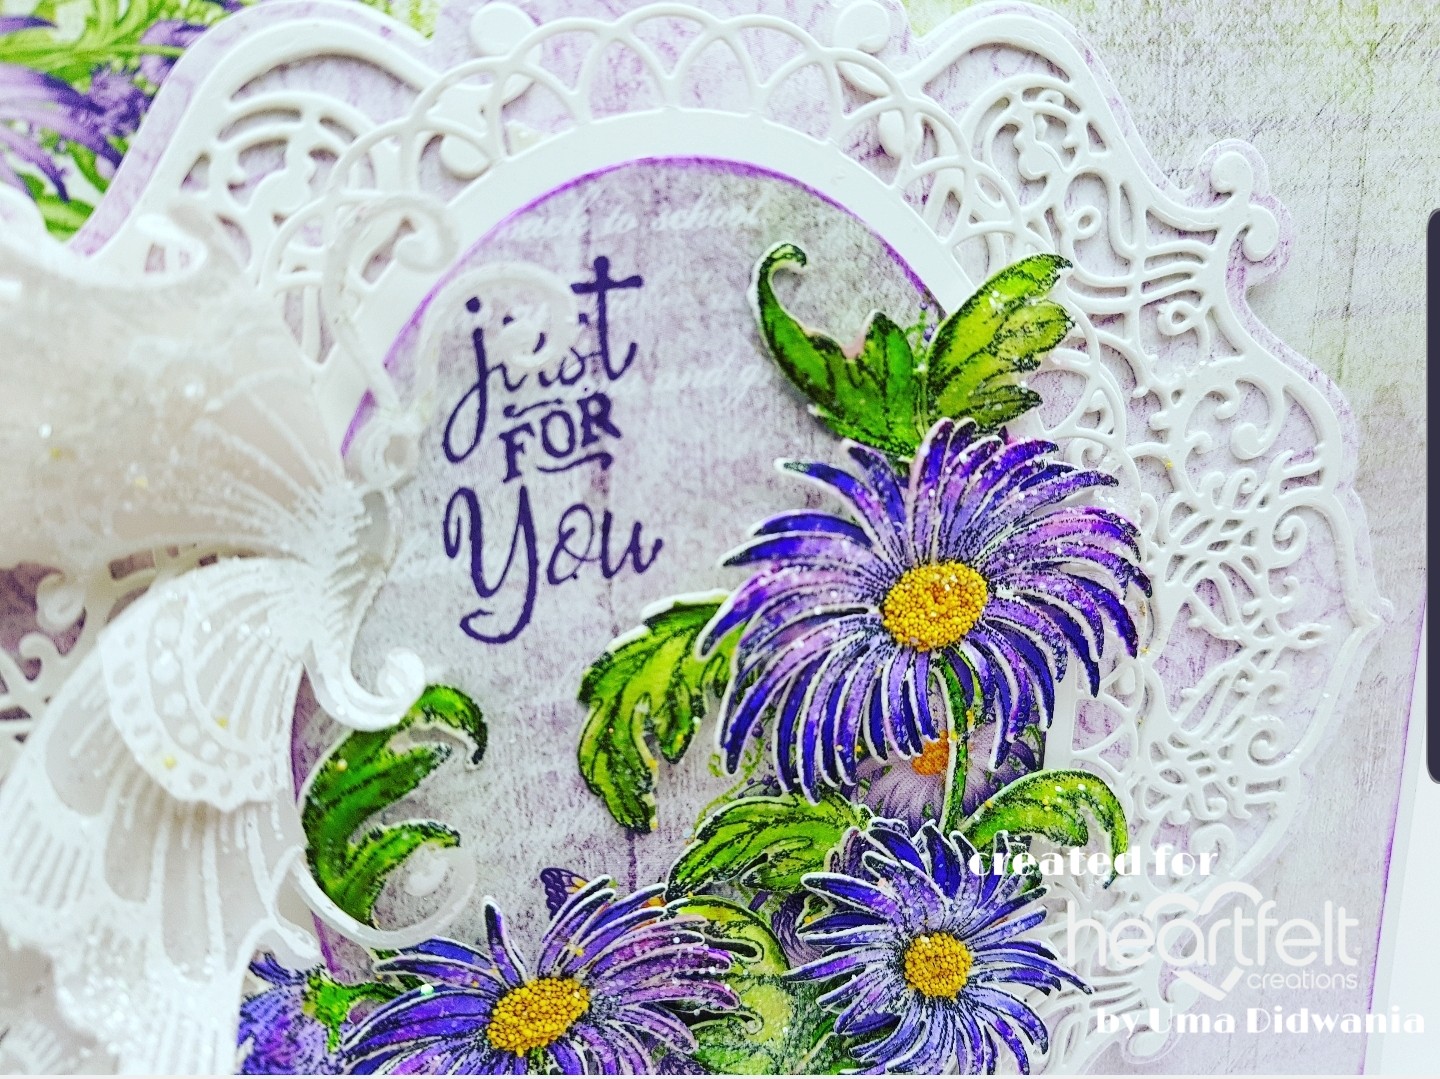
Cut a card mat from designer paper collection measures 6.25”×7.25”. Cut small hearts using Eyelet Hearts die into card mat. Distress the edges with matching ink. Adhere it on ready card base. Choose another paper from same designer paper collection measures 6”×7.25”.Adhere it on same size white cardstock. Cut one edge using Swirly Accents Spray die, also cut a heart using Eyelet Hearts die. Adhere it on card using dimensional tape for added dimension. Cut border from white cardstock using Swirly Accents Spray die and glue it as shown in the picture. Further, cut a heart shaped frame from white cardstock using Eyelet Hearts die. Distress edges with magenta Hue ink and add crystal clear using clear dry adhesive. Glue frame on card.

Stamp swan image on watercolor paper using black archival and cut with coordinating die.  Paint image with zig markers.  Glue image using dimensional tape as shown in the picture.  Cut a sentiment strip from same designer paper collection and mat it on white cardstock. Glue sentiment on top of card as shown.

Stamp calls lily flowers on deluxe flower shaping paper using magenta Hue ink and cut with coordinating die Stamp leaves using olive green archival and cut with coordinating die.  Paint flowers and leaves using magenta hue ink and new Sprout ink. Shape flowers and leaves using flower shaping mold. Add stamen in flowers. Arrange flowers and leaves and glue them using hot glue.  For finished look apply glitter using clear dry adhesive.


Thanks for stopping by
Hugs
Uma

Saturday, 30 November 2019

All Occasion Circle Card

Hey Crafty Folks!

Good Morning.....

Today I have a step by  step tutorial of circle card using Black Friday Release on Heartfelt Creations blog.  I create a circle card with a little bit twist. Are you looking to create something different? Create a all occasion card in easy way with Decorative Circle Dies and Card Bases. Click here to check the tutorial. Here are some glimpse of my project.


Hugs & Regards 
Uma

Friday, 29 November 2019

Full Circle

Hello Everyone!!

Happy Wednesday....

Here is my another take with Black Friday Release.  This time I create a folded circle easel type card.


HC PRODUCTS USED:

HCCB1-481 6" x 6" Round Bi-fold Card – White
HCD1-7271 Rounded Window Frame Die
HCD1-7262 Swirly Border Accents Die
Special Birthday Sentiments Cling Stamp Set
HCPC-3887 Wild Aster Cling Stamp Set
HCD1-7257 Wild Aster Die
HCDP1-2106 Wild Aster Paper Collection
HCDA2-450 Stack and Store Daubers-Pack of 30
352854 Metal Tip for Adhesive Bottles
DDC08 Designer Dries Clear Adhesive Refill
RACP524 Ranger Archival Ink Pad Vibrant Fuchsia
RACP475 Ranger Archival Ink Pad Library Green
RACP499 Ranger Archival Ink Plum
Sap Green Archival
HCD1-7272 Rounded Sunlight Window Die
HCD1-7273 Rounded Eyelet Window Die   
HCD1-7274 Rounded Lattice Window Die
Deluxe Flower Shaping Paper Pack 50
HCD1-754 Eyelet Circle and Basics Small Dies

OTHER PRODUCTS :
White cardstock,  micro beads (Sunflower yellow), diamond dust

VIDEO LINKS:
Watch video to learn how to create circle fold window cards with elegant and versatile dies
https://youtu.be/LnM95GR92ao
INSTRUCTIONS :
Take a Round Bi- fold card and fold it’s all mats into half. Cut circle card mats from designer paper collection using Rounded Sunlight window die.Cut them into half and adhere on folded card mats. Now cut a half dolly from white cardstock using Rounded Lattice Window die. Mat it on front card panel. Now cut 2 dollies from white cardstock using Rounded Window frame die and one using Rounded Eyelet Window die. Cut circle mats for these dollies using Eyelet circle & Basics small die. Cut one mat using largest die from Rounded Window Frame die. Glue all round mats on dollies according to the size. Glue these dollies on folded card as shown in the picture.

Stamp aster flower on deluxe flower shaping paper using vibrant fuchsia ink and cut with coordinating dies. Sponge flowers using vibrant fuchsia and plum archival, shape flowers using groove tool. Layer flowers and add micro beads in center using clear adhesive. Stamp aster leaves using library green ink and cut with coordinating die. Paint leaves using sap green and library green ink. Shape leaves using ball tool. Cut some borders from  white cardstock using Swirly Accents Border die. Paint die cuts using leaf green archival. Arrange flowers and leaves on all layer and glue them with hot melted glue. Also add Swirly borders into arrangement. 

Fussy cut a Butterfly for same paper collection,  apply glue on it and add glitter and diamond dust on it. Glue butterfly on front card panel.  Stamp a birthday sentiment from special birthday sentiment stamp using vibrant fuchsia ink on white cardstock. Cut with arrow die and glue it as shown.  For finished look apply glitter on flowers using designer clear dries adhesive.


Thanks for stopping by
Hugs
Uma

Wednesday, 13 November 2019

Wide Open Spaces

Hello  Friends!!
Happy Wednesday....

Leave the busyness of life behind, with an awe-inspiring wilderness retreat! Breathe deeply, enjoy a starry sky, and immerse yourself fully in the tranquility of nature! Enjoy the isolation of a quaint little cabin in the woods, surrounded by statuesque trees, towering mountain views, and a quietly winding river! Enjoy a day trip that begins at the water’s edge! Push off the canoe and paddle your way to becoming one with the great outdoors…perhaps the ducks will share their favorite spot among the reeds, as the trout jump from the water, beckoning you to paddle further upstream! As the dusk begins to settle, listen for the howling coyotes in the distance and enjoy the deer grazing silently in the meadows. By now it’s time to head back to the cabin, lay your head on the pillow and dream about the new adventures tomorrow will bring! Join us as we take time to pause, slow down, and enjoy God’s beautiful creations with the new Wilderness Retreat Collection from Heartfelt Creations! Take a hike through this tranquil paper collection filled with illustrations of glorious wilderness scenes featuring old mills, babbling brooks, mountainside cabins, and a variety of wildlife! Rustic browns, river blues, sunrise yellows, and sunset reds create incredible backdrops for pleasing plaids, stunning stripes, and charming checkered patterns, perfect for all of your masculine themed creations! A wonderful assortment of wilderness themed cling stamp sets, along with coordinating dies, are sure bring all of your outdoor themed paper crafting creations to life, and allow you to create an abundance of different wilderness settings for all of your handmade greeting cards, scrapbook layouts, and memory keeping albums! Create breathtaking views with beautifully detailed illustrations of wilderness cabins, old work mills, fish filled rivers, howling coyotes, and soaring eagles. Create your own escape from reality, with the beauty and tranquility of the Wilderness Retreat Collection!  Here is my first take using this collection.


HC PRODUCTS USED:

HCD1-7267 Create a 'scape Backcountry Die
HCD1-7268 Create a 'scape Wilderness Die
HCD1-7270 Create a 'scape Nature Die
HCPC-3893 Create a 'scape Backcountry Cling Stamp Set
HCPC-3894 Create a 'scape Wilderness Cling Stamp Set
HCPC-3896 Create a 'scape Nature Cling Stamp Set 
HCDP1-2108 Wilderness Retreat Paper Collection
HCD1-7263 Swirly Accent Spray Die
Deluxe Flower Shaping Paper Pack 50
3D Cherry Blossom Shaping Mold
Cherry Blossom Retreat Die
Cherry Blossom Retreat Cling Stamp Set
HCDA2-450 Stack and Store Daubers-Pack of 30
HCS1 459 1 Assorted Pearl Stamens Small
DDC08 Designer Dries Clear Adhesive Refill
352854 Metal Tip for Adhesive Bottles
RACP962 Ranger Archival Ink Pad Fern Green
RACP524 Ranger Archival Ink Pad Vibrant Fuchsia
RACP482 Ranger Archival Ink Pad Olive
RACP468 Ranger Archival Ink Pad Jet Black
RACP430 Ranger Archival Ink Pad Deep Purple
Zig markers
Album Tags and Accents Die
PGM15015 Rajni Chawlas's Crystal Clear

OTHER PRODUCTS
White cardstock , satin cord, watercolor  paper

VIDEO LINKS

INSTRUCTIONS:

Ready bendy card measures 8.5"×8”
First, cut a piece of white cardstock measures 6”×7” for main card base. Cut more 2 piece of white cardstock measures 4.5"×7” and 2.5"× 7”. Score on ½” on both cardstock from shorter side. On the other side cut a half inch tab on both. Glue both from score side on both edges of main card base. Cut 2 border from white cardstock using Swirly Accents Spray die and one base piece from pattern paper. Glue die cuts on base pieces and arrange them on main card as shown. Cut card mats according to the size of card base and mat them. Make 2 cuts on card using pen knife to insert tabs to close bendy card.

Stamp some images on watercolor paper using black archival and paint with zig markers. Cut images using coordinating dies and glue using dimensional tape as shown in the picture. Cut a sentiment strip from same collection and glue it on white cardstock. Glue sentiment on top left side of card using dimensional tape. Cut 2 tags from paper collection and 2 from white cardstock using die. Tie tag on right side of card using satin cord.

Stamp Cherry Blossom flowers using vibrant fuchsia ink on deluxe flower shaping paper and cut with coordinating die. Paint flowers with vibrant fuchsia and deep purple archival. Shape using shaping mold and add stamens. Stamp leaves using olive green archival and cut with coordinating die. Paint leaves with olive green archival and fern green archival, shape using shaping mold. Arrange flowers and leaves as shown. For finished look apply glitter using clear dry adhesive.


Thanks for stopping by
Hugs
Uma

Wednesday, 2 October 2019

Happy Days

Hey Crafty Folks!

Happy Wednesday...

Here is my second card for today.


HC PRODUCTS USED:
Deluxe Flower Shaping Paper Pack 50
Tulip Time Paper Collection
HCFB1 467 3d Leafy Accents Shaping Mold
HCPC 3835 Leafy Accents Cling Stamp Set
HCD1 7193 Leafy Accents Die
HCD1 7177 Butterfly Dreams Border Die
HCPC 3823 Butterfly Dreams Border Cling Stamp Set
HCPC 3819 Small Sweet Peony Cling Stamp Set
HCD1 7173 Sweet Peony Die
3D Petite Florals Shaping Mold
Floral Fashionista Die
Floral Fashionista Cling Stamp Set
DMCT4185 Groove Golf Tool Set
HCDA2-450 Stack and Store Daubers-Pack of 30
DDC08 Designer Dries Clear Adhesive Refill
RACP436 Ranger Archival Ink Leaf Green
RACP614 Ranger Archival Ink Pad Magenta Hue
RACP475 Ranger Archival Ink Pad Library Green
RACP632 Ranger Archival Ink Pad Buttercup
RPEJ685 Embossing Powder White
HCD1-7262 Swirly Border Accents Die
HCD1-7263 Swirly Accent Spray Die
HCD1-757 Eyelet Oval and Basics Large Dies

OTHER PRODUCTS:
Vellum paper, white cardstock,  glitter, satin cord, dimensional tape

VIDEO LINKS:

INSTRUCTIONS:
Ready side fold card measures 6”×6”
First, choose a pattern paper from designer paper collection and cut a piece measures 5 7/8”×5 7/8” to create card mat. Distress the edges with matching ink and adhere it on ready card base. Choose another paper from the same designer paper collection and cut a piece measures 5.5"×5.5". Distress edges with matching ink and mat it on white cardstock which is 1/8of an inch bigger from all 4 sides. Adhere it on card base using dimensional tape.
Cut 2 base piece from pattern paper using Swirly Border die and 2 decorative piece from white cardstock. Add glitter on decorative pieces using clear adhesive. Mat it on base pieces using dimensional tape for added dimension. Glue them on center of card using dimensional tape as shown in the picture. Further, cut an oval piece from white cardstock using Eyelet Oval and basic large die. Distress with matching ink and mat it using dimensional tape.
Stamp small sweet peony flower on Deluxe flower Shaping paper using magenta hue ink and leafy accents leaves using library green ink. Cut images with coordinating dies.  Paint flowers with same ink and shape using groove tool. Layer flowers and add stamen in the center. Add glitter on the flowers using clear dry glue. Sponge leaves using leaf green archival and shape using 3D Shaping mold. Stamp floral fashionista flowers using buttercup ink and cut with coordinating die.  Shape with 3D mold and add stakes in center. Arrange flowers and leaves and glue them using hot melted glue. Cut a sentiment strip from same collection and mat it on white cardstock. Add sentiment using dimensional tape. Stamp Butterfly border on vellum paper using versamark and heat emboss with white embossing powder. Cut with coordinating die.Trim some butterflies and glue them as shown.
Cut 4 corners from white cardstock using Swirly Accents Spray die. Apply glitter using clear dry adhesive.  Glue all four corners on card as shown. Tie bow with satin card and glue it on the card.


Thanks for stopping by
Hugs
Uma

Just for you

Hey Crafty Peeps!

Good morning......

Its wednesday and it's time for inspirational post with Heartfelt Creations.  Today I have a card with wild aster collection and new release dies.

HC PRODUCTS USED:
HCDP1-2106 Wild Aster Paper Collection
HCD1-7263 Swirly Accents Spray Die
HCD1-7258 Wild Aster Spray Die
HCPC-3888 Wild Aster Spray Cling Stamp Set
HCPC 3824 Fluttering Butterfly Cling Stamp Set
HCD1 7178 Fluttering Butterfly Die
HCST1-401 Deluxe Flower Shaping Kit
159723 Designer Dries Clear Adhesive
RACP468 Ranger Archival Ink Pad Jet Black
Just For You Sentiments Cling Stamp SeT
Zig markers
RACP430 Ranger Archival Ink Pad Deep Purple
RPEJ685 Embossing Powder White
HCD1-776 Eyelet Oval Die

OTHER PRODUCTS:
Vellum paper, yellow micro beads, glitter, white cardstock , water color paper

VIDEO LINKS

INSTRUCTIONS:
Ready to side fold card measures 8”×6”
To prepare card mat, first choose two pattern paper from the designer paper collection and cut pieces measures 7 7/8”×5 7/8”. Distress the edges of 1 piece using deep purple archival and mat it on ready card base. Further, take another piece and cut using Swirly Accents Spray die. Distress the edges with same ink . Mat it on white cardstock which is cut in same size. Adhere it on card base using dimensional tape as shown. Cut white cardstock using Eyelet Oval die, also cut a pattern paper using plain oval die. Mat both of them on card base. Cut 2 borders from white cardstock using Swirly Accents Spray die and glue it as shown.

Stamp 2 times floral image from Wild Aster Spray stamp on watercolor paper using black archival. Paint image with zig markers and cut with coordinating die. Glue 1 image on card as shown. Cut flowers from the second image and slightly shape them.  Add yellow micro beads on the center of flowers. Glue these flowers on 1st one to give some 3D look. Apply clear dry glue and add glitter on it. Stamp a sentiment using deep purple archival as shown.

Stamp Butterfly image 3 times on vellum paper using versamark and heat emboss with white embossing powder. Cut with coordinating die. Trim 2 butterflies and glue on card as shown.  For finished look add glitter on Butterfly using adhesive that dries clear.


Thanks for stopping by
Would love to hear from you..
Hugs
Uma

Wednesday, 25 September 2019

Aster Gatefold Card

Hey Friends!

Today, here is another card using "Booklet Frames And  Accents" die. This card I create a gatefold using "Swirly Accents Spray" die. I faced some problems to make gatefold in this shape, but the result is fabulous.  Vellum Butterfly from "Butterfly Dreams" collection enhance the beauty of this card.


HC PRODUCTS USED:
HCD1-7263 Swirly Accent Spray Die
HCD1-7257 Wild Aster Die
HCDP1-2106 Wild Aster Paper Collection
HCPC 3824 Fluttering Butterfly Cling Stamp Set
HCD1 7178 Fluttering Butterfly Die
HCD1-757 Eyelet Oval and Basics Large Dies
RACP499 Ranger Archival Ink Plum
RACP614 Ranger Archival Ink Pad Magenta Hue
RACP475 Ranger Archival Ink Pad Library Green
RACP436 Ranger Archival Ink Leaf Green
RPEJ685 Embossing Powder White
DDC08 Designer Dries Clear Adhesive Refill
Deluxe Flower Shaping Paper Pack of 50 - White
RAHT Heat It Craft Tool
HCDA2-450 Stack and Store Daubers-Pack of 30
DMCT4185 Groove Golf Tool Set

OTHER PRODUCTS :
Smooth cardstock,  vellum paper,  versamark,  glitter, yellow micro beads, distress oxide , glitter

INSTRUCTIONS:
First take a piece of white cardstock measures 13”×6.25”. Score on 3.25” and 9.75”.  Fold score lines and create a gatefold card. Cut it with Swirly Accents Spray die to make it shaped gatefold card. Choose pattern paper from designer paper collection and cut pieces according to the card size using same dies. Mat designer paper on card base. Cut 4 piece decorative border from white cardstock using Swirly Accents Spray Die.  Glue them as shown.

Cut a oval piece from white cardstock using largest Oval die and 2 more from designer paper using 2nd and 3rd largest dies. Also cut 2 borders from white cardstock using another die from Swirly Accents Spray Die. Glue all oval piece and borders on the center of the card as shown. Stamp Aster flower on deluxe flower shaping paper using plum ink and leaves using library green archival. Cut images with their coordinating dies.  Paint flowers with magenta hue and plum ink. Shape with groove tool.  Layer flowers and all yellow micro beads in the center of flowers using designer dries glue. Paint leaves  with leaf green and library green archival. Also shape leaves. Arrange flowers and leaves and glue them using hot glue.

Stamp 2 butterfly image on vellum paper using versamark and heat emboss with white embossing powder. Cut with coordinating die. Color butterfly with distress oxide and glue it as shown in the picture. Cut a sentiment from same paper collection and adhere it on card using dimensional tape. For finished look apply glitter using clear dry glue.


I hope you like it....
Thanks for stopping by...
Hugs...
Uma

Best Guy Ever

Hello Everyone! Good morning.... Today is Heartfelt Wednesday and I am back with another card using "Majestic Frames" die....