Showing posts with label Layout. Show all posts

Thursday, 10 January 2019

Love: Mixed Media Layout

Hey Everyone,

Good Morning......

I am here to share you my inspirational post for Mudra Craft Stamp. This time I create a layout using Mudra's gorgeous chipzeb , stamp and stencil.
Here is it...

For step by step instructions and product list check my post on Mudra Craft Stamp Blog.


Hope you like 
Love


Participating in 
Allsorts Challenge Blog: Week 501 Hearts and Flowers 

Splashy Mix Challenge: Challenge #1 Anything Goes 

Dream Valley Challenges: Challenge #193 Anything Goes 


HLS January Mixed Media Challenge: Layers

Friday, 15 June 2018

Special Hug Layout

Hello Crafty folks!!!

A very good morning to all of u.....

I want to let you all know that our 5th challenge is starting today at.....
         
              "THE CREATIVE CRAFTERS "

Our theme is always "Anything Goes ".

As a inspiration I create a layout using heartfelt creations products.


Product used:
HCDP1-290 Backyard Blossoms Paper Collection
HCDP1-287 Lush Lilac Paper Collection
HCPC-3826 Blossoming Coneflower Stamp Set
HCPC-3828 Garden’s Edge Coneflower Stamp Set
HCPC-3827 Backyard Blossoms Stamp Set
HCPC-3494 Delicate Asters Stamp Set
HCD1-7180 Blossoming Coneflower Die
HCD1-7181 Backyard Blossoms Die
HCD1-7182  Garden’s Edge Coneflower Die
HCD1-726  Delicate Asters Die
HCD1-7161 Sweetheart Borders Die
HCD1-7179 Butterfly Kisses Decorative Die
HCS1-459-4 Rock Candy-Small Stamens
HCST1-401 Deluxe Flower Shaping Kit

Other Products:

Archival Ink (Sunflower  Yellow and Leaf Green),ZIG Markers (202,041,047,050 and 070),Art Stones, Styro foam Buds , Green Moss, Water Droplets, Versamark , White Heat Embossing Powder, Fence chipboard 

Instructions:
Project Size: 12"×12"
PC: Google 
Choose a pattern paper from the Backyard paper collection. Adhere it on the thick chipboard. Choose 2  another pattern paper from Lush lilac paper collection and create a curtain. Glue sweetheart border die cut on the edge of the curtain. Apply modelling paste on the base paper using stencil.  Take a photo of 3.75"×3.25". Cut two photo matt (4"×3.5" and 4.25"×3.75") from the same paper collection. Distress the edges of the photo matt using scissors. Glue the photo matt on the base using dimensional tape as shown in the pic.  Glue the photo over the photo matt. Cut a dolly die cut using Butterfly Kisses Decorative Die. Also cut a tag from the same paper collection and add a cord. Arrange the dolly and tag around the photo matt as shown in the pic. Arrange the curtain using dimensional tape for added dimensions. Glue the green moss at the bottom of the layout using glue that dries clear. Stamp flowers and fillers from Backyard Collection using black archival and color using zig markers. Cut them with coordinating die. Shape slightly using deluxe flower shaping kit. Also make some aster flowers and leaves using Delicate Aster stamp and die.. Glue them as shown in the pic. Color some styro foam buds using archival ink. Take a fence chipboard and heat emboss it with white embossing powder.  Glue the chipboard at the bottom of the layout as shown. Cut two sentiment tickets from the Lush lilac paper collection and adhere on the layout as shown. For the finished look apply sparkling dust on the flowers and some art stones using adhesive that dries clear.

More close up pics:


Thanks for stopping by......... 
Would love to hear from you ...........
Hugs .......
Uma

Wednesday, 30 May 2018

Unconditional love layout/DT post for Heartfelt Creations

Hello folks !!!!!
Good morning .....
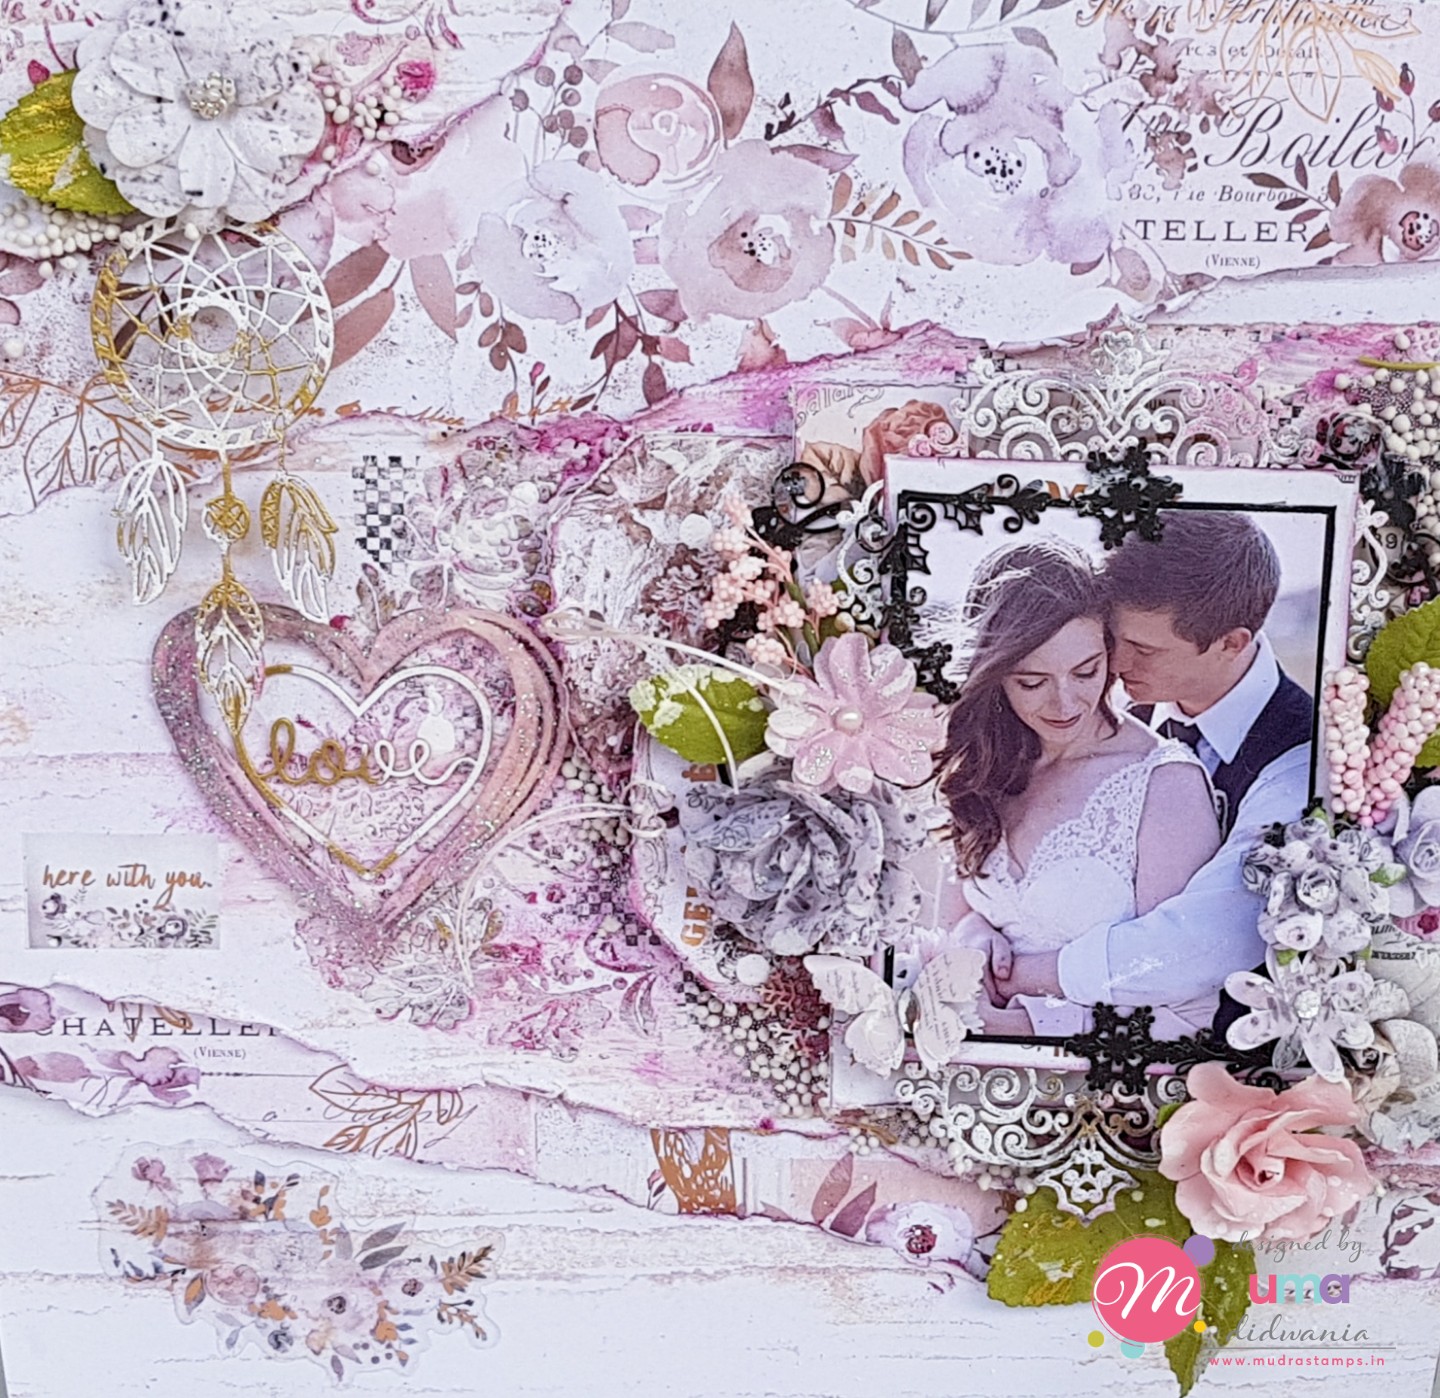
Today is inspiration wednesday, and I am back with my new creation.  I made a layout with Sweet Peony flower and Dogwood flowers.


HC PRODUCTS USED:

ITEM NUMBER:     NAME:

HCDP1-287        Lush Lilac Paper Collection
HCPC -3820        Large Sweet Peony Stamp
HCPC-3773         Flowering Dogwood Stamp
HCPC-3811         Rain boots and Blossom
                             Stamp
HCPC-3474         Heartfelt Expressions Stamp
HCPC-3819         Small Sweet Peony Stamp
HCPC-3825         Butterfly Kisses Stamp
HCPD1-7173       Small Sweet Peony Die
HCST1- 401         Deluxe Flower Shaping Kit
HCD1-7174          Large Sweet Peony Die
HCD1- 7129         Flowering Dogwood Die
HCD1-7179          Butterfly Kisses Decorative
                              Die
HCD1-7169          Rain Boots and Blossoms
                              Die
HCS1-459-4          Rock Candy Small
HCS1-458-3          Bright Bead Medium
HCS1-459-1          Assorted Pearl Small

OTHER PRODUCTS:
Versa Mark, White heat embossing powder, Mini micro pearl, Rainbow glitter, White cord, Archival Ink Pad ( deep purple , leaf green , library green), Vellum Paper, Cheese cloth.

For more tips on creating with the Sweet Peony collection, watch the tutorial athttps://youtu.be/L9_MLkvpGPQ

Instructions:
Ready project size 12"×12"
Choose two pattern paper from Lush lilac paper collection. Take a thick chipboard and glue a pattern paper over it. Take another pattern paper little bit smaller than the first one. Make straight cuts over the pattern paper in 1" distance as shown in the picture. Distress the edges of all the cuts using scissors. Adhere the pattern paper using dimensional tape for added dimensions. Apply modelling paste using stencil. Take a piece of cardboard. Apply gesso on the edges of the cardboard. Adhere the cardboard and the pieces of some pattern paper using dimensional tape as shown in the picture. 
</p><p>
Take a square piece of chipboard (4.5") and make a frame. Glue the micro mini pearls on the frame using clear dry glue.  Frame the picture.  Cut a square frame using decorative die and glue it on the frame.
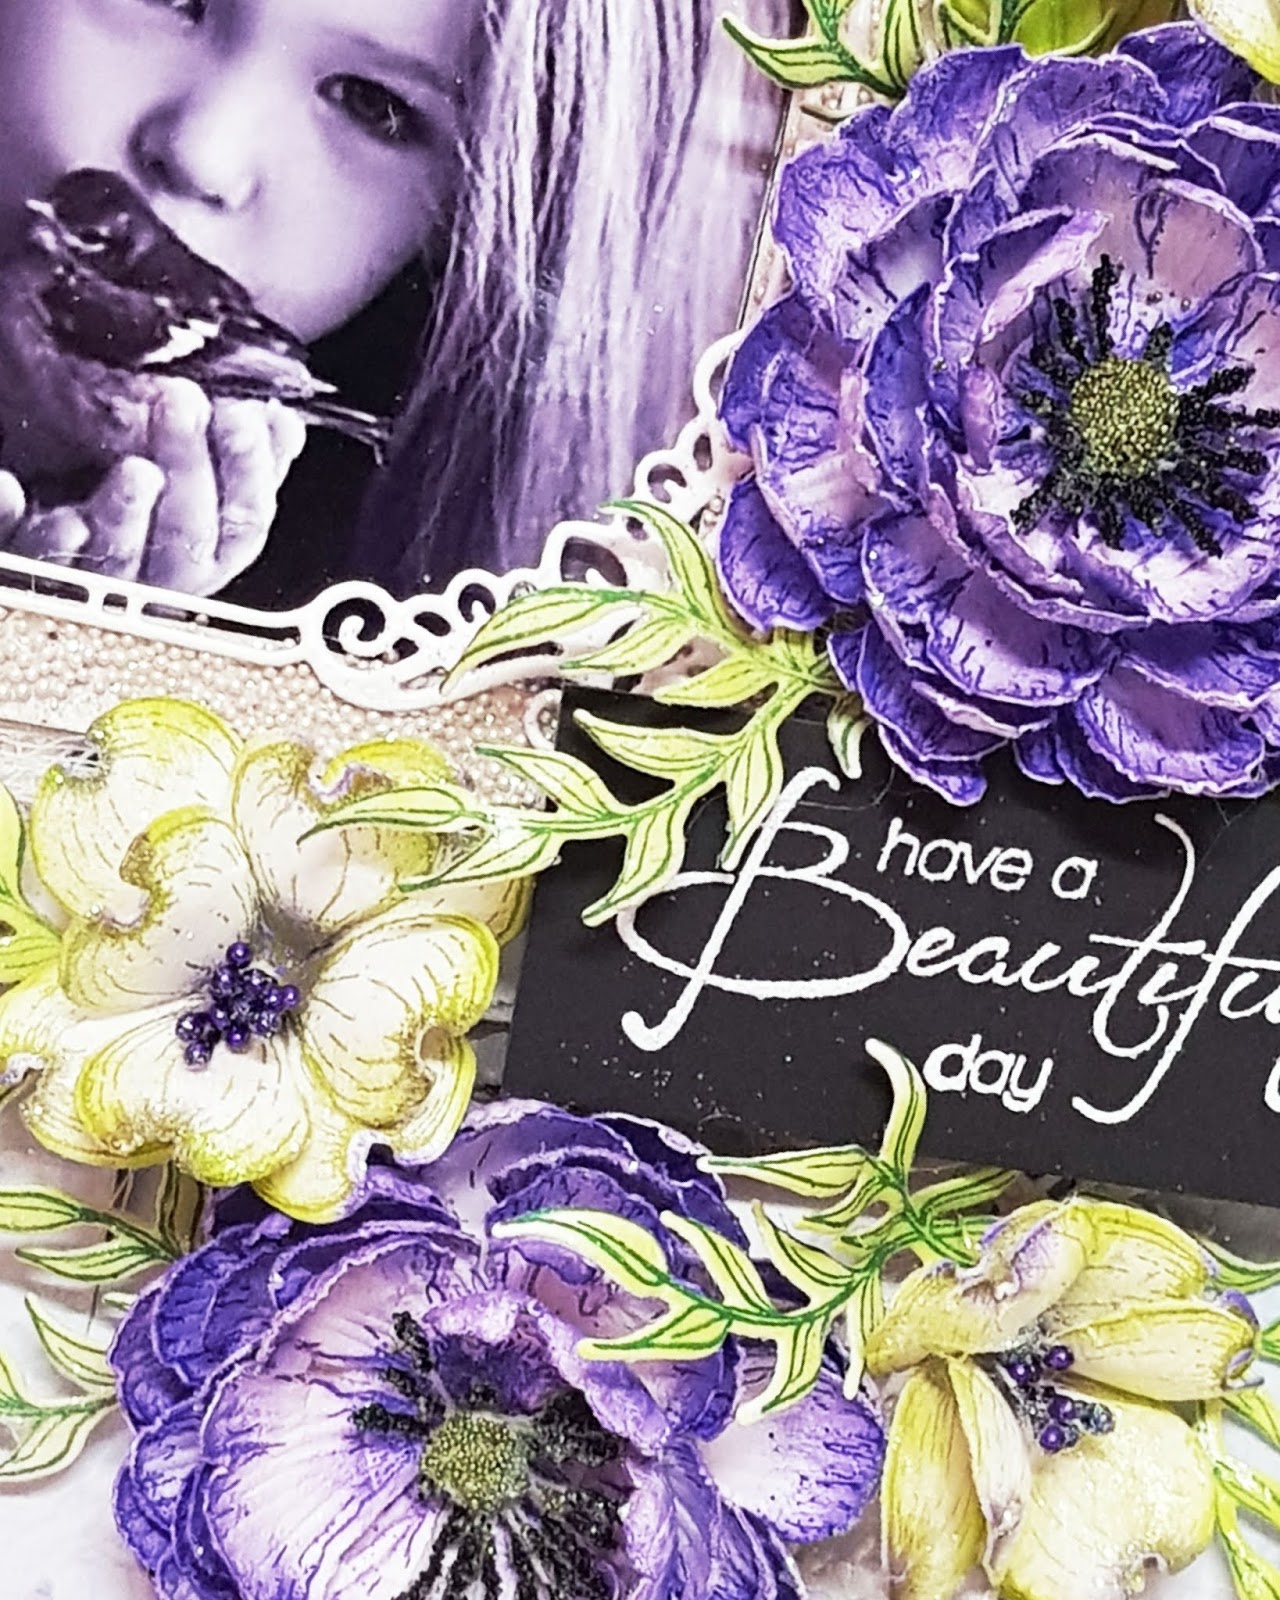
Glue the frame on the layout using hot melted glue. Stamp some sweet peony flowers on the white cardstock using deep purple archival ink pad and color with same color. Also stamp some Dog wood flower using leaf green archival and color them with leaf green same color. Cut with coordinating die.  Shape the flowers using deluxe flower shaping kit. Stamp some leaves using library green and color with leaf green archival. Arrange the flowers and leaves in desire manner and glue them using hot melted glue.
Stamp a sentiment using versamark on black chipboard and heat embossed with white embossing powder. Paste the sentiment chipboard using dimensional tape. Cut a dolly from white cardstock using decorative die.  Glue half dolly die cut on the right side as shown in the picture. Stamp a butterfly on vellum paper using versamark and heat embossed with white embossing powder. Cut with coordinating die and glue on right side. Also cut a tag from the same collection and adhere it as shown. For the finished look apply rainbow glitter using adhesive that dries clear. 

Here are the pics of layout...


Thanks for stopping by 
Hugs.....
Uma

Saturday, 26 May 2018

Mummy's little girl

Hello Crafty Peeps!!!!
Good morning......

Today I'd like to share my layout with "Organza Foam" flowers, which is recently launched by "Dadarkar Arts". You can buy this foam from here. As you all know that foam flowers are so pretty and looks so real. Organza foam is very thin and give more real look to flowers. This is available only in white color. You can apply any color over it, like Archival inks,  Pastel colours, Gelatos and many more. No need to heat this foam, You can simply twist and create amazing flowers with this. If you have any queries about the organza foam you can freely ask me.

Here is my project:


Thanks for stopping by
Regards
Uma 

Monday, 19 February 2018

Beautiful Moments layout

Hello friends!!!!!
A very good morning to all of u. .....
 Here is a layout with handmade flowers (heartfelt's classic rose) . Life is full of memories some good or some bad but some special moments in life are evergreen .


Products used:

. Blushing Rose Paper Collection (HCDP1-271)
. Classic Rose Stamp
. Classic Rose Die (HCD1-7110)
. Berry Blossoms Stamp ( HCPC-3731)
. Berry Blossoms Die (HCD1-793)
. Rain Boots And Blossoms Stamp (HCPC-3811)
. Rain Boots and Blossoms Die ( HCD1-7169)

Other products:

. White cardstock
. Archival ( vibrant fuchsia , library green , leaf green )
. Gallery oil pastel 204
. Stamens
. Floral wire
. Chipzeb sentiments
. Jute string
. Clear water droplets
. Lace trim
.Clear dry glue
. Hot glue
. Double sided foam tape
. Paper dolly
. Sparkling dust

Instructions:

Project size 12"×12"
For the base of the layout find a pattern paper from Blushing Rose paper collection. Adhered it on the thick chipboard. Find yellow pattern paper in same collection , tear the paper in wave form and adhered it on the base using double sided foam tape. Cut a card panel 6"×4" and for mating cut another card panel little bit smaller than the first. Find and cut out the 2 tags from the same collection and add burlap string to the top. Glue the card base on the left side of the layout using double sided foam tape as shown in the picture.  Mat a photo 4.5"×3" on the card panel. Add a lace trim . Adhere the tags on the right side of the photo. Stamp the flowers with Classic Rose Stamp and berry blossom stamp on the white cardstock using vibrant Russia color and cut with co-ordinating die. Color the flowers  with same colour and yellow oil pastel color. Shape the flowers without using any tools. Stamp some leaves with Classic Rose Stamp and Rain Boots and Blossom stamp using Libra green color and cut with co-ordinating dies. Color the leaves with leaf green color and slightly shape with ball tool . Twist some floral wires leaf green and made swirls. Arrange all the elements ( flowers,leaves,swirls )in desired manner. Add some glitter stamens. Glue some clear water drops using glue that dries clear. Glue a chipzeb sentiment using clear dry glue. Find and cut out the "Beautiful Moments with you" sentiment and butterfly from the same collection and glue on right side of matted photo. For the final touch add some sparkling dust on the flowers using adhesive that dries clear.

Here are some more close up pics :


Hope you like it . Would love to hear from you .
Happy crafting
Uma

Entering in
Lil patch of crafty friends challenge
Addicted to stamps challenge 
Stamping Sensations
Welcome to Crafty friends
The Crafty Addicts challenge blog 
Creative Inspiration
Stuck?! Sketches 

Thursday, 2 November 2017

Timeless Memories


Today I am here once again on my blog with this beautiful layout...
I made this layout as a inspiration post for "Element craft studio "dt call challange.


Do you know what is the heart touching story behind in this lovely layout? A story of a girl’s eternal love...When an artist makes a painting, she wants to show the inspiration behind her creation. Because of which, the creation becomes priceless forever...
Today I want to show you the inner beauty of my creation rather than writing any common tutorial...
This layout is totally about the immorality of love---In the left side of the layout, I have adhered the pieces of the paper which shows the walls of the community…
The blooming pink colour shows her heart full of love and in the left corner the clock shows the timeless memory of the picture on the clock which captured the special moment of that memory…
The picture is in black and white colour which shows that the moment may be old in terms of dates but it will remain as fresh and young as the blooming flowers around the clock forever in our memories...The butterfly shows that the colours of true love spread everywhere in the air as the butterfly flies.......
On the top right corner I put a branch with flowers which shows her beautiful present life is blooming with grace of love, the flowers on the branch are like her family…
The pink colour shows her heart is full of love for her family...She lives happily in her present life but at the same time, she treasures all the valuable moments  in the cage of her heart...She cherishes every moment of her love which won't die in her memories ever......

Really this proves that the "MEMORIES ARE TIMELESS"
Some more close ups are here.....
 
 
Would love to hear about such precious memories of yours too, please share your eternal moments with me.....
Hugsssss.........
Uma Didwania 

Best Guy Ever

Hello Everyone! Good morning.... Today is Heartfelt Wednesday and I am back with another card using "Majestic Frames" die....