Hello Crafty Folks!
Good morning..
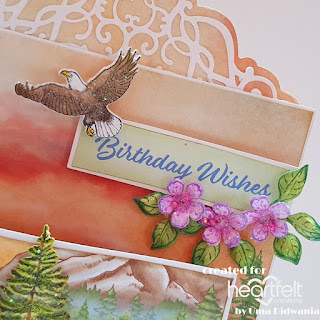
Today I'd like to share a simple and quick card. This is my inspirational post for Heartfelt Creations which I made earlier but because of some health issues I was not able to share this with you.
HC PRODUCTS USED
Tulip Time Paper Collection
3D Pansy Shaping Mold
Cheery Pansy Die
Cheery Pansy Cling Stamp Set
HCD1-764 Blazing Poppy Die
HCPC-3674 Blazing Poppy Petals Cling Stamp Set
DMCT4185 Groove Golf Tool Set
HCST1-401 Deluxe Flower Shaping Kit
HCDA2-450 Stack and Store Daubers-Pack of 30
HCS1 459 1 Assorted Pearl Stamens Small
DDC08 Designer Dries Clear Adhesive Refill
RACP632 Ranger Archival Ink Pad Buttercup
RACP524 Ranger Archival Ink Pad Vibrant Fuchsia
RACP482 Ranger Archival Ink Pad Olive
RACP436 Ranger Archival Ink Leaf Green
RACP638 Ranger Archival Ink Pad Rose Madder
PGM15015 Rajni Chawlas's Crystal Clear
Celebrate Love Sentiments Cling Stamp Set
Deluxe flower shaping paper
OTHER PRODUCTS:
Smooth white cardstock, dimensional tape, satin cord
VIDEO LINKS
INSTRUCTIONS:
Ready side fold card measures 6.5"×6.5”
To create card mat choose a paper and a piece measures 6.25”×6.25”. Distress edges with butter cup ink and adhere it on ready card base. Cut another mat from same paper measures 6”×6”. Distress edges with matching ink and adhere it on white cardstock which is 1/8 of an inch bigger from all four sides. Adhere this card mat on card using dimensional tape. Cut a round dolly from white cardstock using Rounded Eyelet Lattice die. Stamp sentiment in the middle of dolly using vibrant fuchsia ink. Glue it on card using dimensional tape.
Stamp blazing Poppy flower on deluxe flower shaping paper using vibrant fuchsia ink and cut with coordinating die. Paint flowers with vibrant fuchsia and rose Madder ink. Shape flowers using groove tool. Layer flowers and add stamens. Stamp Cheery Pansy leaves on deluxe flower shaping paper using olive green ink and cut with coordinating die. Paint leaves using leaf green archival and shape using shaping mold Arrange flowers and leaves and glue them using hot glue. For finished look apply glitter using designer clear dries adhesive.
That's all for today
Hope you enjoy...
Good morning..
Today I'd like to share a simple and quick card. This is my inspirational post for Heartfelt Creations which I made earlier but because of some health issues I was not able to share this with you.
Tulip Time Paper Collection
3D Pansy Shaping Mold
Cheery Pansy Die
Cheery Pansy Cling Stamp Set
HCD1-764 Blazing Poppy Die
HCPC-3674 Blazing Poppy Petals Cling Stamp Set
DMCT4185 Groove Golf Tool Set
HCST1-401 Deluxe Flower Shaping Kit
HCDA2-450 Stack and Store Daubers-Pack of 30
HCS1 459 1 Assorted Pearl Stamens Small
DDC08 Designer Dries Clear Adhesive Refill
RACP632 Ranger Archival Ink Pad Buttercup
RACP524 Ranger Archival Ink Pad Vibrant Fuchsia
RACP482 Ranger Archival Ink Pad Olive
RACP436 Ranger Archival Ink Leaf Green
RACP638 Ranger Archival Ink Pad Rose Madder
PGM15015 Rajni Chawlas's Crystal Clear
Celebrate Love Sentiments Cling Stamp Set
Deluxe flower shaping paper
OTHER PRODUCTS:
Smooth white cardstock, dimensional tape, satin cord
VIDEO LINKS
INSTRUCTIONS:
Ready side fold card measures 6.5"×6.5”
To create card mat choose a paper and a piece measures 6.25”×6.25”. Distress edges with butter cup ink and adhere it on ready card base. Cut another mat from same paper measures 6”×6”. Distress edges with matching ink and adhere it on white cardstock which is 1/8 of an inch bigger from all four sides. Adhere this card mat on card using dimensional tape. Cut a round dolly from white cardstock using Rounded Eyelet Lattice die. Stamp sentiment in the middle of dolly using vibrant fuchsia ink. Glue it on card using dimensional tape.
Stamp blazing Poppy flower on deluxe flower shaping paper using vibrant fuchsia ink and cut with coordinating die. Paint flowers with vibrant fuchsia and rose Madder ink. Shape flowers using groove tool. Layer flowers and add stamens. Stamp Cheery Pansy leaves on deluxe flower shaping paper using olive green ink and cut with coordinating die. Paint leaves using leaf green archival and shape using shaping mold Arrange flowers and leaves and glue them using hot glue. For finished look apply glitter using designer clear dries adhesive.
That's all for today
Hope you enjoy...


