Wednesday, 16 October 2019

Majestic Blooms

Hey Friends!

Today  I have uploaded a video tutorial of these "Majestic Blooms" paper flowers on my channel.


Supplies Used:

I Craft Creative Die
Floral Oriental Paper
Large Groove Tool
Mini Groove Tool
Rose Madder Archival Ink
Tea Rose Archival Ink
Soft Matte Gel
Micro Mini Pollens
Pastel Bead Stamens
Crystal Clear Powder
Meadow Green Cardstock
Purr-fect Posies Die
Deluxe Flower Shaping Kit

You can watch the video here๐Ÿ‘‡


Thanks for stopping by
Hugs
Uma

Birthday Easel Card

Hello friends!!

Good Morning....
Today I'd like to share a birthday easel card using "Swirly Accents" die and "Sweet Peony" flowers .


HC PRODUCTS USED:
Tulip Time Paper Collection
HCFB1 467 3d Leafy Accents Shaping Mold
HCPC 3835 Leafy Accents Cling Stamp Set
HCD1 7193 Leafy Accents Die
HCPC 3819 Small Sweet Peony Cling Stamp Set
HCPC 3820 Large Sweet Peony Cling Stamp Set
HCD1 7173 Sweet Peony Die
HCD1 7174 Large Sweet Peony Die
Special Birthday Sentiments Cling Stamp Set
DMCT4185 Groove Golf Tool Set
HCDA2-450 Stack and Store Daubers-Pack of 30
DDC08 Designer Dries Clear Adhesive Refill
RACP962 Ranger Archival Ink Pad Fern Green
RACP614 Ranger Archival Ink Pad Magenta Hue
RACP436 Ranger Archival Ink Leaf Green
HCS1 459 1 Assorted Pearl Stamens Small
HCD1-7263 Swirly Accent Spray Die

OTHER  PRODUCTS:
White cardstock  glitter, flat back pearl,

Instructions:
Ready easel card measures 6.25"×6.25”
Take white cardstock and cut a folded card using Swirly Accents Spray edge die. Also cut a single card of same size using same die. Choose 2 pattern papers from designer paper collection and cut mats according to the card. Score on half on folded card and fold it. Glue single car on it to create easel card.  Distress the edges of pattern paper using matching ink and mat on card. Cut 4 pieces of white paper using Swirly Accents Spray die. Mat them on card using clear glue dots as shown in the picture.

Stamp large sweet peony flowers and small sweet peony flowers on deluxe flower Shaping paper using magenta hue ink. Cut images with coordinating dies and sponge with same ink using stack and store daubers. Shape flowers using groove tool. Layer flowers and add stamens into center. Stamp leafy accents leaves on deluxe flower shaping paper using fern green archival and cut with coordinating dies. Sponge leaves using same ink and shape using shaping mold. Guess flowers and leaves on card using hot melted glue.

Stamp sentiment on white cardstock using magenta hue ink and cut with arrow die. Distress the edges with leaf green archival and glue it on card as shown. Glue some pearls on base card to create stopper for easel. For finished look apply glitter on flowers using designer clear dries adhesive .


Thanks for stopping by
Hugs Uma

Thursday, 10 October 2019

Realistic & Delicate Flowers

Hello Everyone

Good Morning...

Today I would like to share a video tutorial of making flowers. Flower making is stress buster for me.
In this video, I am showing, how you can create a realistic and delicate paper flower using simple techniques.


For these flowers I used Large classic petunia die from Heartfelt Creations . Check tutorial here๐Ÿ‘‡.


All the products links are in description box.

Thanks for stopping by
Hugs
Uma

Wednesday, 9 October 2019

Sailing Away

Hello Everyone!!

Good evening....

Most awaited "Sea Breeze" collection is now available for all.
Warm balmy breezes, glistening sun baked sand, and the sound of frothy waves lapping at the shoreline are the perfect assembling of elements to create a tranquil and soothing haven where a tired soul can find rest. The sights, smells, and sounds of the ocean somehow know how speak to your inner most being and conjure up feelings of fresh hope, renewed dreams, and a sense of well-being, as troubles are cast aside, drifting off to the bottom of the sea. A large, towering lighthouse stands vigilant, ready to bring those at on the water safely home while at the same time beckoning you to come for a closer look as you stroll across the gritty ground, bending low to gather tiny, opalescent sea shells as your meander along the shoreline. Enjoy the peace and tranquility that sea breezes carry as you immerse yourself in the beauty and solitude of the new Sea Breeze Collection from Heartfelt Creations! Roll up your pant legs and stroll through a captivating paper collection filled with hues of crisp ocean blues, light sandy browns, glistening corals, and stunning sunset oranges intertwined with faded yellows and fiery reds. Discover beautiful beach scenes displaying stately lighthouses, soaring seagulls, and elegant sailboats as you saunter through every page of this peaceful and calming assembling of artistically styled decorative papers. Stamp, color and die cut your very own seaside harbor retreats for all of your paper crafting creations with the wonderful assortment of cling stamp sets and coordinating dies, boasting detailed illustrations of sand engulfed fences, rocky lighthouse abodes, charming row boats, and pretty sea shells. So, shed your sandals, breathe deeply, and join us as we take in the soothing ambiance of the seaside with the breathtaking Sea Breeze Collection! Here is my first take with this collection.....


HC PRODUCTS:

HCD1-7264 Sea Breeze Harbor Die
HCD1-7265 Sand and Sunsets Die
HCD1-7266 A Day at Sea Die
HCPC-3890 Sea Breeze Harbor Cling Stamp Set
HCPC-3891 Sand and Sunsets Cling Stamp Set
HCPC-3892 A Day at Sea Cling Stamp Set
HCDP1-2107 Sea Breeze Paper Collection
HCD2-751 Cut Mat Create 2A Die
Ticket and Tags Die
DDC08 Designer Dries Clear Adhesive Refill
RACP451 Ranger Archival Ink Pad Coffee
RACP468 Ranger Archival Ink Pad Jet Black
Zig markers
HCD1-754 Eyelet Circle and Basics Small Dies

OTHER  PRODUCTS 
White cardstock,  neenah solar white cardstock, Corrugated sheet, distress ink, jute twine,

INSTRUCTIONS :
Ready to side fold card measures 8.5"×6.5"
First choose a pattern paper from designer paper collection and cut a piece measures 8.25”×6.25”. Distress the edges with distressing tool and pumice stone distress ink. Mat it on ready card base. Choose another paper from same designer collection and cut a piece measures 8”×6”. Adhere it on white cardstock which is 1/8of an inch bigger from all four sides. Punch eyelets on left side of card and add jute twine as shown. Mat it on card base. Tear a corrugated sheet and glue it on card. Cut 3 tags from the pattern paper using tickets and tag die. Tie jute twine on tag and glue on card as shown. Cut 3 rings from pattern paper using circle die, add jute twine and glue as shown in the picture.
Create a shadow box from white cardstock using Cut Mat &Create 2(A) die measures 4.75”×5.75”. Take a piece of neenah solar white cardstock measures 4.5"×5.5". Create a sea beach scene using distress ink. Mat it inside the shadow box to create window scene. Stamp light house, boat image and birds on water color paper using black archival. Paint images with zig markers and cut with coordinating dies. Glue images inside the box to complete window scene. Cut pattern paper according to the size of shadow box and cover that. Glue shadow box on card as shown.
Stamp some more images using black archival and coffee archival. Paint and cut with coordinating dies. Glue images on shadow box to embellish it. Cut a sentiment strip from same collection and mat it on white cardstock. Distress the edges with pumice stone ink and glue sentiment as shown. For finished look apply glitter on images using adhesive that dries clear.


Thanks for stopping by
Hope you like it....
Hugs
Uma

Wednesday, 2 October 2019

Happy Days

Hey Crafty Folks!

Happy Wednesday...

Here is my second card for today.


HC PRODUCTS USED:
Deluxe Flower Shaping Paper Pack 50
Tulip Time Paper Collection
HCFB1 467 3d Leafy Accents Shaping Mold
HCPC 3835 Leafy Accents Cling Stamp Set
HCD1 7193 Leafy Accents Die
HCD1 7177 Butterfly Dreams Border Die
HCPC 3823 Butterfly Dreams Border Cling Stamp Set
HCPC 3819 Small Sweet Peony Cling Stamp Set
HCD1 7173 Sweet Peony Die
3D Petite Florals Shaping Mold
Floral Fashionista Die
Floral Fashionista Cling Stamp Set
DMCT4185 Groove Golf Tool Set
HCDA2-450 Stack and Store Daubers-Pack of 30
DDC08 Designer Dries Clear Adhesive Refill
RACP436 Ranger Archival Ink Leaf Green
RACP614 Ranger Archival Ink Pad Magenta Hue
RACP475 Ranger Archival Ink Pad Library Green
RACP632 Ranger Archival Ink Pad Buttercup
RPEJ685 Embossing Powder White
HCD1-7262 Swirly Border Accents Die
HCD1-7263 Swirly Accent Spray Die
HCD1-757 Eyelet Oval and Basics Large Dies

OTHER PRODUCTS:
Vellum paper, white cardstock,  glitter, satin cord, dimensional tape

VIDEO LINKS:

INSTRUCTIONS:
Ready side fold card measures 6”×6”
First, choose a pattern paper from designer paper collection and cut a piece measures 5 7/8”×5 7/8” to create card mat. Distress the edges with matching ink and adhere it on ready card base. Choose another paper from the same designer paper collection and cut a piece measures 5.5"×5.5". Distress edges with matching ink and mat it on white cardstock which is 1/8of an inch bigger from all 4 sides. Adhere it on card base using dimensional tape.
Cut 2 base piece from pattern paper using Swirly Border die and 2 decorative piece from white cardstock. Add glitter on decorative pieces using clear adhesive. Mat it on base pieces using dimensional tape for added dimension. Glue them on center of card using dimensional tape as shown in the picture. Further, cut an oval piece from white cardstock using Eyelet Oval and basic large die. Distress with matching ink and mat it using dimensional tape.
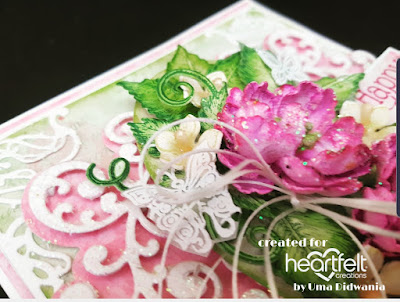
Stamp small sweet peony flower on Deluxe flower Shaping paper using magenta hue ink and leafy accents leaves using library green ink. Cut images with coordinating dies.  Paint flowers with same ink and shape using groove tool. Layer flowers and add stamen in the center. Add glitter on the flowers using clear dry glue. Sponge leaves using leaf green archival and shape using 3D Shaping mold. Stamp floral fashionista flowers using buttercup ink and cut with coordinating die.  Shape with 3D mold and add stakes in center. Arrange flowers and leaves and glue them using hot melted glue. Cut a sentiment strip from same collection and mat it on white cardstock. Add sentiment using dimensional tape. Stamp Butterfly border on vellum paper using versamark and heat emboss with white embossing powder. Cut with coordinating die.Trim some butterflies and glue them as shown.
Cut 4 corners from white cardstock using Swirly Accents Spray die. Apply glitter using clear dry adhesive.  Glue all four corners on card as shown. Tie bow with satin card and glue it on the card.


Thanks for stopping by
Hugs
Uma

Just for you

Hey Crafty Peeps!

Good morning......

Its wednesday and it's time for inspirational post with Heartfelt Creations.  Today I have a card with wild aster collection and new release dies.

HC PRODUCTS USED:
HCDP1-2106 Wild Aster Paper Collection
HCD1-7263 Swirly Accents Spray Die
HCD1-7258 Wild Aster Spray Die
HCPC-3888 Wild Aster Spray Cling Stamp Set
HCPC 3824 Fluttering Butterfly Cling Stamp Set
HCD1 7178 Fluttering Butterfly Die
HCST1-401 Deluxe Flower Shaping Kit
159723 Designer Dries Clear Adhesive
RACP468 Ranger Archival Ink Pad Jet Black
Just For You Sentiments Cling Stamp SeT
Zig markers
RACP430 Ranger Archival Ink Pad Deep Purple
RPEJ685 Embossing Powder White
HCD1-776 Eyelet Oval Die

OTHER PRODUCTS:
Vellum paper, yellow micro beads, glitter, white cardstock , water color paper

VIDEO LINKS

INSTRUCTIONS:
Ready to side fold card measures 8”×6”
To prepare card mat, first choose two pattern paper from the designer paper collection and cut pieces measures 7 7/8”×5 7/8”. Distress the edges of 1 piece using deep purple archival and mat it on ready card base. Further, take another piece and cut using Swirly Accents Spray die. Distress the edges with same ink . Mat it on white cardstock which is cut in same size. Adhere it on card base using dimensional tape as shown. Cut white cardstock using Eyelet Oval die, also cut a pattern paper using plain oval die. Mat both of them on card base. Cut 2 borders from white cardstock using Swirly Accents Spray die and glue it as shown.

Stamp 2 times floral image from Wild Aster Spray stamp on watercolor paper using black archival. Paint image with zig markers and cut with coordinating die. Glue 1 image on card as shown. Cut flowers from the second image and slightly shape them.  Add yellow micro beads on the center of flowers. Glue these flowers on 1st one to give some 3D look. Apply clear dry glue and add glitter on it. Stamp a sentiment using deep purple archival as shown.

Stamp Butterfly image 3 times on vellum paper using versamark and heat emboss with white embossing powder. Cut with coordinating die. Trim 2 butterflies and glue on card as shown.  For finished look add glitter on Butterfly using adhesive that dries clear.


Thanks for stopping by
Would love to hear from you..
Hugs
Uma

Best Guy Ever

Hello Everyone! Good morning.... Today is Heartfelt Wednesday and I am back with another card using "Majestic Frames" die....