Wednesday 27 February 2019

Fluttering Farmed Pansies

Hello Everyone

Here is another card using delicate pansy
flowers.


Products used:
HCPC-3862 Cheery Pansy Stamp
HCPC-3865 Petite Pansy frame stamp
HCPC-3824 Fluttering Butterfly Stamp
HCD1-7222 Cheery Pansy Die
HCD1-7225 Petite Pansy Frame Die
HCD1-7228 Lacy Diamond Die
HCD1-7213 Elegant Pocket Accents Die
HCD1-7178 Fluttering Butterfly Die
HCD2-7190 Frame A Card Leafy Borders die
HCFB1-473 3D Pansy Shaping Mold
HCDP1-299 Burst Of Spring Paper Collection
HCD1-776 Eyelet Oval Die
Zig Markers
Jet Black Archival

Other Products:

Smooth white cardstock, versa mark , gold heat embossing powder, gold glass glitter,  sun flower flock powder, Gamorous versafine ink pad, soft matt gel, watercolor paper, flower making paper

Video Link:
To know more how to create Pansy flowers, watch the video...
https://youtu.be/_8WJPTKIUlQ

Instructions: 

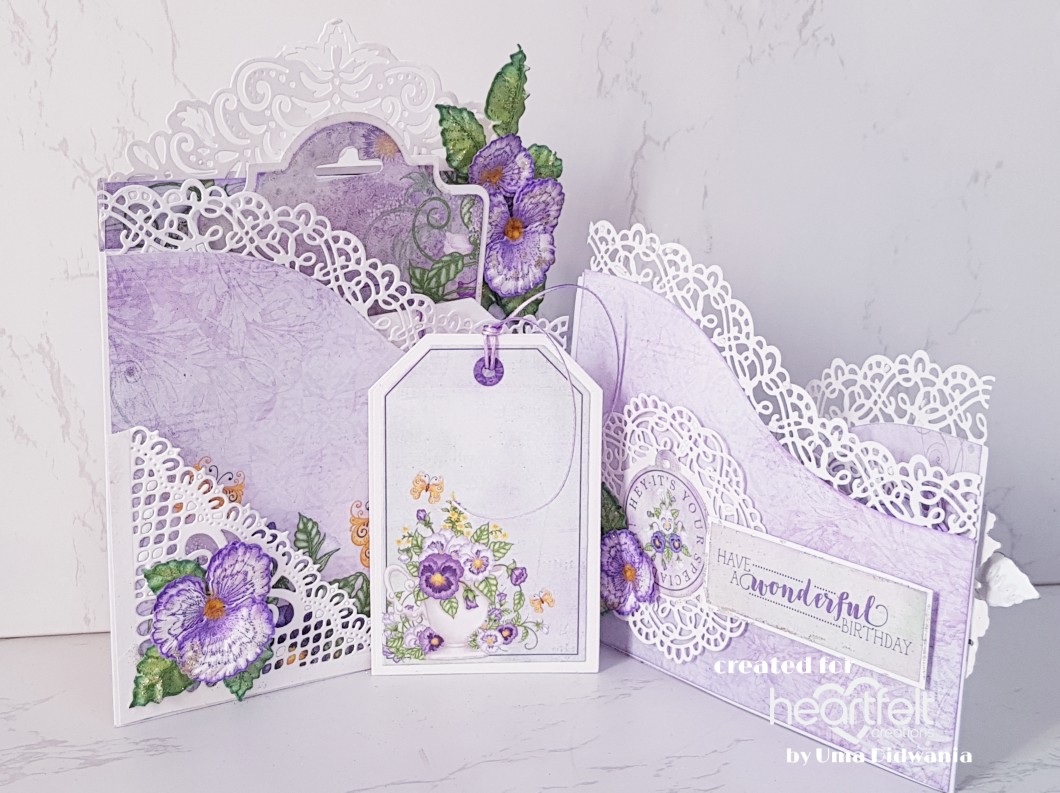
Ready top side fold card measures 8.5”×6.25”
To prepare card mats, first choose a pattern paper from the designer paper collection and cut piece measuring 8.25”× 6”. Distress the edges of the pattern paper using same color ink. Mat it on the ready card base. Further choose another pattern paper from the same collection and cut a piece measuring  8”×5.75”. Mat it also on the card base. Cut 4 borders from white cardstock using frame a card Leafy border die and 4 base pieces from pattern paper using same die. Glue white borders on the base borders and mat them diagonally on the card. Further cut 2 border from the white card stock using elegant pockets accents die and 2 base borders from the pattern paper.  Also cut an oval piece from pattern paper using eyelet oval die. Arrang the borders on the oval die cut. Glue it on the center of the card using dimensional tape as shown in the picture.

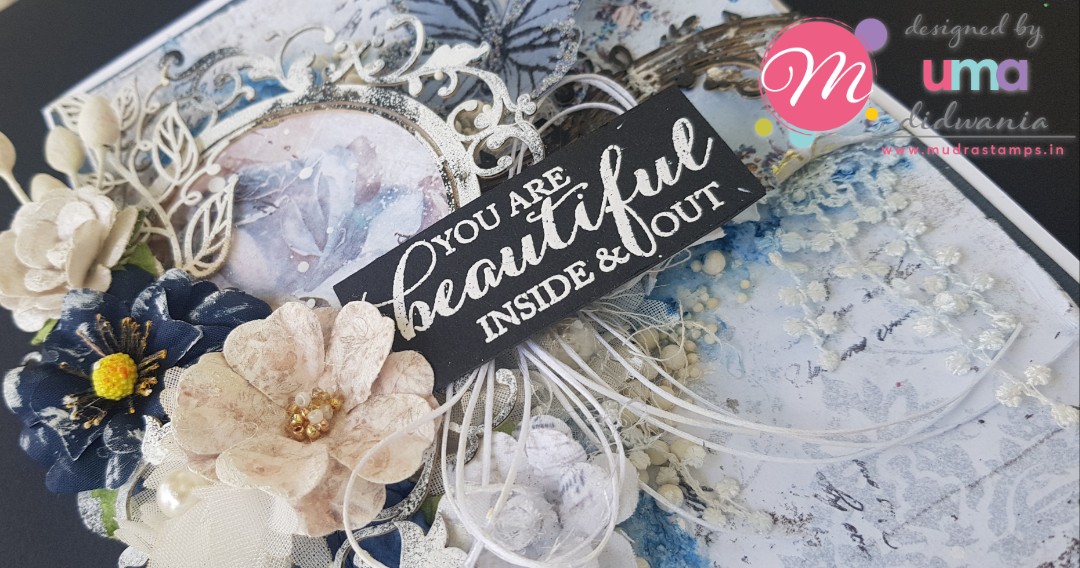
Cut a piece of white cardstock using Lacy Diamond die and arrange it on the center of the card using dimensional tape. Stamp a pansy frame on water color  paper using black archival. Paint the image using zig markers and cut with coordinating die. Stamp some small pansy flowers using glamorous ink on flower making paper and cut with coordinating die. Paint flowers using same ink and shape them in shaping mold. Arrange flowers and dust flock powder in the center of the flowers. Glue frame on card and glue flowers on the frame as shown in the picture.

Stamp a butterfly using versamark on the pattern paper and heat embossed it with gold embossing powder. Cut butterfly using coordinating die. Apply soft matt gel on it and add gold glass glitter on it. Cut a sentiment strip from the designer paper collection and mat it on the white cardstock. Glue it on center of card using dimensional tape . Glue the butterfly on the right side of the card as shown in the picture.

Thanks for stopping by
Hugs
Uma

Sunday 24 February 2019

All time Card

Hello Friends!!
Today I have a card to share with you which I created for Mudracraftstamp Blog using their amazingly beautiful chipzeb and stamps.  To check my post and step by step instructions click here


Thanks for stopping by
Hope you like it
Regards
Uma

Wednesday 20 February 2019

Happiness Always

Hello Crafty Folks!!
Good morning..

Today I have another card with "Burst of Spring" collection.


PRODUCTS USED:
HCD1-7211 Decorative Pocket Accents Die
HCD1-7202 Album Tags and Accents Die
HCD2-7191 Intricate Swrils Frames die
HCD1-7179 Butterfly Kisses Decorative Die
HCD1-7228 Lacy Diamond Die
HCD1-7225 Petite Pansy Frame Die
HCPC-3865 Petite Pansy Frame Cling Stamp Set  White Embossing powder
Zig markers
Black Archival

OTHER PRODUCTS USED:
Vellum paper, Versamark,  Smooth white cardstock, watercolor paper, Fossilized Amber distress oxide, Wilted voilet distress oxide

VIDEO LINKS:
To more about "Burst of Spring collection watch Emma's video
https://youtu.be/_8WJPTKIUlQ

INSTRUCTIONS:
Ready upside fold card measures 5”×7”
To prepare card mat, first choose a pattern paper from the designer paper collection and cut a piece measuring 4 7/8” × 6 7/8”. Cut a border from the white cardstock using decorative pocket accents die. Glue the border on the top side of the ready card base. Layer the card mat on the card base. Cut a frame from the white card stock using Intricate Swrils Frames die. Cut a piece of pattern paper and mat on the frame. Layer this frame on the card base using dimensional tape as shown in picture. Cut 2 corners from the white cardstock using album tags and accents die. Glue corners on two side od the card.

Stamp pansy frame on water color paper using black archival. Paint the frame using zig markers and cut with coordinating die. Cut white cardstock using Lacy Diamond die. Glue pansy frame on lacy diamond. Glue frame on the center of the card using dimensional tape as shown in picture.

Stamp butterfly on vellum paper using versamark and heat embossed it with white embossing powder. Cut with coordinating die.  Paint the butterfly with distress oxide. I cut 2 butterflies here. Glue the both butterflies from the center using glue dots. Glue the butterfly on the left side of the card as shown in the picture. Cut a sentiment ticket from the same collection and mat it on the white cardstock. Glue sentiment on the right side of the card.

Foldout Pansies

Hey Everyone,
Good morning...

Before anything,  I must be apologise for late posting.  I was facing trouble with my blogger account.  Yesterday It was sought out .  Here is my first take with "Burst of Spring " collection.  I create a foldout card. This is also my first take with fold out card.


PRODUCTS USED:
HCPC- 3863 Burst of Spring Stamp
HCPC- 3864 Delicate Pansy Spray Stamp
HCPC- 3862 Cheery Pansy Stamp
HCD1-7222 Cheery Pansy Die
HCD1-7223 Burst of spring Die
HCD1-7224 Delicate Pansy Spray Die
HCDP1-299 Burst of Spring Paper Collection
HCFB1-473 3d Psnsy Shaping Mold
HCD1-7226 Diamond Basics Die
HCD1-7227 Eyelet Diamond Die
HCD1-7228 Lacy Diamond Die
HCCF1-445-2  6”×6” Foldout Cards-White
HCD1-7211 Decorative Pocket Accents Die
HCD1-7213 Elegant Pocket Accents Die
HCD1-7214 Ornate Pocket Accents Die
HCD1-7201 Ticket And Tags Die
HCD1-7202 Album Tags and Accents Die
HCD1-7203 Ornamental Tags Die
HCD1-7179 Butterfly Kisses Decorative Die
HCD1-7120 Fleur Border Basics Die
Deep Purple Archival
Majestic Violet Archival
Black Archival
Zig Markers
Emerald Green Archival
Leaf Green Archival


OTHER PRODUCTS USED:
White cardstock,  satin cord, flower making paper, water color paper,  Sunflower flock powder


VIDEO LINKS:
To know how to create Pansy flowers, watch Emma's video
https://youtu.be/_8WJPTKIUlQ

INSTRUCTIONS:
Ready foldout card measures 7.5”× 6.5”
First take ready foldout card base and cut pattern paper from the designer paper collection and according to size of card. Cut 3 borders from the white card stock using fleur border basics die. Glue these borders on the edges of the card. Further, cut another border from the white card stock using decorative pocket accents die. Glue it on the edge of the last layer of the card. Mat the card panels on all the layers of the card.

To decorate  the front of the card first stamp a pansy bouquet from the burst of spring stamp set on water color paper using black archival. Paint the image using zig markers and cut with coordinating die. Arrange the image on the right side of the card using dimensional tape as shown in the picture. Cut a decorative tag from white cardstock using ornamental tag die.  Cut a sentiment strip from the designer paper collection. Mat sentiment on decorative tag and glue it on the card using dimensional tape.

To decorate first fold cut a dolly from white cardstock using butterfly kisses decorative die and a tag from the designer paper collection. Glue the dolly and tag on the left corner of the card. Cut white cardstock and pattern paper using diamond dies and mat them on the 3rd part of the card . cut a tag from the designer paper collection and mat it on the white cardstock. Glue the tag on the card. Stamp a delicate pansy spray on water color paper using black archival and paint with zig markers. Cut the images with coordinating die and glue it on the left side of the card. Cut a sentiment strip from the designer paper collection and mat it on white cardstock  Glue the sentiment strip on the card.

To decorate second fold, cut decorative piece from the white cardstock using ornate pocket dies. Glue it on the card and create pockets as shown in the picture. Cut tags from the designer paper collection  using dies and mat them on white cardstock.  Arrange tags in the pockets.  Stamp a bouquet stamp from the burst of spring stamp on water color paper using black archival. Paint the image using zig markers and cut with coordinating die. Glue the image on the pocket.

To decorate back side fold , create a pocket using ornate pocket dies and arrange a tag in it. Glue a dolly from butterfly kisses decorative die and a sentiment strip. Once satisfied with arrangements of all elements, stamp some cheery pansy flower on flower making paper using deep purple archival and cut with coordinating die. Paint the flowers using sunflower yellow ink and majestic violet ink. Stamp leaves using emerald green archival and cut with coordinating die. Paint the leaves using leaf green archival and emerald green.  Shape flowers and leaves using flower shaping mold. Arrange the flowers and add flock powder in the center. Glue flowers and on the card as shown in the picture. For the finished look apply glitter on the flowers using adhesive that dries clear.

Warm Regards
Uma

Tulip All the way

Hello Everyone!!!
Good morning.........

Sorry for late posting , There was some problems with my blog. That's why I am not able to post here. But now its clear and here is my post with tulip collection.


PRODUCTS USED:
Black Archival
Buttercup Archival
Olive Green Archival
HCD1-7218 Tulip Time Die
HCD1-7162 Eyelet Hearts Die
HCPC- 3858 Tulip Time Stamp
HCPC- 3845 Just For You Sentiment Stamp
HCFB1-472 Tulip Shaping Mold

OTHER PRODUCTS:
Cane wood tricycle, white satin ribbon, Green moss, chop stick, Smooth white cardstock, Flower making paper

VIDEO LINKS:
To learn more how to create tulip flowers, watch Emma's video
https://youtu.be/rfYMxeNBmJk

INSTRUCTIONS:
To create flower stamp tulip flowers on flower making paper using buttercup archival.  Paint the flowers using same ink and cut with coordinating die. Shape the flowers using 3d shaping mold. Stamp tulip leaves using olive green ink and cut with coordinating die. Shape leaves using ball tool.  Arrange the flowers and apply glitter using adhesive that dries clear. Further cut 2 hearts from the white cardstock using eyelet hearts die. Join both hearts cutouts as shown in the picture . Cut 4-5 heart frames using 2 heart dies. Cut and glue all pieces to create frame. Glue a photo inside the frame. Glue a chopstick on the backside of the frame.

Take cane tricycle and filled with green moss. Arrange and glue all the flowers and heart frame in the tricycle. Take a satin ribbon and tie on it. Further, take a heart cutout and stamp a sentiment using black archival. Glue sentiment on the handle of the tricycle.

Hope you like it.
Regards
Uma

Saturday 2 February 2019

Eternal Love

Hello Friends!!

Today I'd like to share a Valentine day card as a Guest Designer of Dadarkar Arts. My term was over in dec 2018. Still they send a huge box of goodies from their newly launched products . The products are so good and I can't hold my hand to work on it. Aditi Dadarkar (owner of Dadarkar Arts) is so generous. She send goodies to me without any expectations. Isn't it great? I am so thankful to Aditi who always believe on me.
Did you check Dadarkar Arts new release??  You can check that here.

Here is my card using "My Love Collection".


Products used:
My Love double sided paper pack
My Love self adhesive chipboard
White Super Fine embossing powder 
Glitter Spray by Get Inspired 
Be Mine chipboard 
Bright White Premium Cardstock
Opaque texture paste

Instructions:
Ready side fold card measures 9.25"×5.5" .
Take a piece of smooth white cardstock measures 11"×9.25". Score on 5.5" and fold to create a cardbase. Choose a pattern paper from the designer paper collection and cut a piece measursing  5"×9" and glue it on ready cardbase. Also glue some cheese cloth. Choose another pattern paper from the same collection and cut a piece measursing 8"×4". Apply opaque texture paste using prima's stencil. Apply fairy dust on texture paste and dry it. Glue it on the cardbase using dimensional tape for added dimensions.
Take a mdf frame,  apply versamark and heat embossed it with smooth white embossing powder. Glue frame on the card using dimensional tape as shown in the picture. Fussy cut some flowers and images from the same collection and arrange them on card using dimensional tape. Tie a bow using satin white cord and glue it on the card. Glue  sentiment and angel chipboard . For the finished look add some pearl dots.


Hope You Like
Hugs

Friday 1 February 2019

Altered Flower Vase

Hello Everyone!

I am here on the very first day of the month with our very first challenge of "Mixed Media Academy". It's a mixed media challenge with "Anything Goes" theme. Yes, that means you can create anything using mixed media techniques and stand for a chance to win exciting prize from aur fabulous sponsor. It can be card, tag, layout or any altered art. You can check all the details of challenge here. As a inspirational post, I altered a flower vase. 

Here is the list of products I used:

Heavy White Gesso (finnabair)
Platinum Crackle Paste (finnabair)
Prima Flowers
Air Dry Clay (Dadarkar Arts)
Prima re-design molds
Mini Art Stones (finnabair)
Medium Art Stones (finnabair)
Gold Glass Glitter (finnabair)
Mini micro pearls 
Chipzeb (Mudra Craft Stamps)
White Cord
Script Stencil 
Opal Magic Wax - Vintage silk
Opal Magic Wax - Aged Brass
Artisan Powder -  Mesdames Merlot


Thanks for stopping by
Hugs
Uma

Best Guy Ever

Hello Everyone! Good morning.... Today is Heartfelt Wednesday and I am back with another card using "Majestic Frames" die....