Showing posts with label handmade flower. Show all posts

Wednesday, 6 May 2020

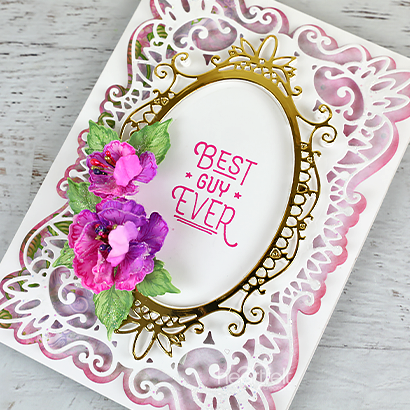
Best Guy Ever

Hello Everyone!
Good morning....

Today is Heartfelt Wednesday and I am back with another card using "Majestic Frames" die. I created a simple and elegant card using Oakberry flowers. If you don't have much time and want to creajte a card in half an hour than it's perfect for you. 


Other Products: Smooth White Cardstock
For more ideas on creating with the 5 x 7 Decorative Frame Dies, watch the tutorial at https://youtu.be/qdBFA5VpmSo.
For more tips on creating with the Oakberry Lane collection, watch the tutorial at https://youtu.be/HirfUN8NEYY.
Instructions: First cut a piece of designer paper using base die from Royal Elegance Frames die. Distress edges with matching ink and adhere it on ready card base. Cut a piece of decorative frame from white cardstock and adhere it on card using foam dots. Cut 2 Oval decorative frames, 1 from luxe gold cardstock and one from white cardstock. Stamp sentiment on white cardstock frame using vibrant fuchsia ink and glue it on card. Further, adhere gold frame on card as shown using foam dot.
For flowers, stamp Oakberry Blossom on deluxe flower shaping paper using vibrant fuchsia ink and leaves using bamboo leaves ink. Cut with coordinating dies. Paint flowers with vibrant fuchsia and Majestic Violet ink and leaves using bamboo leaves ink. Shape flowers and leaves using flower shaping mold. Pierce the shaped flowers using piercing tool from the center and add stamens. For 1 flower I use 4 layers. Arrange flowers and leaves using hot melted glue as shown in the picture. For finished look apply glitter using designer dries clear adhesive. 
Thanks so much for stopping by today!!  I’ll be back soon with more inspiration!!
Hugs 
Uma

Wednesday, 22 April 2020

One In A Million Frame

Hello friends!

Happy Heartfelt Wednesday 

Now wait is over and Majestic Frames Die collection is launched worldwide. Intricate, elegant and..... majestic. The Majestic Frames Die collection is perfect for cardmaking, Scrapbooking or all kinds of projects. You can create elegant cards in very less time. Here is my first take using these beautiful dies.....


Other Products: Smooth white cardstock, Flat Back Pearl, Hot Glue Gun
For more ideas on creating with the 5 x 7 Decorative Dies, watch the tutorial at https://youtu.be/qdBFA5VpmSo.
For more tips on creating with the Oakberry Lane collection, watch the tutorial at https://youtu.be/HirfUN8NEYY.
Instructions: Card size is 5 x 7”. First cut a piece of designer paper using base die from Decorative Circle Frames die. Distress edges with matching ink and adhere it on ready card base. Cut a piece of decorative frame from white cardstock and Luxe Gold cardstock. Glue both together and adhere on card using foam dots. For extra dimension, I use 2 dots. Cut 2 circles, 1 from Luxe Gold Cardstock and one from white cardstock. Stamp sentiment on white circle using vibrant fuchsia ink. Adhere it on card as shown using foam dot. Add pearls around the circle.
For flowers, stamp Oakberry Blossoms on deluxe flower shaping paper using vibrant fuchsia ink and leaves using bamboo leaves ink. Cut with coordinating dies. Paint flowers with vibrant fuchsia and Majestic Violet ink and leaves using bamboo leaves ink. Shape flowers and leaves using flower shaping mold. Pierce the shaped flowers using piercing tool from the center and add stamens. For 1 flower I use 4 layers. Arrange flowers and leaves using hot melted glue and add large gold stamens to the arrangement. For finished look, apply glitter using designer dries adhesive.
Diecut the tags from the paper collection, add ribbon and adhere to card.


Thanks for stopping by 
Hugs 
Uma

Wednesday, 15 January 2020

Interlocking Anniversary Card

Hello Crafty Folks!

Happy Wednesday....
It's inspirational Wednesday and here I am back with my another creation. This time I create a interlocking card for anniversary. I used tulip flowers by Heartfelt Creation and leaves from Cherry Pansy .


HC PRODUCTS USED :
HCCB1-483  6” × 6” Interlocking Card – White
HCPC- 3858 Tulip Time Stamp
Tulip Time Die
HCPC-3862 Cheery Pansy Stamp
3D Pansy Shaping Mold
Cheery Pansy Die
Window Scene Paper Collection
Wild Aster Paper Collection
Celebrate Love Sentiments Cling Stamp Set
DMCT4185 Groove Golf Tool Set
HCST1-401 Deluxe Flower Shaping Kit
HCDA2-450 Stack and Store Daubers-Pack of 30
HCS1 459 4 Rock Candy Stamens Small
DDC08 Designer Dries Clear Adhesive Refill
RACP985 Ranger Archival Ink Cactus Flower
RACP436 Ranger Archival Ink Leaf Green
RACP494 Ranger Archival Ink Pad Majestic Violet
RACP475 Ranger Archival Ink Pad Library Green
PGM15015 Rajni Chawlas's Crystal Clear
HCPC- 3889  Wild Aster Scroll & Cluster Stamp
HCD1-7259 Wild Aster Scroll & Cluster Die
HCD1-7154 Eyelet Circle & Basics Small  die
HCD1-7201 Ticket and Tags Die
HCD1-7271 Rounded Window Frame Die
HCD1-7272 Rounded Sunlight Window Die
HCD1-7273 Rounded Eyelet Window Die   
HCD1-7274 Rounded Lattice Window Die 
HCDP1-2109 Window Scenes Paper Collection
Deluxe Flower Shaping Paper 2019

OTHER  PRODUCTS:
Smooth white cardstock, satin cord, dimensional tape, magnets,   flower center prills

VIDEO LINKS

INSTRUCTIONS:
Ready card measures 6”×6”
First take a white interlocking card and cut inside card mat from designer paper collection measures 5.7/8” × 5.7/8”. Distress edges with cactus flower ink and adhere it to ready card base. Cut 4 circles using Rounded window frame die. Cut all circles into half, distress edges with cactus flower ink and mat them on card flaps. Before mating I glued 2 magnets on 2 flap on outside. Cut Half circle decorative die cuts from white cardstock using dies. Distress die cuts with cactus  flower ink and mat them as shown. Cut 2 circle frame from white cardstock using Eyelet Circle & Basics Small die. Glue both inside the card to make a window scene.
Stamp image from Wild Aster Scroll & Cluster stamp on white cardstock using cactus flower ink and library green ink and cut with coordinating die. Paint image with cactus flower ink and leaf green ink. Slightly emboss flowers and add flower center pearls. Glue it on circle frame inside the card. Cut a strip from white cardstock using ticket and tags die. Stamp sentiment from celebrating love sentiment stamp on strip using cactus flower ink.  Trim strip from one side and glue it inside the card using dimensional tape as shown in the picture. Add crystal clear on flowers and circle frame using glue that dries clear .
Cut half round diecuts from white cardstock using dies. Distress them with cactus flower ink and adhere it on all flaps as shown.  To create magnetic dolly closer, first cut a circle from white cardstock using largest die from Eyelet circle & Basics small die. Glue magnets on it. Cut a dolly from white cardstock using die and adhere it on magnet circle using dimensional tape. Cut a round piece from designer paper using Eyelet circle & Basics small die. Mat it on center of dolly. Further, cut a small dolly from white cardstock using die and mat it on big dolly using dimensional tape. Cut a circle from designer paper and mat on center of small dolly. Cut a white cardstock using same circle die, stamp sentiment from celebrating love sentiment using cactus flower ink and trim it. Mat it on center of small dolly using dimensional tale as shown.
For Flowers, stamp tulip flowers using cactus flower ink on deluxe flower shaping paper and cut with coordinating die. Sponge flowers using majestic Violet ink and cactus flower ink. Shape flowers using groove tool and layer it. I use 3 layers for one flower .Add Rock Candy stamens small to the center of flowers. Stamp Cheery Pansy leaves using library green ink on deluxe flowers shaping paper.Cut with coordinating die and paint with leaf green archival. Shape leaves using shaping mold.  Glue flowers and leaves on card using hot melted glue. Tie a bow using satin cord and glue it as shown. For finished look apply crystal clear on flowers using glue that dries clear


Wednesday, 8 January 2020

Step Into My Garden

Hello Crafty Folks!

Happy Wednesday,

Here is one more card using Cottage Garden Collection


HC PRODUCTS USED:
HCD1-7278 Cottage Garden Hydrangea Die
HCD1-7279 Fresh Cut Hydrangea Die
HCPC-3900 Cottage Garden Hydrangea Cling Stamp Set
HCPC-3901 Fresh Cut Hydrangea Cling Stamp Set
HCDP1-2111 Cottage Garden Paper Collection
HCFB1-489 3D Hydrangea Shaping Mold
PGM15015 Rajni Chawlas's Crystal Clear
RACP454 Ranger Archival Ink Pad Manganese Blue
RACP614 Ranger Archival Ink Pad Magenta Hue
RACP436 Ranger Archival Ink Leaf Green
RACP482 Ranger Archival Ink Pad Olive
RACP468 Ranger Archival Ink Pad Jet Black
Zig markers
DDC08 Designer Dries Clear Adhesive Refill
HCS1 460 Bridal Bouquet Stamens Small
HCDA2-450 Stack and Store Daubers-Pack of 30
HCFB1-462 3D Rose Shaping Mold
Deluxe Flower Shaping Paper Pack of 50 - White
HCD1-7110 Classic Rose Die
HCPC-3752 Classic Rose Cling Stamp Set
Fanci-Fold Pocket & Accents Die
Petite Pocket Accents Die

OTHER PRODUCTS :
White cardstock, watercolor paper, dimensional tape, satin cord, organza ribbon, thermocol dome(1”) ,

VIDEO LINKS
For more tips on creating with the Cottage Garden Collection watch the tutorial at https://youtu.be/faBoB2s49RI.

INSTRUCTION :
Ready top side fold card measures 8.5"×6.5"
First cut a card mat from designer  paper collection measures 8.25”×6.25” and mat it on ready card base. Cut a designer paper measures 7”×5” to create window scene. Further, cut another mat from same collection measures 8”×6”. Adhere it on white cardstock which is 1/8 of an inch bigger from all four sides. Cut a window using Petite pocket Accents die Mat it on card using dimensional tape. Cut 2 designer borders from white cardstock using Petite Pocket Accents die and glue it on window as shown in the picture.

Stamp hydrangea flower on deluxe flower shaping paper using manganese blue ink Cut with coordinating die.  Paint flowers using manganese blue and magenta hue ink . Shape with shaping mold.  Stamp classic rose leaves using olive green archival on deluxe flower shaping paper and cut with coordinating die. Pierce the center and add stamens. Paint leaves using leaf green archival and olive green archival. Shape leaves using shaping mold. Glue flowers on dome shape thermocol . Create 2 hydrangea like this. Arrange leaves and hydrangea flower in lower side of card as shown in the picture. Cut 2 corner from white cardstock, trim corner die cuts and glue on card as shown.

Stamp bird stamp on water color paper and paint with zig markers. Stamp 2 times. Cut with coordinating die. Arrange image on top side of window using dimensional tape as shown. Add few hydrangea flowers on it.  Cut a sentiment strip from designer paper collection and mat it on white cardstock.  Tie bow using orange ribbon and satin cord. Glue bow and sentiment strip. For finished look apply frosting powder using designer clear dries adhesive.


Thanks for stopping by
Hugs
Uma

Wishful Hydrangea

Hello Everyone!

Happy Wednesday

Today, is the debuting day of "Cottage Garden" collection.  Here is my first take using this beautiful collection.


PRODUCTS USED:
HCDP1-7278 Cottage Garden Hydrangea Die
HCPC-3900 Cottage Garden Hydrangea Cling Stamp Set
HCDP1-2111 Cottage Garden Paper Collection
HCFB1-489 3D Hydrangea Shaping Mold
RACP482 Ranger Archival Ink Pad Olive
DDC08 Designer Dries Clear Adhesive Refill
352854 Metal Tip for Adhesive Bottles
PGM15016 Rajni Chawlas's Frosting Powder
HCDA2-450 Stack and Store Daubers-Pack of 30
HCD1-7271 Rounded Window Frame Die
Elegant Pocket Accents Die
HCD1-755 Circle Basics Large Dies
Leaf Green Archival
Aquarium Archival
Buttercup Archival

OTHER  PRODUCTS :
White cardstock, half cut pearl, hot melted glue

VIDEO LINKS
For more tips on creating with the Cottage Garden Collection watch the tutorial at https://youtu.be/faBoB2s49RI.

INSTRUCTIONS:
Ready tent fold card measures 8”×6”
First choose a card mat from designer paper collection and cut a piece measures 7 7/8”×5 7/8” . Adhere it on ready card base. Further  choose another paper from same designer paper collection and cut a piece measures 5 7/8” × 7.5" .Mat it on white cardstock  Cut 2 edges from long side using Elegant pocket Accent die. Adhere it on card using dimensional tape.  Cut 2 border from white cardstock using Elegant Pocket Accent die and glue them on both edges.  Now cut a decorative dolly die cut from white cardstock using Rounded Window Frame die. Mat it on center of card using dimensional tape. Cut a circle piece from designer paper collection using largest die from Circle Basics & Large die. Mat ir on decorative dolly.
Stamp big hydrangea flower on white cardstock using leaf green archival and cut with coordinating die.  Paint leaves using leaf green archival and add more shading using online green archival.  Stamp small hydrangea flowers on deluxe flower shaping paper using aquarium ink and cut with coordinating die. Paint flowers using Buttercup ink and aquarium ink. Shape flowers using 3d shaping mold. Glue flowers on big hydrangea flower Glue this flower on card as shown in the picture.  Cut  a sentiment from designer paper collection and mat it on white cardstock. Adhere sentiment on card using dimensional tape. For finished look apply glitter on flowers and add some half cut Pearl.


Thanks for stopping by
Hugs
Uma

Saturday, 14 December 2019

Special Day Poppy

Hello Crafty Folks!
Good morning..

Today I'd like to share a simple and quick card.  This is my inspirational post for Heartfelt Creations which I made earlier but because of some health issues I was not able to share this with you.


HC PRODUCTS USED
Tulip Time Paper Collection
3D Pansy Shaping Mold
Cheery Pansy Die
Cheery Pansy Cling Stamp Set
HCD1-764 Blazing Poppy Die
HCPC-3674 Blazing Poppy Petals Cling Stamp Set
DMCT4185 Groove Golf Tool Set
HCST1-401 Deluxe Flower Shaping Kit
HCDA2-450 Stack and Store Daubers-Pack of 30
HCS1 459 1 Assorted Pearl Stamens Small
DDC08 Designer Dries Clear Adhesive Refill
RACP632 Ranger Archival Ink Pad Buttercup
RACP524 Ranger Archival Ink Pad Vibrant Fuchsia
RACP482 Ranger Archival Ink Pad Olive
RACP436 Ranger Archival Ink Leaf Green
RACP638 Ranger Archival Ink Pad Rose Madder
PGM15015 Rajni Chawlas's Crystal Clear
Celebrate Love Sentiments Cling Stamp Set
Deluxe flower shaping paper

OTHER PRODUCTS:
Smooth white cardstock, dimensional tape, satin cord

VIDEO LINKS

INSTRUCTIONS:
Ready side fold card measures 6.5"×6.5”
To create card mat choose a paper and a piece measures 6.25”×6.25”. Distress edges with butter cup ink and adhere it on ready card base. Cut another mat from same paper measures 6”×6”. Distress edges with matching ink and adhere it on white cardstock which is 1/8 of an inch bigger from all four sides. Adhere this card mat on card using dimensional tape.  Cut a round dolly from white cardstock using Rounded  Eyelet Lattice die.  Stamp sentiment in the middle of dolly using vibrant fuchsia ink. Glue it on card using dimensional tape.

Stamp blazing Poppy flower on deluxe flower shaping paper using vibrant fuchsia ink and cut with coordinating die. Paint flowers with vibrant fuchsia and rose Madder ink. Shape flowers using groove tool. Layer flowers and add stamens.  Stamp Cheery Pansy leaves on deluxe flower shaping paper using olive green ink and cut with coordinating die. Paint leaves using leaf green archival and shape using shaping mold  Arrange flowers and leaves and glue them using hot glue.  For finished look apply glitter using designer clear dries adhesive.


That's all for today
Hope you enjoy...

Wednesday, 11 December 2019

A Gift From The Heart

Hello Everyone!!

Happy Wednesday....

Today is the debuting day of Calla lily collection by Heartfelt Creations. Here is my inspiration of this week.


HC PRODUCTS USED:
HCD1-7275 Calla Lily Die
HCD1-7276 Feathery Swan Die
HCPC-3897 Calla Lily Cling Stamp Set
HCPC-3898 Feathery Swan Cling Stamp Set
HCDP1-2110 Calla Lily Paper Collection
HCFB1-484 3D Calla Lily Shaping Mold
HCS1-485 Pastel Pollen Stamens – Medium
RACP614 Ranger Archival Ink Pad Magenta Hue
RACP482 Ranger Archival Ink Pad Olive
TSMP704 Memento Dye Ink Pad New Sprout
Swirly Accents Spray Die
HCD1-7162 Eyelet Hearts Die
Zig markers
Black Archival

OTHER PRODUCTS:
Smooth white cardstock, water color paper, hot melted glue, dimensional tape

VIDEO LINKS:
For more tips on creating with Calla lily Collection watch the tutorial at https://youtu.be/VWKPoXjpiug

INSTRUCTIONS:
Ready side fold card measures 6.5"×7.5"
Cut a card mat from designer paper collection measures 6.25”×7.25”. Cut small hearts using Eyelet Hearts die into card mat. Distress the edges with matching ink. Adhere it on ready card base. Choose another paper from same designer paper collection measures 6”×7.25”.Adhere it on same size white cardstock. Cut one edge using Swirly Accents Spray die, also cut a heart using Eyelet Hearts die. Adhere it on card using dimensional tape for added dimension. Cut border from white cardstock using Swirly Accents Spray die and glue it as shown in the picture. Further, cut a heart shaped frame from white cardstock using Eyelet Hearts die. Distress edges with magenta Hue ink and add crystal clear using clear dry adhesive. Glue frame on card.

Stamp swan image on watercolor paper using black archival and cut with coordinating die.  Paint image with zig markers.  Glue image using dimensional tape as shown in the picture.  Cut a sentiment strip from same designer paper collection and mat it on white cardstock. Glue sentiment on top of card as shown.

Stamp calls lily flowers on deluxe flower shaping paper using magenta Hue ink and cut with coordinating die Stamp leaves using olive green archival and cut with coordinating die.  Paint flowers and leaves using magenta hue ink and new Sprout ink. Shape flowers and leaves using flower shaping mold. Add stamen in flowers. Arrange flowers and leaves and glue them using hot glue.  For finished look apply glitter using clear dry adhesive.


Thanks for stopping by
Hugs
Uma

Saturday, 30 November 2019

All Occasion Circle Card

Hey Crafty Folks!

Good Morning.....

Today I have a step by  step tutorial of circle card using Black Friday Release on Heartfelt Creations blog.  I create a circle card with a little bit twist. Are you looking to create something different? Create a all occasion card in easy way with Decorative Circle Dies and Card Bases. Click here to check the tutorial. Here are some glimpse of my project.


Hugs & Regards 
Uma

Friday, 29 November 2019

Full Circle

Hello Everyone!!

Happy Wednesday....

Here is my another take with Black Friday Release.  This time I create a folded circle easel type card.


HC PRODUCTS USED:

HCCB1-481 6" x 6" Round Bi-fold Card – White
HCD1-7271 Rounded Window Frame Die
HCD1-7262 Swirly Border Accents Die
Special Birthday Sentiments Cling Stamp Set
HCPC-3887 Wild Aster Cling Stamp Set
HCD1-7257 Wild Aster Die
HCDP1-2106 Wild Aster Paper Collection
HCDA2-450 Stack and Store Daubers-Pack of 30
352854 Metal Tip for Adhesive Bottles
DDC08 Designer Dries Clear Adhesive Refill
RACP524 Ranger Archival Ink Pad Vibrant Fuchsia
RACP475 Ranger Archival Ink Pad Library Green
RACP499 Ranger Archival Ink Plum
Sap Green Archival
HCD1-7272 Rounded Sunlight Window Die
HCD1-7273 Rounded Eyelet Window Die   
HCD1-7274 Rounded Lattice Window Die
Deluxe Flower Shaping Paper Pack 50
HCD1-754 Eyelet Circle and Basics Small Dies

OTHER PRODUCTS :
White cardstock,  micro beads (Sunflower yellow), diamond dust

VIDEO LINKS:
Watch video to learn how to create circle fold window cards with elegant and versatile dies
https://youtu.be/LnM95GR92ao
INSTRUCTIONS :
Take a Round Bi- fold card and fold it’s all mats into half. Cut circle card mats from designer paper collection using Rounded Sunlight window die.Cut them into half and adhere on folded card mats. Now cut a half dolly from white cardstock using Rounded Lattice Window die. Mat it on front card panel. Now cut 2 dollies from white cardstock using Rounded Window frame die and one using Rounded Eyelet Window die. Cut circle mats for these dollies using Eyelet circle & Basics small die. Cut one mat using largest die from Rounded Window Frame die. Glue all round mats on dollies according to the size. Glue these dollies on folded card as shown in the picture.

Stamp aster flower on deluxe flower shaping paper using vibrant fuchsia ink and cut with coordinating dies. Sponge flowers using vibrant fuchsia and plum archival, shape flowers using groove tool. Layer flowers and add micro beads in center using clear adhesive. Stamp aster leaves using library green ink and cut with coordinating die. Paint leaves using sap green and library green ink. Shape leaves using ball tool. Cut some borders from  white cardstock using Swirly Accents Border die. Paint die cuts using leaf green archival. Arrange flowers and leaves on all layer and glue them with hot melted glue. Also add Swirly borders into arrangement. 

Fussy cut a Butterfly for same paper collection,  apply glue on it and add glitter and diamond dust on it. Glue butterfly on front card panel.  Stamp a birthday sentiment from special birthday sentiment stamp using vibrant fuchsia ink on white cardstock. Cut with arrow die and glue it as shown.  For finished look apply glitter on flowers using designer clear dries adhesive.


Thanks for stopping by
Hugs
Uma

Best Guy Ever

Hello Everyone! Good morning.... Today is Heartfelt Wednesday and I am back with another card using "Majestic Frames" die....