Wednesday 29 August 2018

FAITHFUL FLIGHT

Hello friends!!!
Good morning:)

It's heartfelt wednesday and I am back with another card. 


HC PRODUCTS USED:
HCD2-7191 Intricate Swrils Frames die
HCDI- 7178 Fluttering Butterfly Die
HCD1-734 Sun kissed Fleur Die
HCD1-7169 Rain Boots and Blossoms Die
HCD1-7193 Leafy Accents Die 
HCFB1-467 Leafy Accents Shaping Mold
HCPC-3533 Sun kissed Fleur Stamp
HCPC-3824 Fluttering Butterfly Stamp
HCPC-3811 Rain Boots and Blossom Stamp
HCPC-3835 Leafy Accents Stamp
HCDP1-289 Butterfly Dreams Paper Collection
HCST1-401 Deluxe Flower Shaping Kit
Olive Green
Cactus Flower
Leaf Green

OTHER PRODUCTS USED:
Smooth white cardstock (Get Inspired), Vellum paper (Get Inspired), white embossing powder (Ranger), versamark, Sparkling dust, Black micro beads (ranger), Distress oxide faded jeans

VIDEO LINK:

To see how to shape the roses, watch the video at https://youtu.be/Z8P070kC3oo
For more tips on creating with the Frame a Card Leafy Borders, watch the tutorial at https://youtu.be/K_1152Kd2Ls.
For more tips on creating with the Butterfly Dreamscollection, watch the tutorial at https://youtu.be/uCKKJfAQFHA.

INSTRUCTIONS:
Ready side fold card measures 5.5"×7.5"
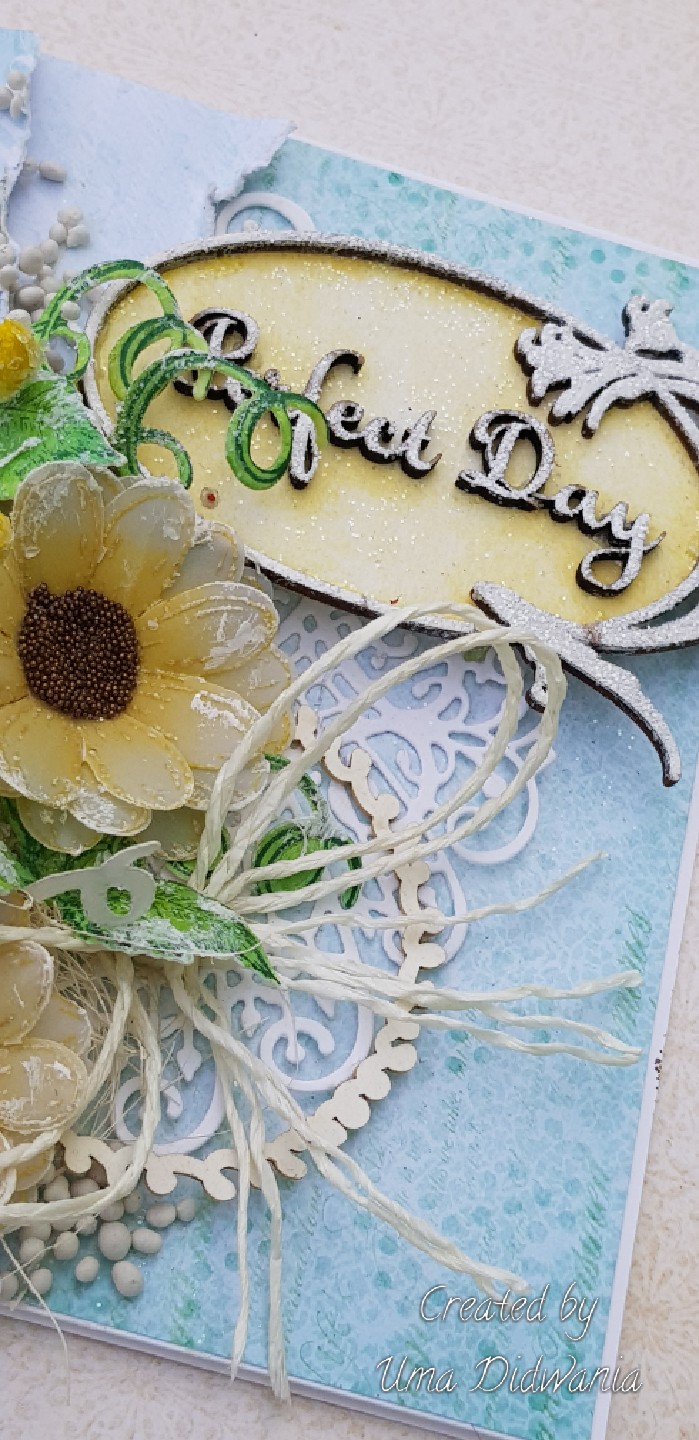
Take a smooth without cardstock measures 11"× 7.5", score at 5.5" to create a slide fold card.  To prepare the card mats first choose a paper from the designer paper collection and cut a piece measuring 5.25"×7.25" and layer it on the ready card base. Further, choose another paper from the same collection and cut a piece measuring 5"×7" and layer it on the white cardstock, 1/16" of an inch bigger on all 4 sides. Layer this panel on the card. Cut a piece of white cardstock using Intricate Swril Frames die and layer it on the pattern paper. Cut a window using pen knife. Layer the frame using dimensional tape as shown in the picture.
Stamp flowers using cactus flower ink on the flower making paper and cut with cordinting die. Color the flowers using leaf green ink and cactus flower ink. Shape the flowers using Deluxe Flower Shaping Kit. Apply glossy accent in the centre of the flowers and set the black micro beads. Stamp some leaves using olive green ink and cut with cordinting die. Color the leaves using leaf green and olive green ink. Shape the leaves using shaping mold. Arrange the flowers and leaves on the card and glue them using hot melted glue.
Stamp butterfly on the vellum paper using versamark and heat embossed it with white embossing powder. Cut with coordinating die and color it using distress oxide faded jeans and cactus flower ink. Arrange the butterfly using dimensional tape as shown in the picture. For the finished look apply sparkling dust on the flowers using adhesive that dries clear.

Thanks for stopping by
Would love to hear from you
Hugs
Uma

Wednesday 22 August 2018

Let it Glow

Hello folks!!!!
Good morning:).........

Another heartfelt wednesday and I am back with another Christmas card. This time I create a ornament shape card in mixedmedia form.


HC PRODUCTS USED:
HCPC 3837 Snowy Pine Village Stamp
HCD1-7195 Snowy Pine Village Die
HCPC 3834 Noel Sentiments Stamp
HCD1-7188 Noel Ornament Die
HCPC-3679 Large Sparkling Poinsettia Stamp
HCD1-765 Large Sparkling Poinsettia die
HCDP1-293 Merry & Bright Paper Collection
HCST1-401 Deluxe Flower Shaping Kit
Aquarium Archival


Other Products: 

Clear gesso, White gesso,  White texture paste, Silver embossing powder, White embossing powder, Cheese cloth, Sparkling dust, Frosted Sugar, The Secret Garden flower making paper, Smooth white cardstock, white cord, lindy's starburst spray( Blue Hawaiian Blue), Dry Branches chipboard, Versamark

VIDEO LINK:

For more tips on creating with the Merry and Bright collection, watch the tutorial at https://youtu.be/6bgO6epBuBI.


Instructions: 

Ready card measures 7”diameter
Take a smooth white cardstock and cut 2 pc of ornaments. Tie both pieces using white cord. For mating choose a designer paper from Merry & Bright paper collection and cut a circle measures 6.75” diameter.  Distress the edges of the pattern paper using a pair of scissors. Layer it on the ready card base using dimensional tape for added dimensions.
Apply clear gesso on the pattern paper and leave it to dry. Apply white texture paste using stencil. Also glue some cheese cloth using soft matt gel.  Mist the color for more effect.  Once I am satisfied with the color effect, I add some glitter using soft matt gel.


Stamp poinsettia flower using versamark and heat embossed it with silver embossing powder. Stamp some pine leaves using versamark and heat embossed them with white embossing powder.  Cut the flowers and leaves with coordinating die and color the flowers using aquamarine archival. Shape the flowers using deluxe flower shaping kit.


Glue dry branches chipboard on the right side of the card using hot melted glue. Arrange the flowers and leaves on the card using hot melted glue as shown in the picture.  Cut a decorative die cut using Noel Ornament Die . Stam a sentiment using Noel Sentiments stamp using versamark and heat embossed it with silver embossing powder. Add the sentiment on the left side of the card using dimensional tape as shown in the picture.


Apply gesso on the flowers and leaves using dry brush technique. For the finished look apply frosted sugar and sparkling dust on the flowers.


Thanks for stopping by
Regards
Uma

Wednesday 15 August 2018

A Season of Blessing

Hi folks!!
Good morning.....
Today I have another Christmas card with the amazing collection "Merry & Bright".


HC PRODUCTS USED
HCD1-7194 Merry Little Christmas Die
HCD1-7195 Snowy Pine Village Die
HCPC-3836 Merry Little Christmas Cling Stamp Set
HCPC-3837 Snowy Pine Village Cling Stamp Set
HCDP1-293 Merry and Bright Paper Collection
HCDI-7144 Decorative Medallion die
HCPC-3679 Large Sparkling Poinsettias Stamp
HCD1-765 Large Sparkling Poinsettias die
HCD1-7161 Sweetheart Borders Die
HCD1-7154 Eyelet Circle & Basics Small
HCPC-3834 Noel Sentiments Stamp
HCD1-7188 Noel Ornaments Die
Cactus Flower Archival
Leaf Green Archival

Other Products:
Smooth white cardstock, White embossing powder,  silver embossing powder,  super fine glitter,  versamark,  pearl string, white cord

VIDEO LINKS
For more tips on creating with the Merry and Bright collection, watch the tutorial at https://youtu.be/6bgO6epBuBI.

Instructions: 
Ready gatefold card measures 7”×7”
Take a smooth without cardstock measures 14”×7”. Score on 3.5” and 10.5” and create a gatefold card. For mating choose pattern paper from the designer paper collection and cut it 1/16” small from all 4 sides. Layer it on the inside of the card. Choose another pattern paper from the same collection and cut 2 pieces of same size. Layer it on the both side of flaps. Cut a window on the flaps using Eyelet Circle & Basics Small die. Also cut 6 frames from the white cardstock using Eyelet Circle & Basics Small die, glue them together and layer it as shown in the picture. Apply glue and add glitter over the frame.

Cut 2 borders using decorative medallion die and 2 borders using Sweetheart border die form the white cardstock. Glue the both borders as shown in the picture. Stamp the poinsettia flower on the flower making paper using cactus ink and cut with coordinating die. Color the flowers using same ink. Stamp the pine leaves using versamark and heat embossed them with white embossing powder. Cut the leaves with coordinating die. Arrange the flowers and leaves on the card and glue them using hot melted glue. Cut a tag and a sentiment ticket from the same collection and.  Tie a cord on the tag and layer it on the card using dimensional tape. Also layer the sentiment ticket using dimensional tape for added dimensions.
Stamp the pine tree and ornamental image using versamark and heat embossed them with silver embossing powder. Color the ornaments using zig markers. Cut the images using coordinating dies and glue them inside of the card. Stamp the Merry Christmas sentiment image using versamark and heat embossed it with silver embossing powder.  Cut with coordinating die and glue it on the inside flap of the card.
For the finished look apply glitter on the flowers  and borders using glue that dries clear.


Thanks for stopping by
Greetings..
Uma

Wednesday 8 August 2018

A Time for Giving

Hii folks !!
Good morning:)

Glistening winter scenes filled with freshly fallen snow, pine boughs draped with shiny holiday ornaments, and prancing reindeer delivering sleighs filled with handpicked gifts for friends and loved ones are delightful imaginings that send our imaginations dancing with delight in the anticipation of the holiday season! Spread a little Christmas joy and happiness featuring these warmhearted inspirations with the new Merry and Bright Collection from Heartfelt Creations! Share cheerful Yuletide greetings and well wishes with a fun and cutesy paper collection overflowing with precious outdoor scenes of cozy snow laden cottages, beautiful birds nestled in delightfully decorated pines, and pleasing decorative holiday arrangements! Brimming with delicate snowflake accents, gorgeous floral clusters, charming polka dots and beautiful brocade patterns all encompassed in a non-traditional color palette of frosty blues, tantalizing teals, magnificent purples and pretty pinks, this paper collection is one that will surely have your holiday projects standing out from all the others received this holiday season! A sweet and desirable assembling of cling stamp sets paired with the coordinating dies culminate a perfect assortment of illustrations including beautiful evergreen groves, rustic snow covered foliage accents, diminutive Christmas baubles and an elegant vase ideal for assembling your own decorative centerpieces! The perfect accents for creating delightful holiday themed dimensional embellishments for all of your Yuletide projects."Merry & Bright" second Christmas collection by Heartfelt Creations is now available. I have created a card with this beautiful collection....


HC PRODUCTS USED:-
HCPC-3836 Merry Little Christmas Stamp
HCPC-3837 Snowy Pine Village Stamp
HCPC-3785 Small Classic Petunia Stamp
HCD1-7194 Merry Little Christmas Die
HCD1-7195 Snowy Pine Village Die
HCD1-7139 Small Classic Petunia Die
HCD1-7161 Sweetheart Border Die
HCD1-7144 Decorative Medallion Die
HCD1-7179 Butterfly Kisses Decorative Die
HCDP1-293 Merry And Bright Paper Collection


OTHER PRODUCTS USED:-
Smooth white cardstock, zig markers, sparkling dust, olive green archival,  leaf green archival, magenta hue, black archival,  white embossing powder , versamark,  micro beads

VIDEO LINK :-
For more tips on creating with the Merry and Bright collection, watch the tutorial at https://youtu.be/6bgO6epBuBI.

INSTRUCTIONS :-
Ready side fold card measures 4.5"×8.5".
To prepare the card mats, first choose the pattern paper from the designer paper collection and cut a piece measuring 4.25"×8.25",mat it on the ready car base. Choose another pattern paper from the same collection and cut a piece measuring 4"×8". Layer it on the card using dimensional tape for added dimensions. Cut a sweetheart border from the white cardstock and glue it as shown in the picture.
 Cut two decorative  border from the white card stock using Decorative Medallion die. Glue both of them on the middle of the  card. Choose a sentiment card from the same collection and layer it on the white cardstock. Also layer it on the light blue pattern paper.  Layer the sentiment card on the card base using dimensional tape as shown in the picture.  Cut a frame from the white card stock using Butterfly Kisses Decorative Die and glue it on the sentiment card. 
Stamp Small Classic Petunia flowers using magenta hue ink and cut with cordinting die. Paint the flowers with the same color. Stamp the pine leaves using olive green ink and cut with coordinating die. Color the leaves with leaf green color. Arrange the flowers and leaves on the top right side of the  card as shown in the picture. 
Stamp the image from the Merry Little Christmas Stamp on the water color paper using black archival. Color the image ising zig markers. Cut the image with the coordinating die and layer it on the card using dimensional tape. Cut two tags from the same collection, tie a bow using white cord, tie the both tags with  cord and glue it on the top of the card. For the finished looked add embossing powder and glitter on the flowers.


Thanks for stopping by...
Regards 
Uma 

Sunday 5 August 2018

Gift bag

Hii folks!!!!
Good morning......
Today I'd like to share an altered gift bag. Create this gift bag Kraft paper and Eyelet Oval & Basics large die. Applied texture paste using Mudra's stencil.  Mist the color using Color bloom spray by Prima. Arrange all the elements as shown in the picture. Heat embossed the sentiment using white embossing powder and layer it using dimensional tape. 


Hope u all like it....
Thanks for stopping by
Hugs
Uma 

Saturday 4 August 2018

Perfect Day Card

Hii folks!!!
Good morning.....
Today I have another card with Heartfelt Creations products. I create daisy flowers using vellum paper. I use 180 gsm vellum paper by Dadarkar Arts. Dadarkar Arts known for quality products. They have various craft products .  You can check entire range here. Vellum paper which i use can check here. They ship worldwide. 


Hope you like it!!!
Regards
Uma

Wednesday 1 August 2018

You light up my life

Hii Folks!!!
Happy Wednesday :)

Yes!!! Today is inspirational wednesday and it's time to get inspired with some new projects. There are lots of amazing projects by my team mates on Heartfelt's blog.  This time i create a light Frame card. For this my inspiration is Ellen's pic. I love this pic of this beautiful couple. I am featuring Backyard Blossoms Collection in this frame. Hope you like it......


HC PRODUCTS USED -
HCPC-3827 Backyard Blossoms Stamp 
HCPC-3826 Blossoming Coneflower Stamp
HCD1-7180 Blossoming Coneflower Die
HCD1-7181 Backyard Blossoms Die 
HCD1-7172 Sweet Lilac Scroll & Cage Die
HCDP1-290 Backyard Blossom Paper Collection 
Cactus Flower Archival  inkpad
Olive Green Archival  inkpad
Chrome Yellow Archival  inkpad 
Black Archival inkpad

OTHER PRODUCTS USED:-
White cardstock, Micro mini pearls, Strip light, Micro beads, White cord, Half cut pearl

VIDEO LINK:-
For more tips on creating with the Backyard Blossoms collection, watch the tutorial at https://youtu.be/swO34-n1HNc.

INSTRUCTIONS:-
Ready project size 9"×7"

First choose a pattern paper from the designer paper collection to create shadow frame which is 9"×7"×1". Take a thick chipboard 9"×7" and cover it with another pattern paper from the same paper collection. Glue the frame on the chipboard. Arrange the strip light on the frame. 

Choose another pattern paper from the same collection and create a one more shadow frame which is 8"×6"×1/2". Glue a picture inside the frame. Glue half cut pearl as shown in the picture. Arrange the frame in the ready large frame as shown in the picture. 
Stamp  flowers on the white cardstock from the Blossoming Coneflower Stamp using black archival. Also stamp some fillers from the Backyard Blossoms.  Cut the flowers and fillers with the coordinating die. Color the flowers and fillers using Archival ink . Glue the micro beads in the centre of the flowers. Cut a cage using Sweet lilac scroll and cage die. 
Take a miniature pot and cover it with micro mini pearls. Arrange the flowers and fillers in the pot. Glue the cage and pot on the right side of the frame as shown in the picture. Also glue the flower corner on the left side of the frame as shown. 
Cut a tag and a sentiment ticket from the same collection.  Tie a cord on the tag. Distress the edges of the sentiment ticket using scissors and apply glitter on the edges. Glue the tag and sentiment ticket using dimensional tape for added dimensions. For the finished look add micro mini pearls on the flowers. 


It would be great if you leave some love in comment section if u really enjoyed this post..

Thanks for your time...
Warm Regards
Uma

Create your Own Embelishment

Hello friends!!!

Good morning .....  today my post is live on Mudra's blog.  Mudra come up with new challenge

 "Make your own embelishment".

Isn't it great to use your scrap and create something new? We daily add some pieces in our scrap boxes, now it's time to use them and win amazing goodies. You can check all the details about challenge here.
I create some flowers and tassels for the inspiration. You can check my detailed post and flower tutorial on Mudra's Craft Stamp Blog.
Here are some pics of my projects....


Thanks for stopping by
Hugs
Uma 

Best Guy Ever

Hello Everyone! Good morning.... Today is Heartfelt Wednesday and I am back with another card using "Majestic Frames" die....