Monday 30 July 2018

Wine Caddy

Hello friends!!!
Good morning .....

Happy Monday!!!! How was your weekend??? Hope you enjoyed lot. I was busy in my projects for upcoming post. Today I have a decorative wine caddy to share with you. I create this caddy using Heartfelt Creations products and Dadarkar Arts products.


First I decopage the caddy using designer paper from Heartfelt's love paper collection.  Apply platinum crackle texture paste using stencil. Sprinkle some glitter on the wet texture paste and let it to dry.
Stamp some poppy flower using thistle archival on "The Secret Garden" flower making paper.  Cut the flowers using coordinating die add color them with the same color. Shape the flowers.
Also stamp some leaves using leafy accents stamp on "The Secret Garden" flower making paper. Cut with coordinating die and shape them using mold.
Arrange flowers and leaves on the caddy and glue them using hot melted glue.  Tie some bows using white cord and glue the as shown in the pic.
For the finished look glue some flat back pearl on the edges of the caddy.


Hope you like it.......
Thanks for your valuable time....
Goodbye till the next post...
Regards
Uma

Tuesday 24 July 2018

Poinsettias Card

Hii folks!!!!
Good morning..........
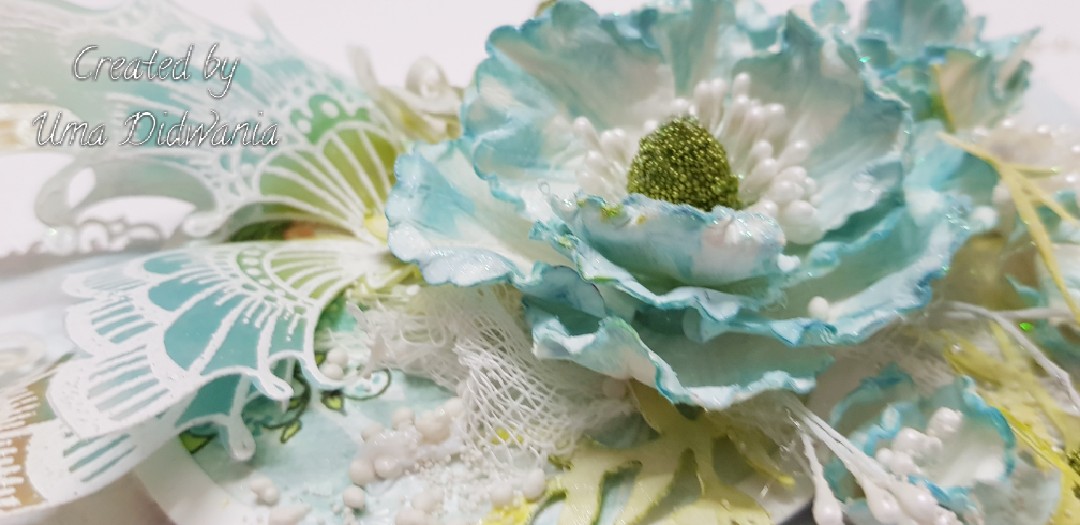
It's inspirational Wednesday and we all come with new creations to inspire you. This time I create a card with beautiful poinsettia flowers. This is my first try on poinsettia flowers. Hope you like it.


HC PRODUCTS USED:-

HCDP1-292 O Holly Night Paper Collection
HCPC-3679 Large Sparkling Poinsettia Stamp
HC Sparkling Poinsettias flowers die
HCD1-7169 Rain Boots And Blossoms Die
HCPC-3811 Rain Boots And Blossoms Stamp
HCST1-401 Delxue Flower Shaping Kit
Red Geranium Archival
Library Green
Emerald Green

OTHER PRODUCTS USED:-

Smooth white cardstock,  cherry pollens, sparkling dust,  frosted sugar

VIDEO LINK:-

For more tips on creating with the O Holy Night collection, watch the tutorial at https://youtu.be/UWDeK6soJ0E

INSTRUCTIONS:-

Ready top side fold card measures 6.5"×6.5"
 To prepare the card mats , first choose a pattern paper from the designer paper collection and cut a piece measuring 6.25"×6.25", mat it on the ready card base. Choose a card panel from the designer paper collection and cut it. Layer it on the white cardstock,  1/16" of an inch bigger on all 4 sides. Further , layer it on the ready card base using dimensional tape for added dimensions.
Take two pieces of same designer paper and cut diagonally.  Adhere it on the ready card base using dimensional tape as shown in the picture. Stamp the large poinsettia flower on the flower making paper using Red Geranium color and cut with coordinating dies. Paint the flowers with same color and shape them. Also stamp leaves using library green color and cut with coordinating dies. Color the leaves using library green and emerald green color and slightly shape them.
Arrange the flowers and leaves on the card and glue them using hot melted glue. Also glue some cherry pollens. Tie a bow using white cord and glue it on the card. Cut a sentiment ticket from the same collection and layer it on the white cardstock. Also cut a tag from the same collection and  layer it on the card using dimensional tape as shown in the picture.
For the finished look apply sparkling dust and frosted sugar on the flowers using adhesive that dries clear.


Thanks for stopping by.......
Hugs
Uma 

Thursday 19 July 2018

Pretty Pink Card

Hello Crafty Peeps 

How are you ??? Hope you all are doing well. Today I'd like to share a anniversary card. I create this card with beautiful designer paper collection from Heartfelt Creations.  Flowers are handmade. To create these flowers I use The Secret garden flower making paper. Texture of the paper is too good which gives amazing look to the flowers. No need to give much pressure while shaping.  I really love this paper. I suggest you must try once. Here is my card


Hope u all like it
Warm Regards
 Uma


Wednesday 18 July 2018

Holly family card

Hello Everyone!!!

Good morning........  Here is another Wednesday with Heartfelt Creations and today I am showcasing a Bendi frame card, featuring O'Holly Night Collection. 


HC PRODUCTS USED:-
HCDP1-292 O Holy Night Paper Collection
HCPC-3832 O Holy Night Stamp Set
HCD1-7187 O Holy Night Die
HCD1-7186 Silent Night Scroll Die
HCD1-7188 Noel Ornament Die
HCPC-3833 Silent Night Scroll Stamp Set
HCPC-3769 Wildwood Florals Stamp
HCPC-3828 Garden'sEdge Coneflower Stamp
HCPC-3834 Noel Sentiments Stamp
HCD1-7182 Garden'sEdge Coneflower Die
HCD1-7125 Wildwood Florals Die
HCD1-7120 Fleur Border Basics Die
Red Geranium
Library Green
Emerald Green
Sepia
Jet Black

OTHER PRODUCTS USED:-
White smooth cardstock, acetate sheet, Zig markers, jute cardstock

VIDEO LINK:-
For more tips on creating with the O Holy Night collection, watch the tutorial at https://youtu.be/UWDeK6soJ0E.

INSTRUCTIONS:-
Ready top side fold card measures 7"×6"
To create bendi frame Take a white cardstock measuring 8.5"×6". Score on 1/2" and 8" on longer side . Create a 1"wide window using pen knife. To prepare mats, choose 2 pattern paper from designer paper collection. Create rectangle window on both the pattern paper and layer it on the white cardstock. Also layer a acetate sheets shown.
Chose a pattern paper from the same collection and cut it in size 7"×6"to create window scene. Stamp holy family images using black archival on water color paper and color them using zig markers. Cut the imges with coordinating dies. Cut another piece of pattern paper using fleur border basics die. Layer it on the pattern paper using dimensional tape.  Arrange the holly family images and glue them. Stamp some leaves using library green color and cut with cordinting die. Color the leaves using same color and also arrange them as shown in the picture. Glue the frame on the both side of pattern paper.  Further, layer it on the ready card base.
 Cut ornaments  from the pattern paper using ornamental die. Stamp the sentiment using red geranium archival.  Arrange the ornaments on the left side of the card as shown in the picture. Cut a sentiment tricket from the same collection and adhere on the top of the card using dimensional tape. Stamp angles image using sepia ink and color the images using zig markers. Cut with coordinating die and arrange it as shown in the picture. Stamp a sentiment card on the jute sheet using sepia color and cut with coordinating die. Slightly color using zig markers and glue it on the right side of card. Stamp some small flowers from wildwood florals using Red Geranium color and cut with cordinting die.  Also stamp some pine cone using library green color and cut with cordinting die. Arrange the pine leaves and flowers as shown in the picture. 


Thanks for stopping by 
Regards 
Uma

Thursday 12 July 2018

Birthday Card

Hii folks!!!!

A very good morning to all of u......

Today I have another card to share with u all which I created by Get Inspired products. I use The Secret garden flower making paper to create these blooms. 

GET INSPIRED PRODUTS:-


Hope you like it
Thanks for stopping by
Hugs
Uma 

Wednesday 11 July 2018

Silent Night/debuting O Holly Night Collection


Hii Crafty folks!!!

Happy Wednesday..........


Celebrate and create inspirational Christmas greetings that spread the true meaning of the holiday season with the O Holy Night Collection from Heartfelt Creations! Immerse yourself in the Christmas story right alongside the angels who announced the Savior’s birth, the shepherds who received the good news, as well as the loving family who welcomed the holy babe in Bethlehem so many years ago! Swaddled in a traditional color palette of reds and greens mingled with hues of midnight blues, golden starlight yellows and snowy whites, this festive paper collection has been beautifully wrapped with tender lace like details, charming plaids, flowing swirls, and elegant brocades all nestled among pretty poinsettias, delicate snowflakes, fanciful Christmas ornaments and gentle images depicting that holy night when Christ was born! Three exquisite cling stamp sets along with coordinating dies provide wonderful options for creating dimensional nativity scenes, holiday themed accents such as an old fashioned scroll, a pinecone with greenery, as well as an assortment of beautifully scripted Christmas sentiments in a variety of styles perfect for all of your holiday card making! The substantially sized and intricately detailed ornament die is magnificent for creating wonderful focal point images on card fronts, stunning accents on scrapbook layouts, or for creating ornament shaped cards ready to deliver your Christmas greetings to friends and loved ones! So pause, reflect and spread the message of God’s love given that holy night so many thousands of years ago as you create and send off holiday wishes with the O Holy Night Collection.


HC PRODUCTS USED:-
HCD1-7186 Silent Night Scroll Die
HCD1-7188 Noel Ornament Die
HCPC-3833 Silent Night Scroll stamp set
HCDP1-292 O Holy Night Paper Collection
HCD1-7120 Felur border basics
HCPC-3791 Festive Holly & Cardinals 
HCD1-7145 Festive Holly & Cardinal die
HCPC-3785 Small Classic Petunia stamp set
HCD1-7139 Small Classic Petunia die

OTHER PRODUCTS:-
Smooth white cardstock, Gold foil cardstock, Zig markers,  Red Geranium, library green, Sepia, Glass glitter (gold rush)

VIDEO LINK:-

INSTRUCTIONS:-
Ready side fold card measures 5.5"×7.5"

Take a smooth white cardstock measures 7.5"×11". Score at 5.5" to create a side fold card. To prepare the card mats , first choose a designer paper collection and cut a piece measuring 7.25"×5.25", and layer it on the gold foil cardstock,  1/16" of an inch bigger on all 4 sides. Further, mat it on the ready card base. Choose another designer paper from the same collection and cut a piece measuring 6"×4.75". Cut one edge of the designer paper using fleur border basics die as shown in the picture. Layer it on the gold foil cardstock, 1/16" of an inch bigger on all 4 sides. Layer it on the ready card base using dimensional tape for added dimensions.
 Cut 3 pieces of gold foil cardstock using ornamental die and 1 piece from designer paper. Fold the 3 gold ornaments into half and glue them together as shown in the picture and a cord. Glue the ornament on the card.
 Stamp small petunia flowers on flower making paper using Red Geranium color and cut with coordinating die. Color the flowers with same color and shape them with ball tool. Stamp some leaves using library green color and paint them using zig markers. Cut with coordinating die.  Arrange the flowers and leaves on the card and glue them using hot melted glue. Stamp 2 pines from Silent Night Scroll stamp and cut with coordinating die. Color the pine and glue it on the card as shown.
Cut a silent night sentiment from the gold foil paper using sentiment die and glue it using the glue that dries clear.  For the finished look apply gold rush glass glitter on the flowers using soft matt gel.


Thanks for stopping by ........

Would love to hear from you .....

Hugs .......

Uma.........

Wednesday 4 July 2018

Wishing You Love

Hii folks!!!!

Good morning....  This is the first Heartfelt wednesday of the July month and I am here with another card. Today I am featuring Classic Wedding collection with Poppy Flower.


HC PRODUCTS USED:


HCDP1-279 Classic Weddings Paper Collection 
HCPC-3674 Blazing Poppy Petals  Stamp 
HCPC-3835 Leafy Accents Stamp
HCD1-7193 Leafy Accents Die 
HCFB1-467 Leafy Accents Shaping Mold
HCD1-7144 Decorative Medallion Die 
HCD1-764 Blazing Poppy Die
HCD1-7162 Eyelet Hearts Die 
HCS1-457-1 Pastel Pearl-Small Stamens
RACP482 Olive Green 

OTHER PRODUCTS USED:
Get inspired smooth white cardstock, The Secret Garden flower making paper, Art stones, micro pearls,  Glitter, Cheese cloth, Chipzeb sentiment, Hero hues (unicorn pastel pink) , micro beads bronze , white cord, Sap Green, Brilliance Platinum Planet

VIDEO LINK:

To see how to shape poppy, watch the video at-
https://youtu.be/83jv-zjmdag


INSTRUCTIONS :

Ready topside fold card measures 4.5"×8" 
To prepare the card mats , first choose a designer paper collection and cut a piece measuring 4" × 8", distress the edges using a pair of scissors and layer it on the white cardstock,  1/16" of an inch bigger on all 4 sides. Further, layer it on the on another designer paper, again 1/16" of an inch larger on all the sides. Finally, mat the panel on the ready card base. Further, take two pieces of same designer paper and adhered them on the card using dimensional tape as shown in the picture. Cut a white cardstock using decorative medallion die and adhere it on the top of the card. Stamp the blazing poppy flowers on the flower making paper using unicorn pastel pink and cut with coordinating dies. Color the flowers with the same ink and shape them. Stamp the leafy accents leaves using olive green ink on white cardstock.  Color the leaves with sap green and olive green. Cut the leaves with coordinating dies and shape them using shaping mold. Cut a frame using eyelet hearts die and glue the micro mini pearls using the  glue that dries clear. Choose a picture from the designer paper for the frame. Glue the frame on the ready card base using dimensional tape. Glue the cheese cloth, flowers and leaves as shown in the picture. Tie a bow using white cord and glue it. Paste some art stones using soft matt gel. Color the sentiment chipzeb with platinum planet and glue it. For the finished look apply glitter on the flowers using adhesive that dries clear.


Hope you like it. ....
Thanks for stopping by
Hugs
Uma

Tuesday 3 July 2018

Heart Shaped Card

Hii folks!!!

Good morning!!!! Today I have another heart shaped card which I created with Mudra's beautiful chipzeb. Flower made with Gardenia die.

Cut a thick card stock in heart shape . For matting choose a pattern paper from from my stash and cut little bit smaller than the card base. Distress the edges using a pair of scissors and layer it on the base card. Appliedtexture paste using stencil.  Once it dry spray mist using pressed petals (prima's color bloom). Create flowers using Mudra's Gardenia die. Glue cheese cloth and sisal. Arrange the flowers and chipzeb and glue them using hot melted glue. Glue micro beads using soft matt gel.  Take a chipzeb sentiment , apply gold color and glue it using soft matt gel .

Here is my card:-


Hope you like it.....
Thanks for stopping by 
Hugs
 Uma 

Participating in:-


Best Guy Ever

Hello Everyone! Good morning.... Today is Heartfelt Wednesday and I am back with another card using "Majestic Frames" die....