Hey Crafty Folks!
Happy Wednesday...
Here is my second card for today.

HC PRODUCTS USED:
Deluxe Flower Shaping Paper Pack 50
Tulip Time Paper Collection
HCFB1 467 3d Leafy Accents Shaping Mold
HCPC 3835 Leafy Accents Cling Stamp Set
HCD1 7193 Leafy Accents Die
HCD1 7177 Butterfly Dreams Border Die
HCPC 3823 Butterfly Dreams Border Cling Stamp Set
HCPC 3819 Small Sweet Peony Cling Stamp Set
HCD1 7173 Sweet Peony Die
3D Petite Florals Shaping Mold
Floral Fashionista Die
Floral Fashionista Cling Stamp Set
DMCT4185 Groove Golf Tool Set
HCDA2-450 Stack and Store Daubers-Pack of 30
DDC08 Designer Dries Clear Adhesive Refill
RACP436 Ranger Archival Ink Leaf Green
RACP614 Ranger Archival Ink Pad Magenta Hue
RACP475 Ranger Archival Ink Pad Library Green
RACP632 Ranger Archival Ink Pad Buttercup
RPEJ685 Embossing Powder White
HCD1-7262 Swirly Border Accents Die
HCD1-7263 Swirly Accent Spray Die
HCD1-757 Eyelet Oval and Basics Large Dies
OTHER PRODUCTS:
Vellum paper, white cardstock, glitter, satin cord, dimensional tape
VIDEO LINKS:
INSTRUCTIONS:
Ready side fold card measures 6”×6”
First, choose a pattern paper from designer paper collection and cut a piece measures 5 7/8”×5 7/8” to create card mat. Distress the edges with matching ink and adhere it on ready card base. Choose another paper from the same designer paper collection and cut a piece measures 5.5"×5.5". Distress edges with matching ink and mat it on white cardstock which is 1/8of an inch bigger from all 4 sides. Adhere it on card base using dimensional tape.
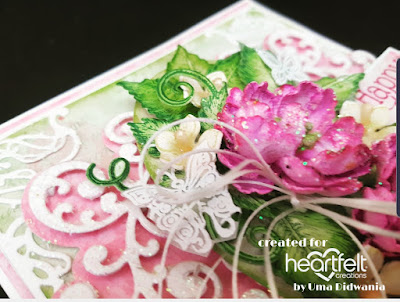
Cut 2 base piece from pattern paper using Swirly Border die and 2 decorative piece from white cardstock. Add glitter on decorative pieces using clear adhesive. Mat it on base pieces using dimensional tape for added dimension. Glue them on center of card using dimensional tape as shown in the picture. Further, cut an oval piece from white cardstock using Eyelet Oval and basic large die. Distress with matching ink and mat it using dimensional tape.
Stamp small sweet peony flower on Deluxe flower Shaping paper using magenta hue ink and leafy accents leaves using library green ink. Cut images with coordinating dies. Paint flowers with same ink and shape using groove tool. Layer flowers and add stamen in the center. Add glitter on the flowers using clear dry glue. Sponge leaves using leaf green archival and shape using 3D Shaping mold. Stamp floral fashionista flowers using buttercup ink and cut with coordinating die. Shape with 3D mold and add stakes in center. Arrange flowers and leaves and glue them using hot melted glue. Cut a sentiment strip from same collection and mat it on white cardstock. Add sentiment using dimensional tape. Stamp Butterfly border on vellum paper using versamark and heat emboss with white embossing powder. Cut with coordinating die.Trim some butterflies and glue them as shown.
Cut 4 corners from white cardstock using Swirly Accents Spray die. Apply glitter using clear dry adhesive. Glue all four corners on card as shown. Tie bow with satin card and glue it on the card.


Thanks for stopping by
Hugs
Uma
Happy Wednesday...
Here is my second card for today.

HC PRODUCTS USED:
Deluxe Flower Shaping Paper Pack 50
Tulip Time Paper Collection
HCFB1 467 3d Leafy Accents Shaping Mold
HCPC 3835 Leafy Accents Cling Stamp Set
HCD1 7193 Leafy Accents Die
HCD1 7177 Butterfly Dreams Border Die
HCPC 3823 Butterfly Dreams Border Cling Stamp Set
HCPC 3819 Small Sweet Peony Cling Stamp Set
HCD1 7173 Sweet Peony Die
3D Petite Florals Shaping Mold
Floral Fashionista Die
Floral Fashionista Cling Stamp Set
DMCT4185 Groove Golf Tool Set
HCDA2-450 Stack and Store Daubers-Pack of 30
DDC08 Designer Dries Clear Adhesive Refill
RACP436 Ranger Archival Ink Leaf Green
RACP614 Ranger Archival Ink Pad Magenta Hue
RACP475 Ranger Archival Ink Pad Library Green
RACP632 Ranger Archival Ink Pad Buttercup
RPEJ685 Embossing Powder White
HCD1-7262 Swirly Border Accents Die
HCD1-7263 Swirly Accent Spray Die
HCD1-757 Eyelet Oval and Basics Large Dies
OTHER PRODUCTS:
Vellum paper, white cardstock, glitter, satin cord, dimensional tape
VIDEO LINKS:
INSTRUCTIONS:
Ready side fold card measures 6”×6”
First, choose a pattern paper from designer paper collection and cut a piece measures 5 7/8”×5 7/8” to create card mat. Distress the edges with matching ink and adhere it on ready card base. Choose another paper from the same designer paper collection and cut a piece measures 5.5"×5.5". Distress edges with matching ink and mat it on white cardstock which is 1/8of an inch bigger from all 4 sides. Adhere it on card base using dimensional tape.
Cut 2 base piece from pattern paper using Swirly Border die and 2 decorative piece from white cardstock. Add glitter on decorative pieces using clear adhesive. Mat it on base pieces using dimensional tape for added dimension. Glue them on center of card using dimensional tape as shown in the picture. Further, cut an oval piece from white cardstock using Eyelet Oval and basic large die. Distress with matching ink and mat it using dimensional tape.
Stamp small sweet peony flower on Deluxe flower Shaping paper using magenta hue ink and leafy accents leaves using library green ink. Cut images with coordinating dies. Paint flowers with same ink and shape using groove tool. Layer flowers and add stamen in the center. Add glitter on the flowers using clear dry glue. Sponge leaves using leaf green archival and shape using 3D Shaping mold. Stamp floral fashionista flowers using buttercup ink and cut with coordinating die. Shape with 3D mold and add stakes in center. Arrange flowers and leaves and glue them using hot melted glue. Cut a sentiment strip from same collection and mat it on white cardstock. Add sentiment using dimensional tape. Stamp Butterfly border on vellum paper using versamark and heat emboss with white embossing powder. Cut with coordinating die.Trim some butterflies and glue them as shown.
Cut 4 corners from white cardstock using Swirly Accents Spray die. Apply glitter using clear dry adhesive. Glue all four corners on card as shown. Tie bow with satin card and glue it on the card.


Thanks for stopping by
Hugs
Uma


Love this gorgeous design and your beautiful flowers Uma!
ReplyDelete