Showing posts with label .Oakberry collection. Show all posts

Wednesday, 6 May 2020

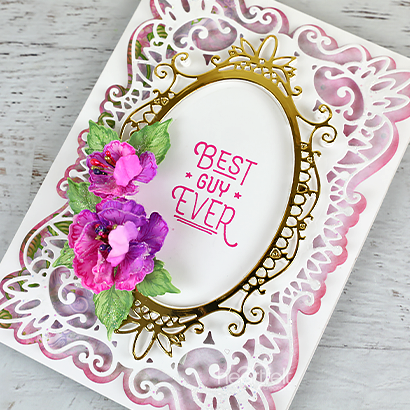
Best Guy Ever

Hello Everyone!
Good morning....

Today is Heartfelt Wednesday and I am back with another card using "Majestic Frames" die. I created a simple and elegant card using Oakberry flowers. If you don't have much time and want to creajte a card in half an hour than it's perfect for you. 


Other Products: Smooth White Cardstock
For more ideas on creating with the 5 x 7 Decorative Frame Dies, watch the tutorial at https://youtu.be/qdBFA5VpmSo.
For more tips on creating with the Oakberry Lane collection, watch the tutorial at https://youtu.be/HirfUN8NEYY.
Instructions: First cut a piece of designer paper using base die from Royal Elegance Frames die. Distress edges with matching ink and adhere it on ready card base. Cut a piece of decorative frame from white cardstock and adhere it on card using foam dots. Cut 2 Oval decorative frames, 1 from luxe gold cardstock and one from white cardstock. Stamp sentiment on white cardstock frame using vibrant fuchsia ink and glue it on card. Further, adhere gold frame on card as shown using foam dot.
For flowers, stamp Oakberry Blossom on deluxe flower shaping paper using vibrant fuchsia ink and leaves using bamboo leaves ink. Cut with coordinating dies. Paint flowers with vibrant fuchsia and Majestic Violet ink and leaves using bamboo leaves ink. Shape flowers and leaves using flower shaping mold. Pierce the shaped flowers using piercing tool from the center and add stamens. For 1 flower I use 4 layers. Arrange flowers and leaves using hot melted glue as shown in the picture. For finished look apply glitter using designer dries clear adhesive. 
Thanks so much for stopping by today!!  I’ll be back soon with more inspiration!!
Hugs 
Uma

Wednesday, 22 April 2020

So Greatful

Hello Friends!!

Happy Heartfelt Wednesday....

 Now the wait is over and Majestic Frames Die collection is launched worldwide. Intricate, elegant and..... majestic. The Majestic Frames Die collection is perfect for cardmaking, Scrapbooking or all kinds of projects. You can create elegant cards in very less time. Here is my another take using these beautiful dies.....


Products Used:

Majestic Swirl Frames DieHCD2-7308
For My Friend Sentiments Cling Stamp SetHCPC-3844
Stack and Store Daubers-Pack of 30HCDA2-450
3D Blossoms Shaping MoldHCFB1-469
Oakberry Lane Blossoms Cling Stamp SetHCPC-3842
Oakberry Lane Blossoms DieHCD1-7200
Tea Time Paper CollectionHCDP1-2112
Luxe Gold CardstockHCGP1-488
Deluxe Flower Shaping Paper Pack of 50 - WhiteHCPP1-475
Bright Pearl Stamens-SmallHCS1-458-1
Ranger Archival Ink Pad - Majestic VioletRACP494
Ranger Archival Ink Pad - Vibrant FuchsiaRACP524
Memento Dye Ink Pad - Bamboo LeavesTSMP707
Rajni Chawla's Crystal ClearPGM15015
Designer Dries Clear Adhesive159723
Double Dots 100pc. -3D Foam CirclesDDOTS


Other Products: Smooth White Cardstock
For more ideas on creating with the 5 x 7 Decorative Dies, watch the tutorial at https://youtu.be/qdBFA5VpmSo.
For more tips on creating with the Oakberry Lane collection, watch the tutorial at https://youtu.be/HirfUN8NEYY.
Instructions: Ready tent fold card measures 7"× 5". First cut a piece of designer paper using base die from Majestic Swirl Frames die. Distress edges with matching ink and adhere it on ready card base. Cut a piece of decorative frame from white cardstock and adhere it on card using foam dots. Cut a piece of luxe gold cardstock measuring 5" × 3" and glue it on card. Cut 2 decorative pieces from white cardstock using dies from Majestic Swirl Frames die. Stamp sentiment using vibrant fuchsia ink. Adhere both die cuts on card as shown using foam dot.
For flowers, stamp Oakberry Blossoms on deluxe flower shaping paper using vibrant fuchsia ink and leaves using bamboo leaves ink. Cut with coordinating dies. Paint flowers with Vibrant Fuchsia and Majestic Violet ink and leaves using bamboo leaves ink. Shape flowers and leaves using flower shaping mold. Pierce the shaped flowers using piercing tool from the center and add stamens. For 1 flower I use 4 layers. Arrange flowers and leaves as shown using hot melted glue.

For finished look, apply glitter using designer dries adhesive.


Thanks for stopping by 
Hugs 
Uma

One In A Million Frame

Hello friends!

Happy Heartfelt Wednesday 

Now wait is over and Majestic Frames Die collection is launched worldwide. Intricate, elegant and..... majestic. The Majestic Frames Die collection is perfect for cardmaking, Scrapbooking or all kinds of projects. You can create elegant cards in very less time. Here is my first take using these beautiful dies.....


Other Products: Smooth white cardstock, Flat Back Pearl, Hot Glue Gun
For more ideas on creating with the 5 x 7 Decorative Dies, watch the tutorial at https://youtu.be/qdBFA5VpmSo.
For more tips on creating with the Oakberry Lane collection, watch the tutorial at https://youtu.be/HirfUN8NEYY.
Instructions: Card size is 5 x 7”. First cut a piece of designer paper using base die from Decorative Circle Frames die. Distress edges with matching ink and adhere it on ready card base. Cut a piece of decorative frame from white cardstock and Luxe Gold cardstock. Glue both together and adhere on card using foam dots. For extra dimension, I use 2 dots. Cut 2 circles, 1 from Luxe Gold Cardstock and one from white cardstock. Stamp sentiment on white circle using vibrant fuchsia ink. Adhere it on card as shown using foam dot. Add pearls around the circle.
For flowers, stamp Oakberry Blossoms on deluxe flower shaping paper using vibrant fuchsia ink and leaves using bamboo leaves ink. Cut with coordinating dies. Paint flowers with vibrant fuchsia and Majestic Violet ink and leaves using bamboo leaves ink. Shape flowers and leaves using flower shaping mold. Pierce the shaped flowers using piercing tool from the center and add stamens. For 1 flower I use 4 layers. Arrange flowers and leaves using hot melted glue and add large gold stamens to the arrangement. For finished look, apply glitter using designer dries adhesive.
Diecut the tags from the paper collection, add ribbon and adhere to card.


Thanks for stopping by 
Hugs 
Uma

Wednesday, 24 April 2019

Adorned with Blossoms

Hello Crafty Folks!

Happy Wednesday to all of you.....

Here is my inspirational post for this week.


PRODUCTS USED:
HCD1-7245 Adorn It Pocket Accents Die
HCD1-7247 Regal Pocket Accents Die
HCD1-7248 Regal Frame & Accents Die
Black Archival
Plum Archival
Cactus Flower Archival
Sunflower Archrival
Library green Archival
Leaf green Archival
Zig markers
Designer Dries Glue
Acetate sheet
Butterfly Dreams Paper pack
HCPC-3842 Oakberry Lane Blossoms Stamp
HCD1-7200 Oakberry Lane Blossoms Die
HCPC-3803 Banners Of Love Stamp
HCD1-7160 Bannes Of Love Die
HCDP1-288 Sweet Peony Paper Collection
HCFB1-469 3D Blossoms Shaping Mold


OTHER PRODUCTS:
White cardstock,  glitter,  dimensional tape

VIDEO LINK:

INSTRUCTIONS:
For base cut a acetate sheet measures 6”×7.5". Score a line on 3”From smaller side and fold it. Cut 2 piece of white cardstock using adorn it pocket accents die. Fussy cut 2 piece of pattern paper from the designer paper collection according to die cut. Apply clear dry glue on die cuts and add glitter on it. Glue both die cuts on pattern paper. Further, glue it on acetate sheet as shown in picture.

For frame , cut a frame from white cardstock using frame Regal frame and accent die and one base frame from pattern paper.  Also cut a base frame from white cardstock.  Glue a photo on white cardstock frame . Also glue both frame on it as shown. Glue frame on base using dimensional tape. Cut 2 piece from white cardstock using Regal pocket and accents die and glue it on the back side of frame.

To create flowers,  stamp oakberry lane blossoms on deluxe flower shaping paper using plum archival. Also stamp leaves using library green Archival.  Cut flowers and leaves with coordinating die.  Paint flowers with sunflower archrival and cactus flower ink. Leaves are painted with leaf green and sunflower inks. Shape flowers and leaves using flower shaping mold.  Complete the flowers adding stamens and glitter using clear dry glue. Arrange flowers and leaves using hot melted glue as shown. Stamp sentiment on watercolor paper using black archival and cut with coordinating die.  Paint sentiment using zig markers and glue it on card using dimensional tape.


Thanks for stopping by
Hugs
Uma

Wednesday, 31 October 2018

CAGED

Hello Crafty Peeps!!
Good Evening  ........

Today is inspirational wednesday. This time I altered a cage frame using mixedmedia techniques and Oakberry blossoms.


HC PRODUCTS USED:
HCPC-3842 Oakberry Lane Blossoms Stamp
HCD1-7200 Oakberry lane Blossoms die
HCPC-3839 Furry-Tailed Frolic stamp
HCD1-7197 Furry-Tailed Frolic Die
HCFB1-3D Blossoms Shaping mold
HCD1-7193 Leafy Accents Die
HCPC-3835 Leafy Accents Stamp
HCFB1- 467 3DLeafy Accents Shaping mold
HCDP1-288 Sweet Peony Paper Collection
RACP-482 Olive Green Archival
RACP-436 Leaf Green Archival
Sepia Archival
478455 Zig markers
HCS1-459-3 Assorted Bead Stamens Medium

OTHER PRODUCTS :
Cage Frame, White Gesso, Art stones , Acrylic paint, Opaque texture paste,  Dried moss ,Soft matt gel

INSTRUCTIONS :
Open the cage frame and apply thick layer of white gesso over it. Dry it and apply opaque texture paste.  Once it completely dry paint it using acrylic paints. Stamp the Oakberry Lane Blossoms flowers on the flower making paper using sepia ink and cut with coordinating die. Shape the flowers using flower shaping molds.  Stamp some leaves using olive green ink and cut with coordinating die. Paint the leaves using sap green archival and olive green archival.  Shape the leaves using shaping mold.

Stamp squirrels using black archival on water color paper.  Paint the squirrel images using zig markers and cut with coordinating die. Arrange the flowers, leaves and squirrels as shown in the picture. Glue dry moss inside the frame using hot melted glue.  Choose a pattern paper from the designer paper collection and cut a piece according to the frame. Glue it on the back cover of the frame. Glue some art stones using soft matt gel.  For the finished look apply sparkling dust on the flowers.


Hope you like it
Hugs
Uma

Participating in:-

Altered Eclectics

Wednesday, 3 October 2018

Squirrel's garden

Hello Everyone!!
Happy Wednesday....

Today I have created a shadow box card with wobbling squirrels . I create a scene of a garden where squirrels are playing. Here is my card....


HC PRODUCTS USED:
HCPC-3842 Oakberry Lane Blossoms Stamp
HCPC-3841 Oakberry Lane Antics Stamp
HCPC-3839 Furry-Tailed Frolic Stamp
HCD2-751 Cut Mat Create 2A die
HCD2-7190 Frame a Card Leafy Borders die
HCD1-7201 Ticket and Tags die
HCD1-7200 Oakberry lane Blossoms die
HCD1-7199 Oakberry Lane Antics die
HCD1-7197 Furry-Tailed Frolic Die
HCPC-3811 Rain Boots and Blossoms Stamp
HCD1-7169 Rain Boots and Blossom die
HCD1-7203  Ornamental Tags die
Sepia Archival
Olive Green Archival
Deep Purple Archival
Cactus Flower Archival
Leaf  Green Archival

OTHERPRODUCTS:
White cardstock wobbles, zig markers,  The Secret Garden flower making paper, gold shimmer card stock,  white satin cord, green moss

VIDEO LINK:
For more tips on creating with the Oakberry Lane collection, watch the tutorial at https://youtu.be/HirfUN8NEYY

For more tips on creating with the tags & sentiments, watch the tutorial at https://youtu.be/eAfLuNkRda4.

INSTRUCTIONS:
Ready top side fold card measures 7”×7”
To prepare the card mat choose a pattern paper from the designer paper collection and cut a piece measuring 6”7/8 ×6”7/8. Layer it on the ready card base.  Create a shadow box measures 6”×6” using Cut Mat Create 2A die. Choose 2 card panels from the same collection, one for window scene and another for window frame. Layer the mats on the shadow box. Cut 2 tags from the same collection using Ornamental Tags die and glue them on the left side of the card. Glue the shadow box on the  card base.

Cut gold shimmer cardstock using Frame a Card Leafy Borders die. Glue the borders on the shadow box as shown in the picture. Stamp the squirrel images from the Furry-Tailed Frolic stamp and Oakberry Lane Antics on the water color paper using sepia archival ink. Color the images using zig markers and cut with coordinating die. Arrange the images on the shadow box using wobbles as shown in the picture.

Stamp the Oakberry Lane Blossoms flowers on the flower making paper using cactus flower ink and deep purple ink. Color the flowers using same ink and cot with coordinating die.  Shape the flowers using flower shaping mold. Stamp the leaves using olive green ink and color them with leaf green and olive green ink  cut the leaves with coordinating die and slightly shape them using deluxe flower shaping kit.

Arrange the flowers and leaves on the card using hot melted glue as shown in the picture. Cut white cardstock using Tickets and Tags die, also cut  a sentiment strip from the same collection. Arrange the sentiment on the card as shown in the picture.

Choose a pattern paper from the same collection and create two paper tassels . Arrange the tassels on the card using satin cord. For the finished look apply sparkling dust on the flowers using adhesive that dries clear.

Thanks for stopping by
Hugs
Uma

Best Guy Ever

Hello Everyone! Good morning.... Today is Heartfelt Wednesday and I am back with another card using "Majestic Frames" die....