Hello Friends!!
Good morning. ...
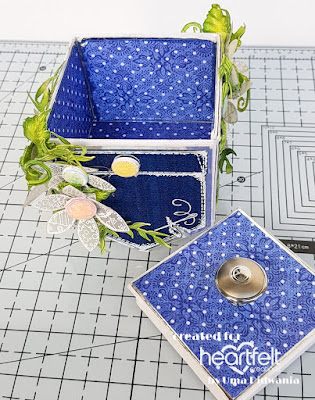
It's Heartfelt Wednesday and we have another inspirational project using Buttons and Blooms collection. Today I have created a box using pocket die. This box is very versatile, you can use this for storing thread spools, for gifting choclate and many more. Here is my box...

Products used :
HCDP1-295 Buttons and Blooms paper collection
HCPC-3849 Buttons and Blooms Stamp
HCD1-7205 Buttons and Blooms Die
HCD1-7206 Patchwork Pockets & Patterns Die
HCPC-3850 Patchwork Pockets & Patterns Stamp
HCPC-3811 Rain Boots and Blossom Stamp
HCD1-7169 Rain Boots and Blossom Die
HCPC-3835 Leafy Accents Stamp
HCD1-7193 Leafy Accents Die
HCFB1-467 Leafy Accents Shaping Mold
Olive Green Archival
Leaf Green Archival
OTHER PRODUCTS:
White cardstock, silver mirror cardstock, versamark, white embossing powder, Blue velvet cardstock, vellum paper, Silver metal knob
VIDEO LINKS
INSTRUCTIONS:
Ready box measures 3.25”×3.25”× 4.5”
To prepare a box first take a piece of white cardstock measures 13.5”× 5.5”. Score and create a box according to the template.

Stamp 4 pockets on the blue velvet cardstock using versamark and heat embossed it with white embossing powder. Cut with coordinating die. Mat the pockets on silver mirror cardstock, 1/16” of an inch bigger on all sides. Glue it on the all 4 sides of the box. Cut a piece of white cardstock measures 3.25”×3.25”. Mat it inside of the box to create a flat surface. Choose a pattern paper from the designer paper collection and cut 4 pieces measures 3”× 2.5”. Mat them on the silver mirror cardstock, 1/16” of an inch bigger on all 4 sides. Glue them on inside walls of the box. Cut a piece measures 3”×3” from the pattern paper and mat it on the silver mirror cardstock, 1/16” of an inch bigger on all sides. Glue it inside of box surface.
To prepare a lid take a piece of white cardstock measures 4.25”×4.25”. Score on ½” and 1” on all 4 sides and fold to prepare a small box. Take a piece of white cardstock measures 3.5”×3.5”. Glue the lid on it. Cut a pattern paper measures 3.25”×3.25” and mat it on the silver mirror cardstock, glue it on the top of the lid. Arrange a knob in the middle of the lid.
Stamp flowers from the Buttons and Blooms stamp on the vellum paper using versamark and heat embossed it with white embossing powder. Cut the flowers with coordinating die. Stamp leaves from rain boots and blossoms stamp on the white cardstock using olive green ink. Color with leaf green and olive green archival and cut with coordinating die. Also stamp some leaves from leafy accents stamp on the white cardstock using olive green ink and color them with leaf green and olive green archival and olive green archival. Cut with coordinating die and shape them in shaping mold. Stamp some buttons on the white cardstock using different color archival and cut with coordinating die . Layer 5 buttons together of same size. Apply glossy accents on the buttons and let them to dry for sometime. Glue all the elements on the box as shown in the picture.


Hope u all like it
Thanks for stopping by
Hugs
Uma
Good morning. ...
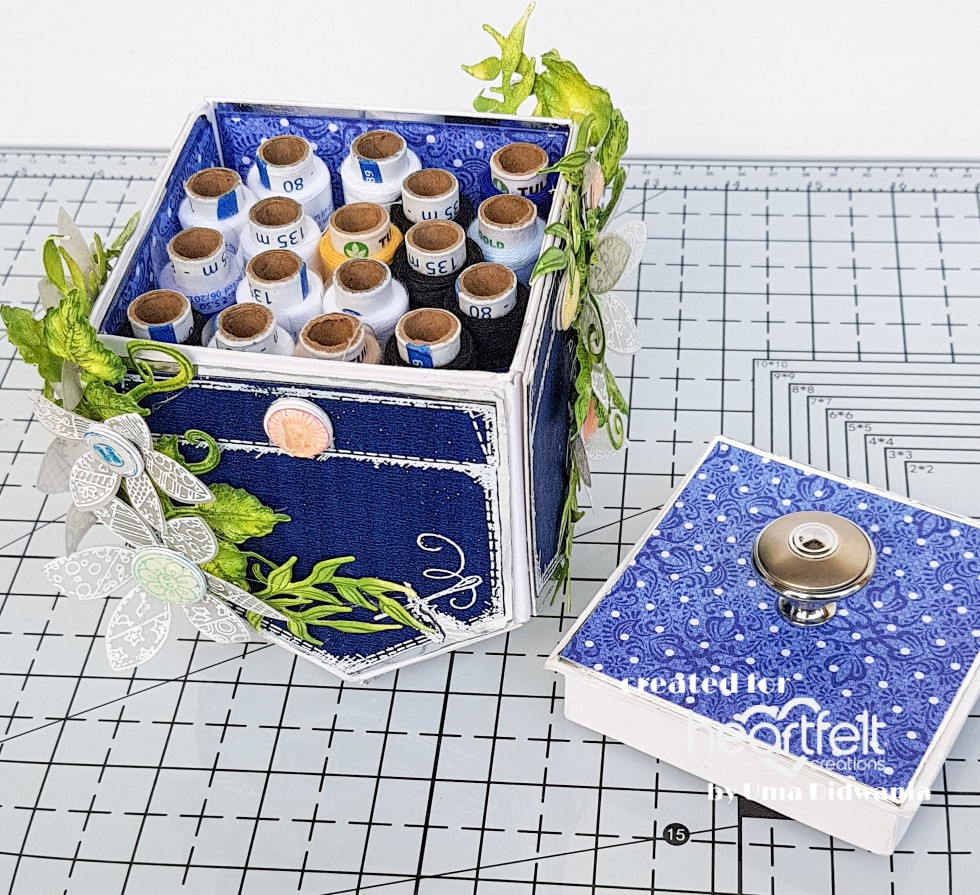
It's Heartfelt Wednesday and we have another inspirational project using Buttons and Blooms collection. Today I have created a box using pocket die. This box is very versatile, you can use this for storing thread spools, for gifting choclate and many more. Here is my box...

Products used :
HCDP1-295 Buttons and Blooms paper collection
HCPC-3849 Buttons and Blooms Stamp
HCD1-7205 Buttons and Blooms Die
HCD1-7206 Patchwork Pockets & Patterns Die
HCPC-3850 Patchwork Pockets & Patterns Stamp
HCPC-3811 Rain Boots and Blossom Stamp
HCD1-7169 Rain Boots and Blossom Die
HCPC-3835 Leafy Accents Stamp
HCD1-7193 Leafy Accents Die
HCFB1-467 Leafy Accents Shaping Mold
Olive Green Archival
Leaf Green Archival
OTHER PRODUCTS:
White cardstock, silver mirror cardstock, versamark, white embossing powder, Blue velvet cardstock, vellum paper, Silver metal knob
VIDEO LINKS
INSTRUCTIONS:
Ready box measures 3.25”×3.25”× 4.5”
To prepare a box first take a piece of white cardstock measures 13.5”× 5.5”. Score and create a box according to the template.

Stamp 4 pockets on the blue velvet cardstock using versamark and heat embossed it with white embossing powder. Cut with coordinating die. Mat the pockets on silver mirror cardstock, 1/16” of an inch bigger on all sides. Glue it on the all 4 sides of the box. Cut a piece of white cardstock measures 3.25”×3.25”. Mat it inside of the box to create a flat surface. Choose a pattern paper from the designer paper collection and cut 4 pieces measures 3”× 2.5”. Mat them on the silver mirror cardstock, 1/16” of an inch bigger on all 4 sides. Glue them on inside walls of the box. Cut a piece measures 3”×3” from the pattern paper and mat it on the silver mirror cardstock, 1/16” of an inch bigger on all sides. Glue it inside of box surface.
To prepare a lid take a piece of white cardstock measures 4.25”×4.25”. Score on ½” and 1” on all 4 sides and fold to prepare a small box. Take a piece of white cardstock measures 3.5”×3.5”. Glue the lid on it. Cut a pattern paper measures 3.25”×3.25” and mat it on the silver mirror cardstock, glue it on the top of the lid. Arrange a knob in the middle of the lid.
Stamp flowers from the Buttons and Blooms stamp on the vellum paper using versamark and heat embossed it with white embossing powder. Cut the flowers with coordinating die. Stamp leaves from rain boots and blossoms stamp on the white cardstock using olive green ink. Color with leaf green and olive green archival and cut with coordinating die. Also stamp some leaves from leafy accents stamp on the white cardstock using olive green ink and color them with leaf green and olive green archival and olive green archival. Cut with coordinating die and shape them in shaping mold. Stamp some buttons on the white cardstock using different color archival and cut with coordinating die . Layer 5 buttons together of same size. Apply glossy accents on the buttons and let them to dry for sometime. Glue all the elements on the box as shown in the picture.



Hope u all like it
Thanks for stopping by
Hugs
Uma


