Hey Everyone,
Good morning...
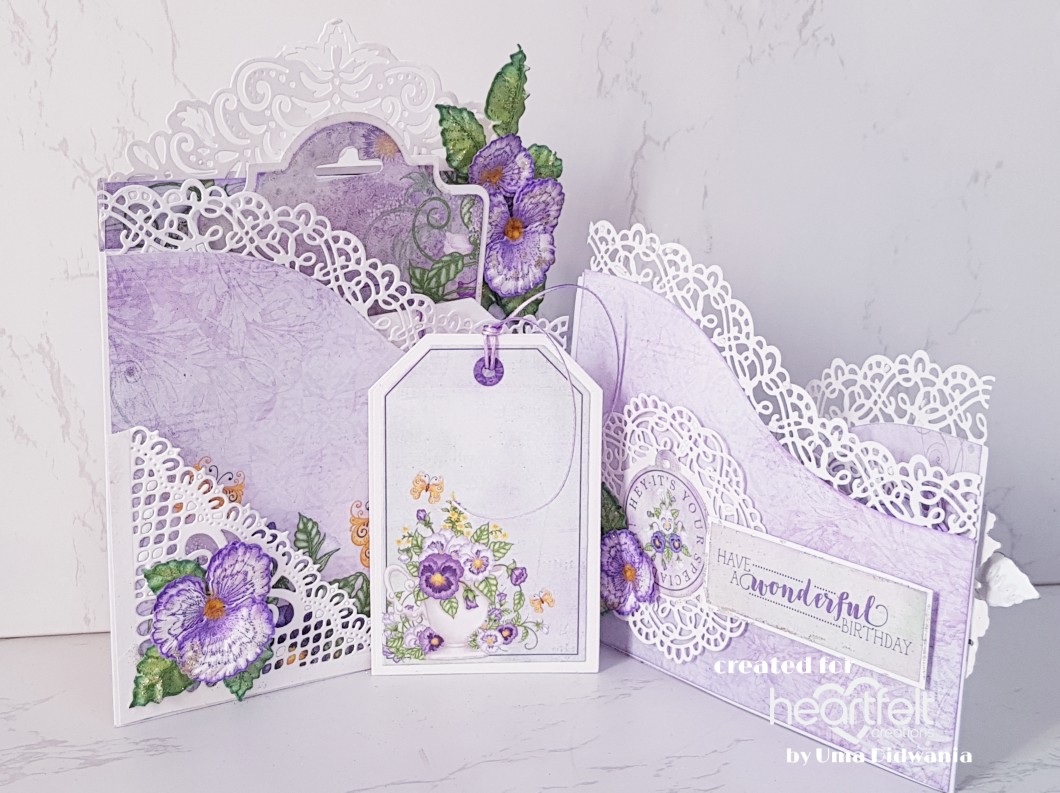
Before anything, I must be apologise for late posting. I was facing trouble with my blogger account. Yesterday It was sought out . Here is my first take with "Burst of Spring " collection. I create a foldout card. This is also my first take with fold out card.


PRODUCTS USED:
HCPC- 3863 Burst of Spring Stamp
HCPC- 3864 Delicate Pansy Spray Stamp
HCPC- 3862 Cheery Pansy Stamp
HCD1-7222 Cheery Pansy Die
HCD1-7223 Burst of spring Die
HCD1-7224 Delicate Pansy Spray Die
HCDP1-299 Burst of Spring Paper Collection
HCFB1-473 3d Psnsy Shaping Mold
HCD1-7226 Diamond Basics Die
HCD1-7227 Eyelet Diamond Die
HCD1-7228 Lacy Diamond Die
HCCF1-445-2 6”×6” Foldout Cards-White
HCD1-7211 Decorative Pocket Accents Die
HCD1-7213 Elegant Pocket Accents Die
HCD1-7214 Ornate Pocket Accents Die
HCD1-7201 Ticket And Tags Die
HCD1-7202 Album Tags and Accents Die
HCD1-7203 Ornamental Tags Die
HCD1-7179 Butterfly Kisses Decorative Die
HCD1-7120 Fleur Border Basics Die
Deep Purple Archival
Majestic Violet Archival
Black Archival
Zig Markers
Emerald Green Archival
Leaf Green Archival
OTHER PRODUCTS USED:
White cardstock, satin cord, flower making paper, water color paper, Sunflower flock powder
VIDEO LINKS:
To know how to create Pansy flowers, watch Emma's video
https://youtu.be/_8WJPTKIUlQ
INSTRUCTIONS:
Ready foldout card measures 7.5”× 6.5”
First take ready foldout card base and cut pattern paper from the designer paper collection and according to size of card. Cut 3 borders from the white card stock using fleur border basics die. Glue these borders on the edges of the card. Further, cut another border from the white card stock using decorative pocket accents die. Glue it on the edge of the last layer of the card. Mat the card panels on all the layers of the card.
To decorate the front of the card first stamp a pansy bouquet from the burst of spring stamp set on water color paper using black archival. Paint the image using zig markers and cut with coordinating die. Arrange the image on the right side of the card using dimensional tape as shown in the picture. Cut a decorative tag from white cardstock using ornamental tag die. Cut a sentiment strip from the designer paper collection. Mat sentiment on decorative tag and glue it on the card using dimensional tape.
To decorate first fold cut a dolly from white cardstock using butterfly kisses decorative die and a tag from the designer paper collection. Glue the dolly and tag on the left corner of the card. Cut white cardstock and pattern paper using diamond dies and mat them on the 3rd part of the card . cut a tag from the designer paper collection and mat it on the white cardstock. Glue the tag on the card. Stamp a delicate pansy spray on water color paper using black archival and paint with zig markers. Cut the images with coordinating die and glue it on the left side of the card. Cut a sentiment strip from the designer paper collection and mat it on white cardstock Glue the sentiment strip on the card.
To decorate second fold, cut decorative piece from the white cardstock using ornate pocket dies. Glue it on the card and create pockets as shown in the picture. Cut tags from the designer paper collection using dies and mat them on white cardstock. Arrange tags in the pockets. Stamp a bouquet stamp from the burst of spring stamp on water color paper using black archival. Paint the image using zig markers and cut with coordinating die. Glue the image on the pocket.
To decorate back side fold , create a pocket using ornate pocket dies and arrange a tag in it. Glue a dolly from butterfly kisses decorative die and a sentiment strip. Once satisfied with arrangements of all elements, stamp some cheery pansy flower on flower making paper using deep purple archival and cut with coordinating die. Paint the flowers using sunflower yellow ink and majestic violet ink. Stamp leaves using emerald green archival and cut with coordinating die. Paint the leaves using leaf green archival and emerald green. Shape flowers and leaves using flower shaping mold. Arrange the flowers and add flock powder in the center. Glue flowers and on the card as shown in the picture. For the finished look apply glitter on the flowers using adhesive that dries clear.
Warm Regards
Uma
Good morning...
Before anything, I must be apologise for late posting. I was facing trouble with my blogger account. Yesterday It was sought out . Here is my first take with "Burst of Spring " collection. I create a foldout card. This is also my first take with fold out card.


PRODUCTS USED:
HCPC- 3863 Burst of Spring Stamp
HCPC- 3864 Delicate Pansy Spray Stamp
HCPC- 3862 Cheery Pansy Stamp
HCD1-7222 Cheery Pansy Die
HCD1-7223 Burst of spring Die
HCD1-7224 Delicate Pansy Spray Die
HCDP1-299 Burst of Spring Paper Collection
HCFB1-473 3d Psnsy Shaping Mold
HCD1-7226 Diamond Basics Die
HCD1-7227 Eyelet Diamond Die
HCD1-7228 Lacy Diamond Die
HCCF1-445-2 6”×6” Foldout Cards-White
HCD1-7211 Decorative Pocket Accents Die
HCD1-7213 Elegant Pocket Accents Die
HCD1-7214 Ornate Pocket Accents Die
HCD1-7201 Ticket And Tags Die
HCD1-7202 Album Tags and Accents Die
HCD1-7203 Ornamental Tags Die
HCD1-7179 Butterfly Kisses Decorative Die
HCD1-7120 Fleur Border Basics Die
Deep Purple Archival
Majestic Violet Archival
Black Archival
Zig Markers
Emerald Green Archival
Leaf Green Archival
OTHER PRODUCTS USED:
White cardstock, satin cord, flower making paper, water color paper, Sunflower flock powder
VIDEO LINKS:
To know how to create Pansy flowers, watch Emma's video
https://youtu.be/_8WJPTKIUlQ
INSTRUCTIONS:
Ready foldout card measures 7.5”× 6.5”
First take ready foldout card base and cut pattern paper from the designer paper collection and according to size of card. Cut 3 borders from the white card stock using fleur border basics die. Glue these borders on the edges of the card. Further, cut another border from the white card stock using decorative pocket accents die. Glue it on the edge of the last layer of the card. Mat the card panels on all the layers of the card.
To decorate the front of the card first stamp a pansy bouquet from the burst of spring stamp set on water color paper using black archival. Paint the image using zig markers and cut with coordinating die. Arrange the image on the right side of the card using dimensional tape as shown in the picture. Cut a decorative tag from white cardstock using ornamental tag die. Cut a sentiment strip from the designer paper collection. Mat sentiment on decorative tag and glue it on the card using dimensional tape.
To decorate first fold cut a dolly from white cardstock using butterfly kisses decorative die and a tag from the designer paper collection. Glue the dolly and tag on the left corner of the card. Cut white cardstock and pattern paper using diamond dies and mat them on the 3rd part of the card . cut a tag from the designer paper collection and mat it on the white cardstock. Glue the tag on the card. Stamp a delicate pansy spray on water color paper using black archival and paint with zig markers. Cut the images with coordinating die and glue it on the left side of the card. Cut a sentiment strip from the designer paper collection and mat it on white cardstock Glue the sentiment strip on the card.
To decorate second fold, cut decorative piece from the white cardstock using ornate pocket dies. Glue it on the card and create pockets as shown in the picture. Cut tags from the designer paper collection using dies and mat them on white cardstock. Arrange tags in the pockets. Stamp a bouquet stamp from the burst of spring stamp on water color paper using black archival. Paint the image using zig markers and cut with coordinating die. Glue the image on the pocket.
To decorate back side fold , create a pocket using ornate pocket dies and arrange a tag in it. Glue a dolly from butterfly kisses decorative die and a sentiment strip. Once satisfied with arrangements of all elements, stamp some cheery pansy flower on flower making paper using deep purple archival and cut with coordinating die. Paint the flowers using sunflower yellow ink and majestic violet ink. Stamp leaves using emerald green archival and cut with coordinating die. Paint the leaves using leaf green archival and emerald green. Shape flowers and leaves using flower shaping mold. Arrange the flowers and add flock powder in the center. Glue flowers and on the card as shown in the picture. For the finished look apply glitter on the flowers using adhesive that dries clear.
Warm Regards
Uma


Very pretty flowers and lovely colours too👌👌👌
ReplyDeleteLovely tutorial and beautiful card
ReplyDeleteSuperb n amazing
ReplyDeleteStunning. I love it.
ReplyDeleteTeresa
Lovely creation dear
ReplyDelete