Tuesday, 16 October 2018

Flower bunch

Hello Folks!!!
Good morning......

Happy Pooja to all of you.....

We all are busy in celebrating pooja... What's your plan for these Pooja vacation.  Maa Durga loves red /pink flower. Today I create a bunch of flower with Icraft's Deckle edge paper. These are handmade paper which are perfect for any type of flower.  It gives natural look to my handmade flowers.  Icraft has wide range of flower making products.  Flower making paper/ Foam /handmade paper,  stamens, floral wire,  floral tape(lots of colours available in tape), You can get all under one roof.

Products used :
Deckled Edge Paper
Icraft Flower Die
Stamens
Floral wire
Floral tape


Thanks for stopping by 
Would love to hear from you 
Hugs
Uma

Wednesday, 10 October 2018

FLORAL GOWN

Hello Crafty Peeps!!!

Heartfelt good morning to all of you :)...........

Now the wait is over and here is the time for new release by our favourite "HEARTFELT CREATIONS". 
Beautiful floral fabric, delicate trimmings and charming buttons accompanied by delicate hand-stitch work, and precise patchwork become a most exquisite project in the hands of an experienced seamstress! While sewing may not be a talent gifted to everyone, you can now experience the same stunning results in your paper crafts with the "Buttons and Blooms" Collection from Heartfelt Creations! An inviting paper collection bound in delightfully vibrant hues of bright blues, happy yellows, pretty pinks and robust reds boast alluring patterns of dainty florals, fun filled polka dots and quilt like patterns which will beckon you to caress them as you would the beautiful bolts of material found in your favorite fabric store! “Applique” cards and scrapbook pages quickly and with ease using the striking yet functional premade card panels designed in varying sizes and patterns! Embellish your handmade creations with a variety of hand-stitched accents found in the gorgeous assembling of cling stamp sets and coordinating dies. Choose from delicately embroidered sentiments, stitched banners, charming patchwork pockets, decorative patches and rick rack trim, all lending that personal handmade touch to your crafty creations! Lastly, “hem” your projects with fetching blossoms that have been skillfully illustrated to give them the appearance of having been cut from patchwork fabric! Designed in three varying sizes, these pleasing posies are ideal for using as flat embellishments, or layered to create wonderful dimensional blooms! So, come along with us…grab your shears, patterned papers and patchwork die cuts and let’s head into the craft room! Bobbins, threads and sewing machines not required!
Here is my seamless floral dress as the inspiration post of this week.


HC PRODUCTS USED:
HCPD1-279 Classic Wedding paper pack
HCPC-3849 Buttons and Blooms Stamp
HCD1-7205 Buttons and Blooms Die
HCD1-7161 Sweetheart Border Die
HCD1-7154 Eyelet Circle & Basics Small Die

OTHER PRODUCTS :
Mannequin, vellum paper, versamark, white embossing powder, blush pearl embossing powder, tulle, half cut pearl, 

VIDEO LINK :
For more tips on creating with the Buttons and Blooms collection, watch the tutorial at https://youtu.be/WpR2XrSH0U0.
INSTRUCTIONS :
Ready project measures 9”× 8.5”
First I choose a pattern paper from the designer paper and cut a round piece measuring 11.5”diameter. Cut another small circle in the middle of the round paper. Glue the tulle on the back side of the round paper. Take a mannequin, and  arrange the round piece on the waist like a skirt. Now take pattern paper and create a top according to the size of mannequin and glue it using hot melted glue. 
Cut vellum paper using sweetheart border die.  Apply versamark on the borders and heat embossed it with white embossing powder. Glue the borders at the bottom of the dress as shown in the picture. Stamp the flowers using versamark on vellum paper and heat embossed them with blush pearl embossing powder. Cut the flowers with coordinating die and slightly shape with ball tool. Glue half cut pearl in the middle of the flowers.
Glue the flowers on the dress using hot melted glue. Take another piece of tulle and stick it on the dress as shown in the picture. Glue half cut pearl on the edges of the tulle and the neckline of the dress. Glue two buttons on the dress as shown in the picture. For the finished look glue some pieces of wool on dress for more shabby effect.


Thanks for stopping by
Would love to hear from you....
Hugs
Uma

Tuesday, 9 October 2018

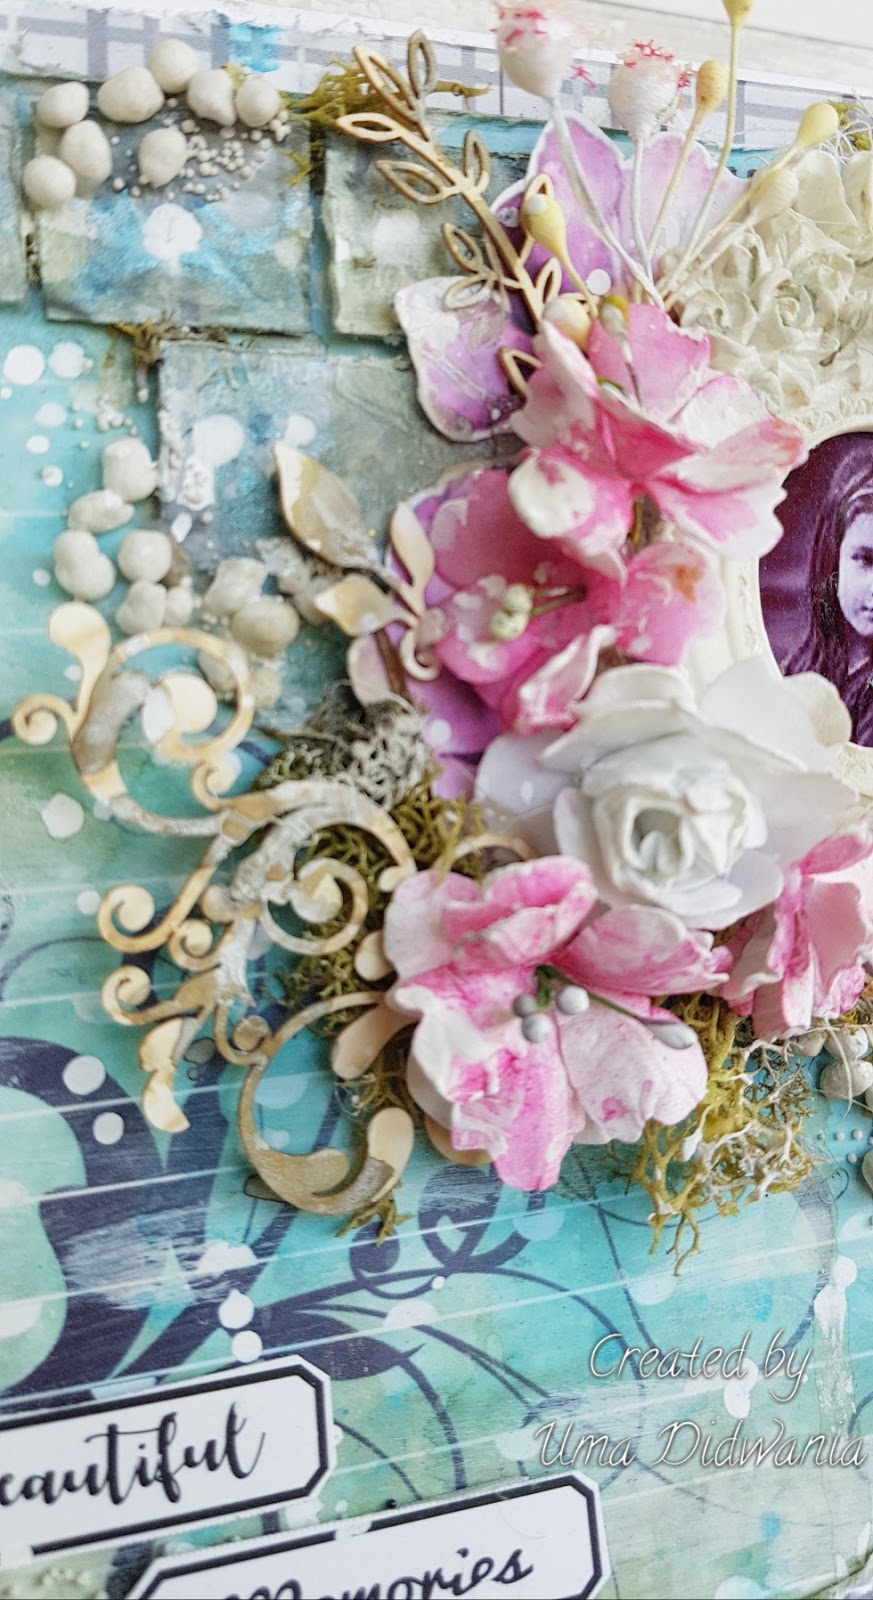
BEAUTIFUL MEMORIES

Hello Everyone!!

Good morning .....:)

I am back with another card with Icraft products.  I already said that they have variety of products . Quality of products are too good. This time I use another paper pack of Icraft.  This is watercolor fantasy paper pack. Here is my card...


Ready top side fold card measures 6.5"×6.5"
To prepare the card mats first choose two pattern paper from the designer paper collection and cut a piece measuring 6.25"×6.25" and other one 6"×6". layer the first piece of designer paper which is 6.25" , on the ready card base.  Take second piece and distress the edges of the pattern paper using a pair of scissors . layer it on the card using dimensional tape as shown in the.  Tale some pieces of pattern paper from my stash and cut into small pieces . Distress the edges of the piece and glue it on the card using dimensional tape to create a wall effect as shown in the as shown in the picture. Apply texture paste on the piece of paper and leave it to dry for sometime.  Mist it with colors. Take a resin frame and glue it on a picture.  Layer the frame using dimensional tape as shown in the picture.  Create some flowers using Icraft dies and flower making paper . Arrange the flowers and other elements and glue them.
Cut 2 sentiment strip from the Icraft's Mayura collection and layer on the card. For the finished look glue green moss on the card to give the more natural look to the wall.


Hope you like it
Thanks for stopping by
Hugs
Uma

Thursday, 4 October 2018

Accordion album box

Hii folks!!!!
Good morning.......

Here is I am with another creation. A accordion gift box with gold and off white combo which is perfect for 50th anniversary gift. 

Products used :-
Sparkling Poinsettias stamp (Heartfelt Creations)
Sparkling Poinsettias Die (Heartfelt Creations)
Wildwood Florals Die (Heartfelt Creations)
Celebrate Love Sentiment (Heartfelt Creations)
Gold foil cardstock (Get Inspired)
The Secret Garden flower making paper 
Off white cardstock 
Versamark 
Gold embossing powder
Silver embossing powder 
Half cut pearl
Square die


Stamp poinsettia flower on the flower making paper using versamark and heart embossed the flower with gold and silver embossing  powder. Shape the flower using ball tool. Flower enhance the beauty of the box.

Inside the box I create frame for the photos using square die, in which we can easily change the pics.


Glue half cut pearl on all four side of box to give it a royal touch.


It can hold 16 pics or messages.


Hope u all like it....
Thanks for stopping by. ...
Regards
Uma

Wednesday, 3 October 2018

Squirrel's garden

Hello Everyone!!
Happy Wednesday....

Today I have created a shadow box card with wobbling squirrels . I create a scene of a garden where squirrels are playing. Here is my card....


HC PRODUCTS USED:
HCPC-3842 Oakberry Lane Blossoms Stamp
HCPC-3841 Oakberry Lane Antics Stamp
HCPC-3839 Furry-Tailed Frolic Stamp
HCD2-751 Cut Mat Create 2A die
HCD2-7190 Frame a Card Leafy Borders die
HCD1-7201 Ticket and Tags die
HCD1-7200 Oakberry lane Blossoms die
HCD1-7199 Oakberry Lane Antics die
HCD1-7197 Furry-Tailed Frolic Die
HCPC-3811 Rain Boots and Blossoms Stamp
HCD1-7169 Rain Boots and Blossom die
HCD1-7203  Ornamental Tags die
Sepia Archival
Olive Green Archival
Deep Purple Archival
Cactus Flower Archival
Leaf  Green Archival

OTHERPRODUCTS:
White cardstock wobbles, zig markers,  The Secret Garden flower making paper, gold shimmer card stock,  white satin cord, green moss

VIDEO LINK:
For more tips on creating with the Oakberry Lane collection, watch the tutorial at https://youtu.be/HirfUN8NEYY

For more tips on creating with the tags & sentiments, watch the tutorial at https://youtu.be/eAfLuNkRda4.

INSTRUCTIONS:
Ready top side fold card measures 7”×7”
To prepare the card mat choose a pattern paper from the designer paper collection and cut a piece measuring 6”7/8 ×6”7/8. Layer it on the ready card base.  Create a shadow box measures 6”×6” using Cut Mat Create 2A die. Choose 2 card panels from the same collection, one for window scene and another for window frame. Layer the mats on the shadow box. Cut 2 tags from the same collection using Ornamental Tags die and glue them on the left side of the card. Glue the shadow box on the  card base.

Cut gold shimmer cardstock using Frame a Card Leafy Borders die. Glue the borders on the shadow box as shown in the picture. Stamp the squirrel images from the Furry-Tailed Frolic stamp and Oakberry Lane Antics on the water color paper using sepia archival ink. Color the images using zig markers and cut with coordinating die. Arrange the images on the shadow box using wobbles as shown in the picture.

Stamp the Oakberry Lane Blossoms flowers on the flower making paper using cactus flower ink and deep purple ink. Color the flowers using same ink and cot with coordinating die.  Shape the flowers using flower shaping mold. Stamp the leaves using olive green ink and color them with leaf green and olive green ink  cut the leaves with coordinating die and slightly shape them using deluxe flower shaping kit.

Arrange the flowers and leaves on the card using hot melted glue as shown in the picture. Cut white cardstock using Tickets and Tags die, also cut  a sentiment strip from the same collection. Arrange the sentiment on the card as shown in the picture.

Choose a pattern paper from the same collection and create two paper tassels . Arrange the tassels on the card using satin cord. For the finished look apply sparkling dust on the flowers using adhesive that dries clear.

Thanks for stopping by
Hugs
Uma

BIRTHDAY CARD

Hello friends!!!
Good morning.....
First of all I am apologise for late posting. This is my last Wednesday's post.

HC PRODUCTS USED
HCD2-7192 Eyelet Lace Frame Die
HCPC-3842 Oakberry lane Blossoms
HCPC-3843 Special Birthday Sentiments Stamp
HCPC-3650 Butterfly Medley Stamp
HCD1-759 Butterfly Medley Die
Cactus Flower Archival
Olive Green Archival
Leaf Green Archival Thistle
HCD1-7202 Album Tags and Accents Die
HCDP1-294 OAKBERRY lane paper collection
HCD1-7200 Oakberry lane Blossoms die

Other Products 
The Secret Garden flower making paper  Vellum paper,  Sparkling dust, white embossing powder, versamark,  spiced marmalade distress oxide

VIDEO LINKS

Instructions:
Ready top side fold card measures 7.5”×5.5”
Take a smooth without cardstock measures 11”×7.5”. Score on 5.5” and create a top side fold card.  Choose a pattern paper from the designer paper collection and cut a piece measuring 7.25” and 5.25”. layer it on the ready card base.  Cut white cardstock using eyelet lace frame die and color it using spiced marmalade distress oxide.  Apply clear glue on the frame die cut and add glitter on it. Glue the frame on the card base as shown in the picture.

Cut white cardstock using album tags and accents die . Distress the edge of the tag using spiced marmalade distress oxide. Stamp a sentiment on the tag from Special Birthday Sentiments Stamp using cactus flower ink Glue the tag using foam tape to add dimension.

Stamp Oakberry Lane Blossom on the flower making paper using cactus flower ink.  Also stamp leaves using olive green ink.  Cut the flowers and leaves with coordinating die. Color the flowers with spiced marmalade distress oxide and cactus flower ink also color the leaves using leaf green archival.  Shape the flowers and leaves using mold. Arrange the flowers and leaves on the card using hot melted glue.

Stamp the butterfly on the vellum paper using versamark and heat embossed it with white embossing powder . Cut with coordinating die  Glue two butterflies on the card. For the finished look apply sparkling dust on the flowers using adhesive that dries clear.

Thanks for stopping by
Hugs
Uma

Tuesday, 2 October 2018

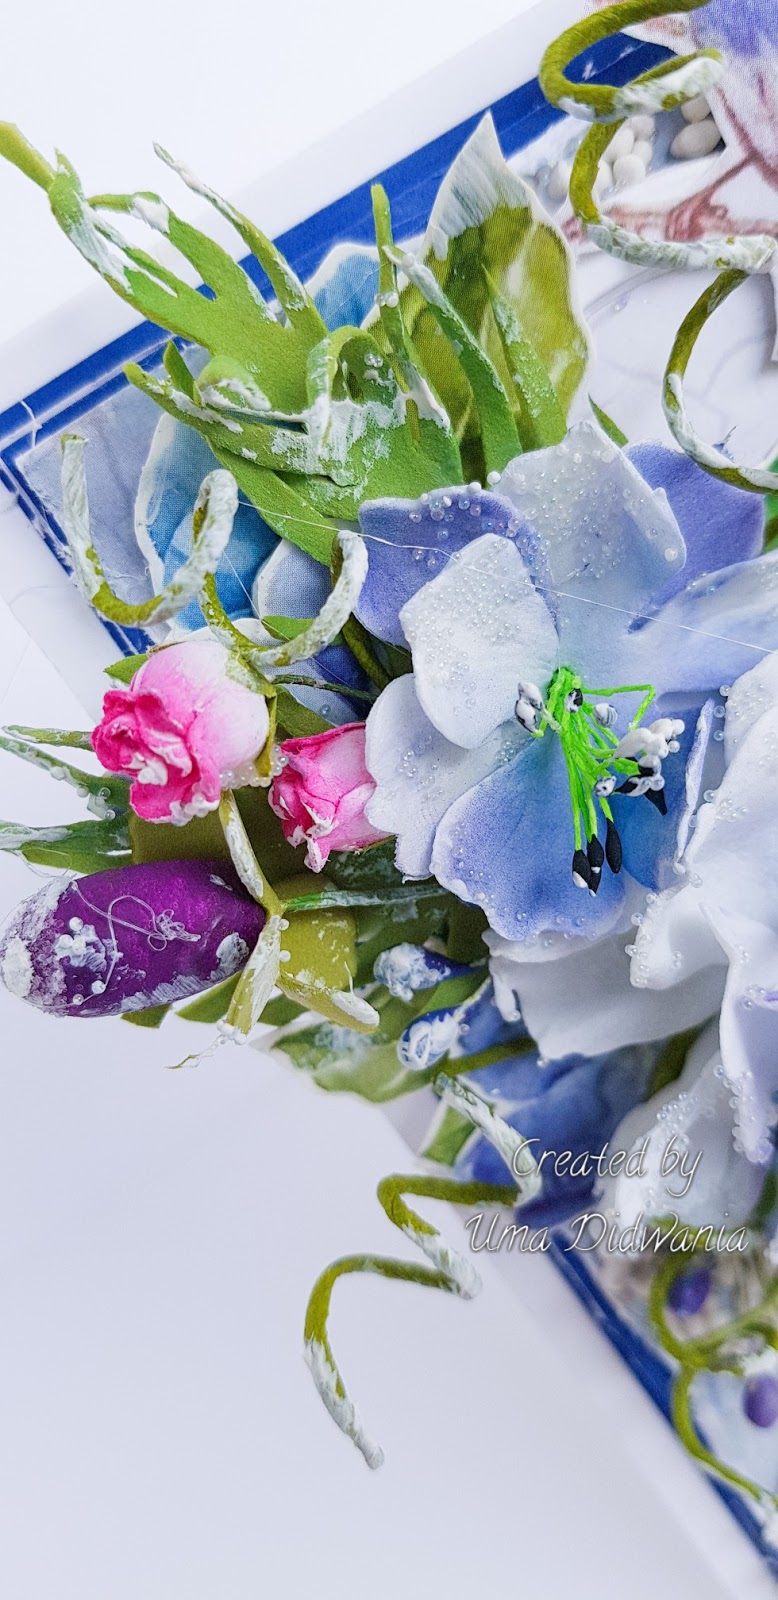
COOL BLUE CARD | GDT | ICRAFT

Hello Crafty Folks !! 

Good morning............:)

Today I am back with new creation. This is my first post of this month for the Icraft. I create this card using Icraft supplies.  Thanks to Foram Shah, who invited me as a guest designer for the month of October. 
Icraft is an Indian brand who have huge variety of craft supplies under one roof.  You can check their entire range here.  
So, here is glimpse of my today's post...


Icraft products used:
Silk Foamiran (White)
Silk Foamiran (Olive green)
Stamens
Fillers
Floral wire
Floral tape
Add on Element Sheet
Majestic Blooms paper collection
Flower Die

Other products used:
White cardstock
Royal Blue cardstock
Art stones
Small Talk
Lace
Circle Die
Micro Glass Fragments (Clear)


Instructions :
Ready top side fold card measures 6.5"× 6.5"
First take a white cardstock measuring 6.5"×13.5". Score on 6.5"and create a top side fold card. To prepare the card mats first choose a pattern paper from the designer paper collection and cut a piece measuring 6"×6". Also cut a royal blue cardstock measures 6.25"×6.25". Distress the edges of the pattern paper using a pair of scissors and layer it on the blue cardstock.  Layer it on the ready card base . Now take another piece of pattern paper and cut it diagonally . Also cut a diagonal piece from the blue cardstock. Distress the edges of the pattern paper using a pair of scissors and layer it on the blue cardstock.  layer it on the card using dimensional tape as shown in the picture. Glue a piece of white Lace diagonally as shown in the picture. 
Take white silk foamiran and cut it using flower die. Color the flowers with oil pastel colors.  Cut a circle frame from the white cardstock using circle die.  Glue it on the card. Twist and shape the flowers (Note: the quality of foam is too good , no need to heat it.). Create two flowers. Take olive green silk foamiran and create some leaves. Cut a round piece from the pattern paper using circle die and create a rose flower. Twist the floral wire and create some flourish. Fussy cut the flower and leaves from the Add on element sheet. Once all done I start arranging all elements.  Glue all the elements using hot melted glue as shown in the picture.  Fussy cut two birds from the designer paper and glue them. Apply soft mat gel and add art stones. Apply white gesso on the flowers and leaves using dry brush technique.  Add sentiment using foam tape to add dimension as shown in the picture.  Fpr the finished look apply clear glass fragments using adhesive that dries clear.


Hope you like it ......
Would love to hear from you........
Warm Regards....
Uma

Best Guy Ever

Hello Everyone! Good morning.... Today is Heartfelt Wednesday and I am back with another card using "Majestic Frames" die....